Making Of
Have you ever wondered what lives inside a plush?
Skin, bone, organs, flesh—echoes of a living body.
At capeesh, each piece begins as a sculpture.
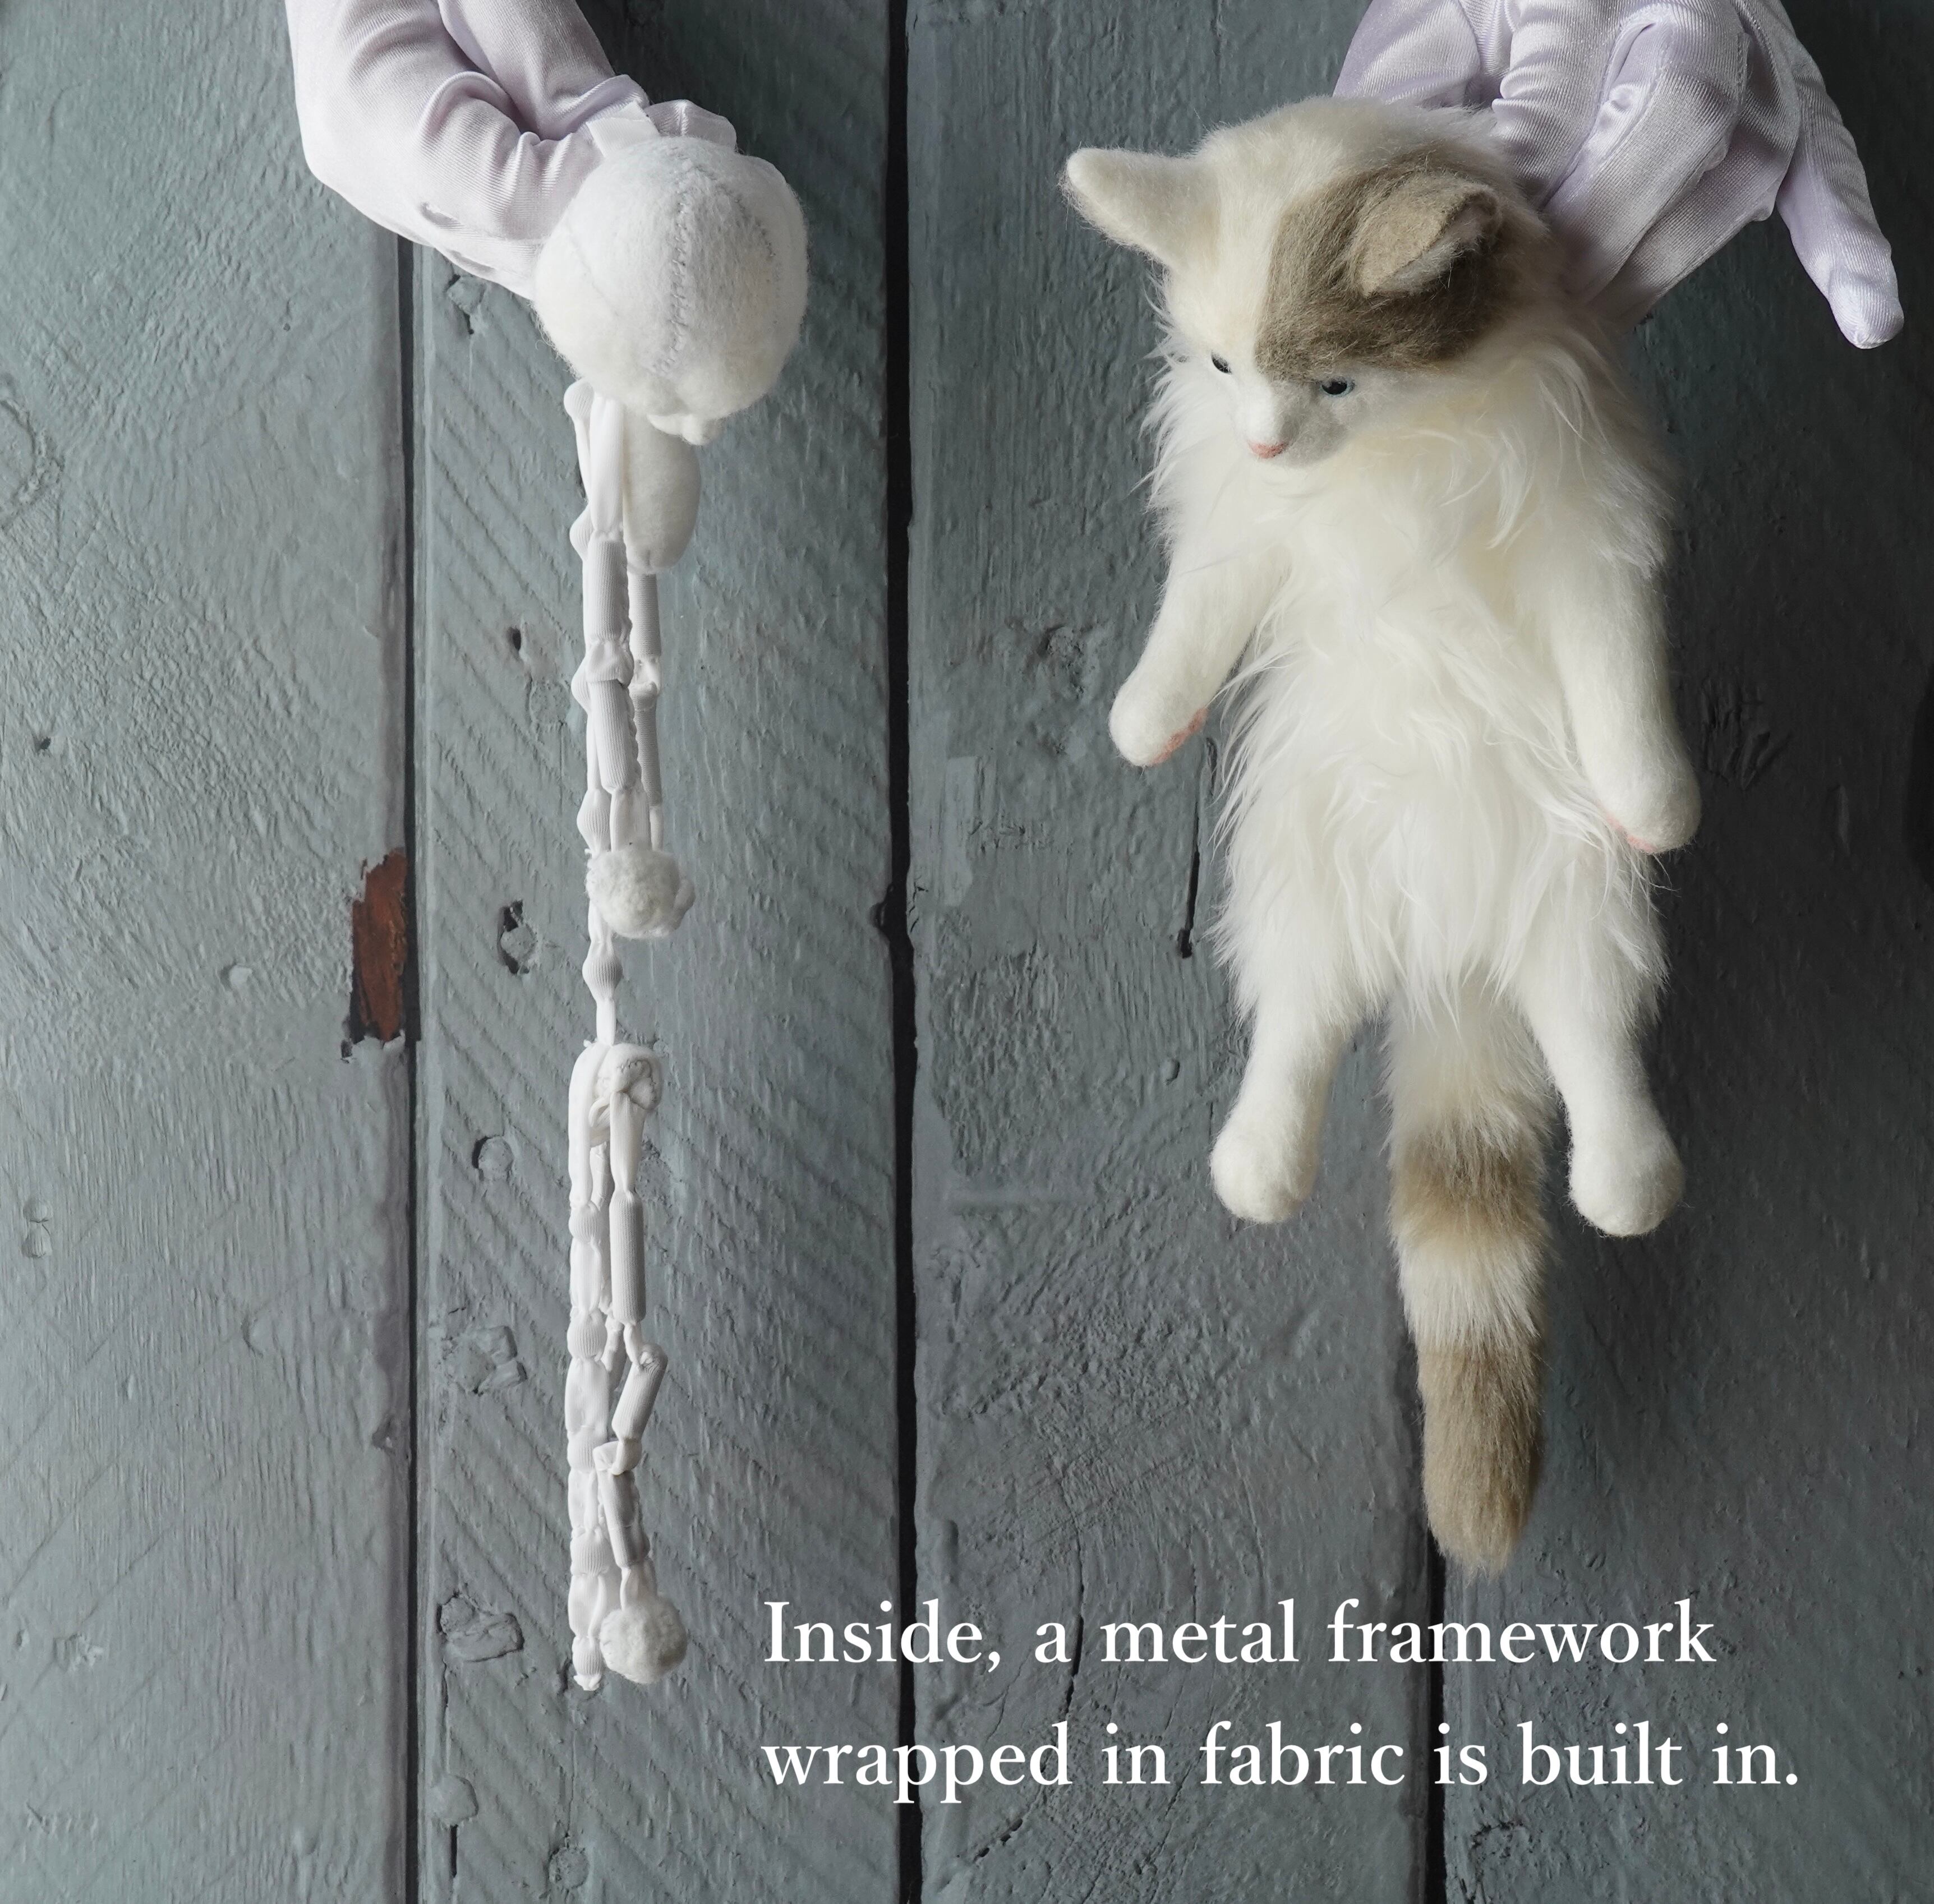
A metal armature becomes the bones.
Weighted glass and soft filling form the body’s core.
Eco-fur wraps it all as skin.
In pursuit of an ideal form, this structure was developed through repeated trial and refinement, bringing together both softness and sculptural beauty.
presence.
Here, we invite you into our making process.
Using our signature cat as an example, we reveal each stage of creation—with little studio notes and moments of trial and wonder along the way,marked by our “ Column ”.
1. Initial Design Sketch
After deciding on the concept, we gather references and create a rough design to define the form and select potential furs. When working with a species for the first time, we also study its anatomy, posture, and behavior to understand its presence. For regular pieces, we do not copy a single animal; instead, we draw inspiration from multiple references—one for skeletal balance, another for markings—combining elements to achieve a universal, timeless expression rather than a single strong personality. For full-order commissions, we reflect the client’s wishes as much as possible while preserving the capeesh philosophy and sculptural sensibility.
2. Sourcing Materials
We carefully gather materials for each part of the body, selecting them with both structure and expression in mind.
⚫︎Skin (Eco-fur)
We call the outer surface “skin,” the equivalent of an animal’s coat.
・Eco-fur (acrylic, polyester)
We use eco-fur made from acrylic and polyester, choosing from a wide range of textures and lengths—straight, short pile, curly, long pile, and patterned furs. Most pieces combine several types within a single body to build depth, realism, and a natural sense of life. Because the choice of fur determines the entire presence of the work, we only proceed when the right material can be secured or dyed to the exact tone we envision. Many concepts never leave the sketch stage simply because the perfect fur could not be found. capeesh does not use animal-derived fur; our pieces exist thanks to the skill and innovation of modern eco-fur makers. Quality eco-fur mimics real pelts with a dual structure: long guard hairs and dense underfur. Without this underlayer, the fur would collapse and lose volume, unable to stand with the quiet fullness that gives each piece its gentle breath and silhouette.
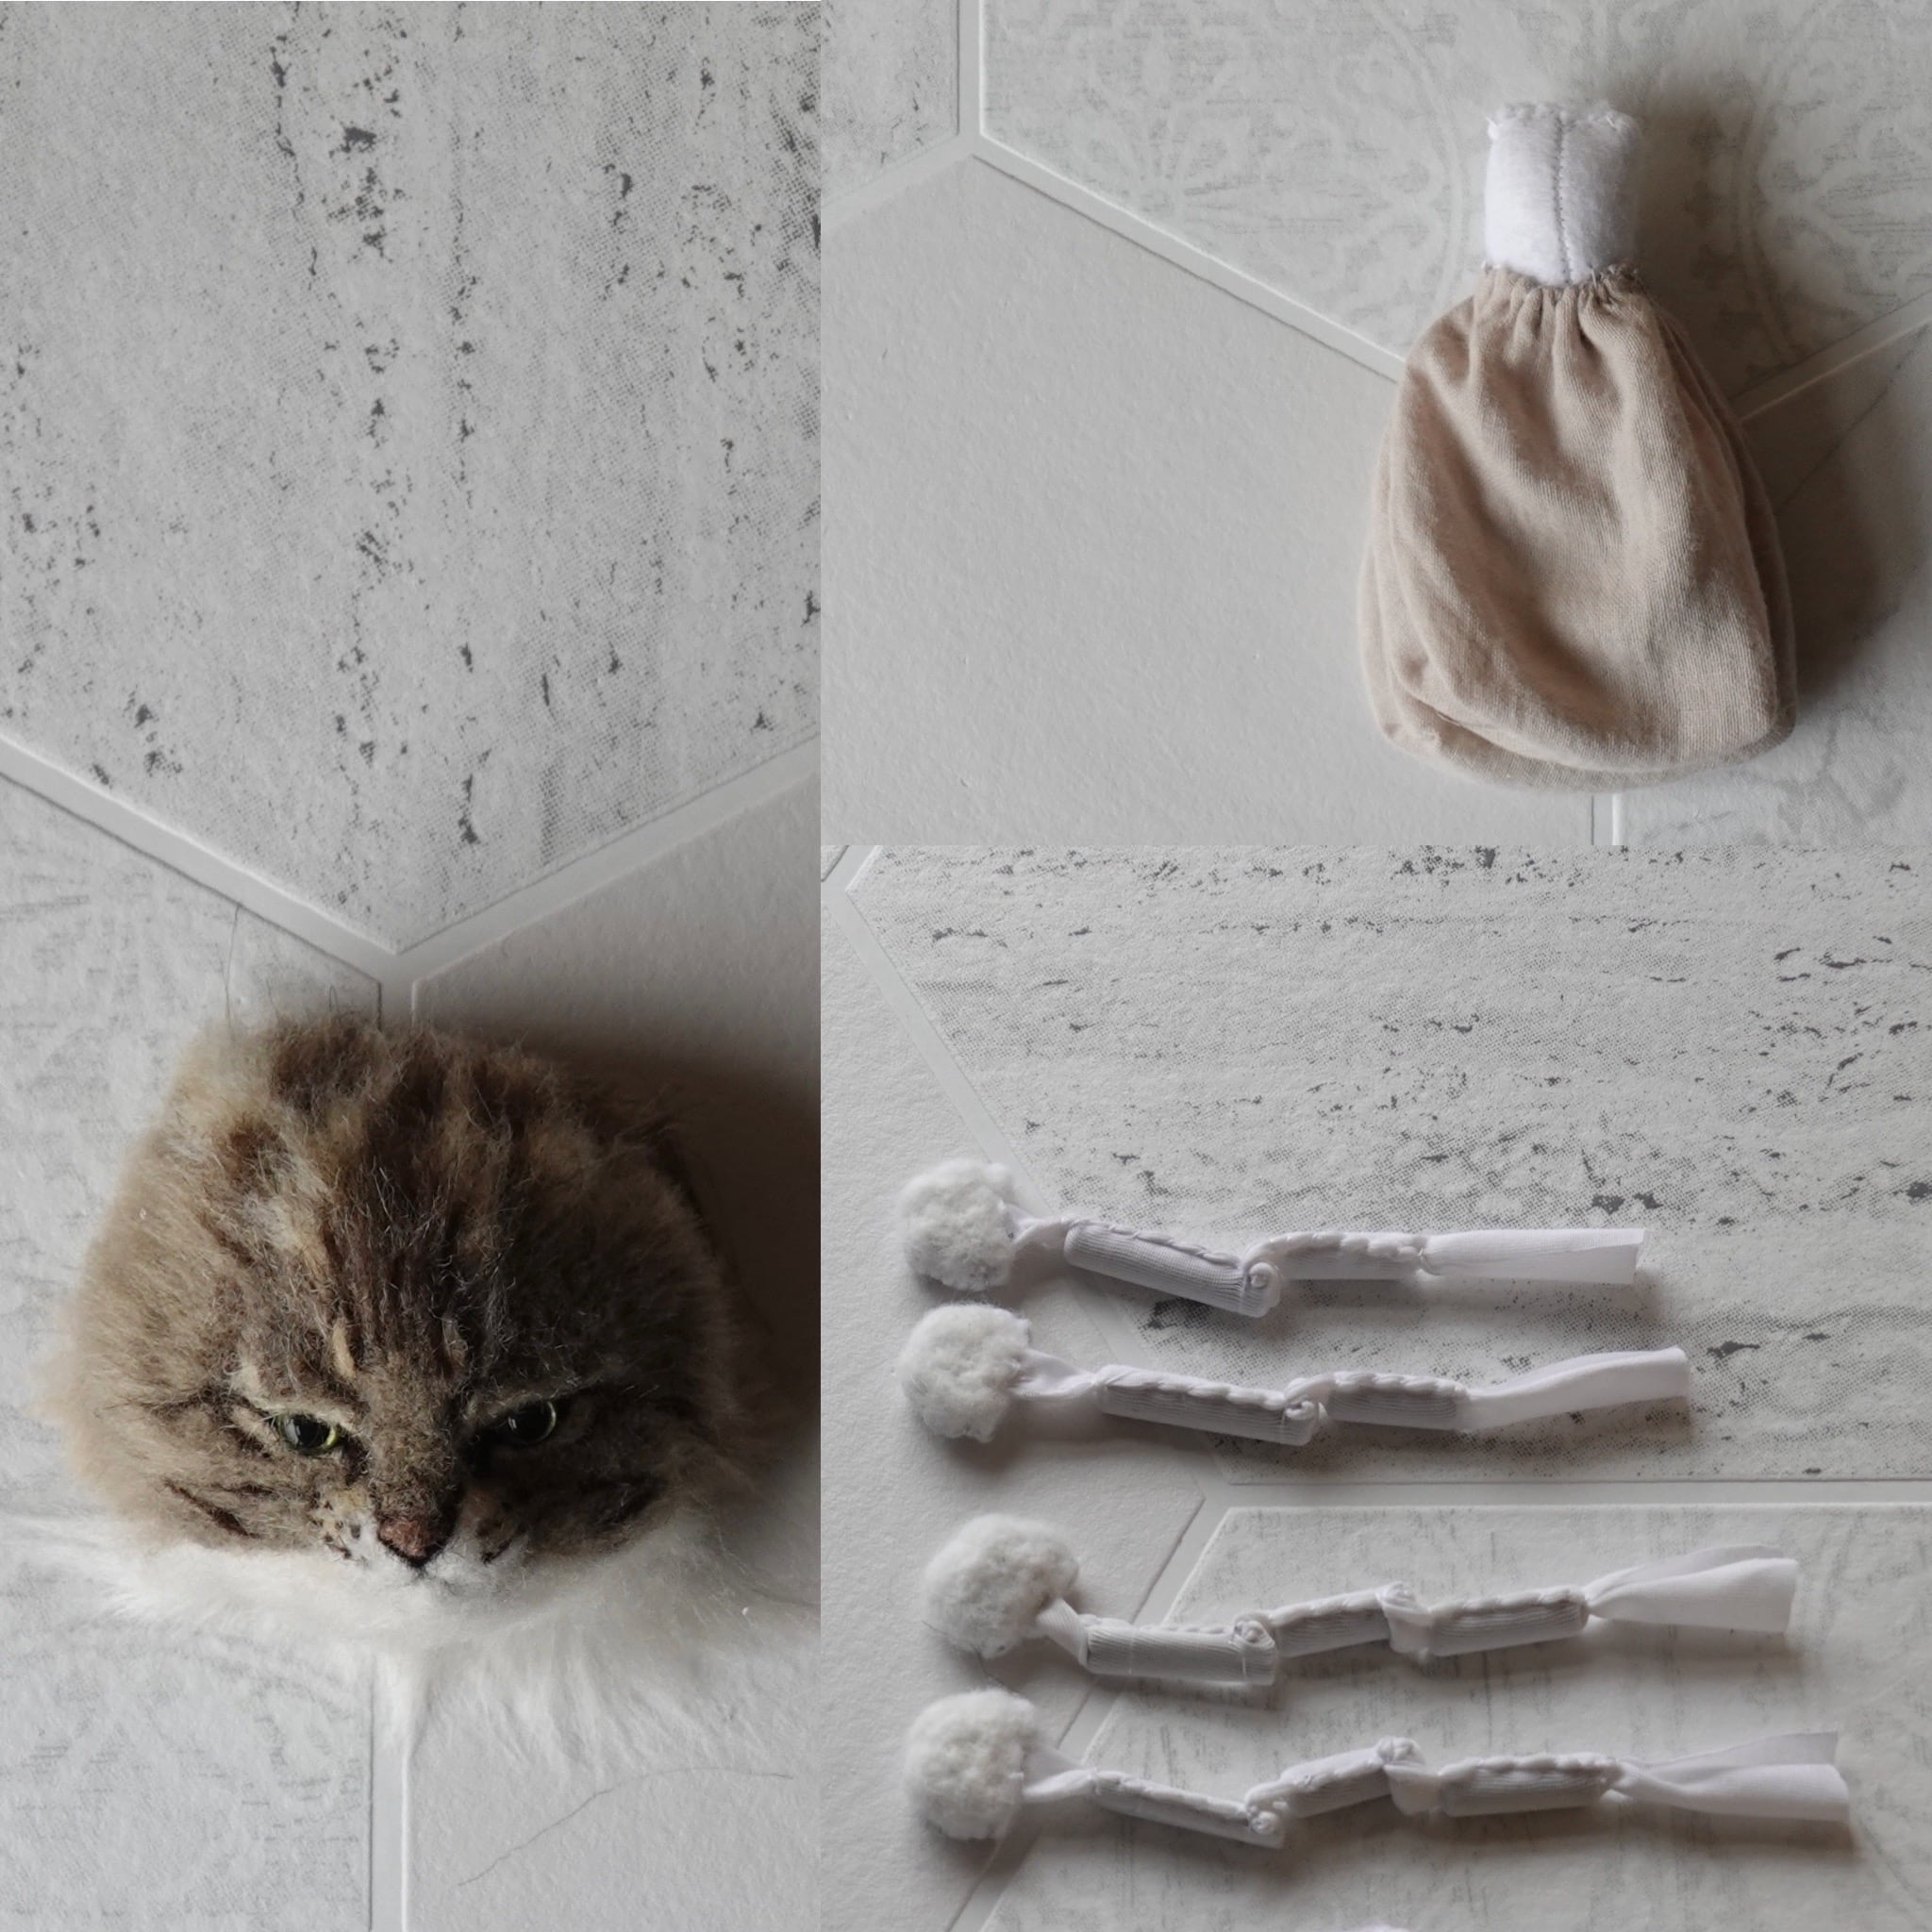
⚫︎Bones
We refer to the internal support structure as “bones,” echoing the framework of a living creature.
《Head structure》
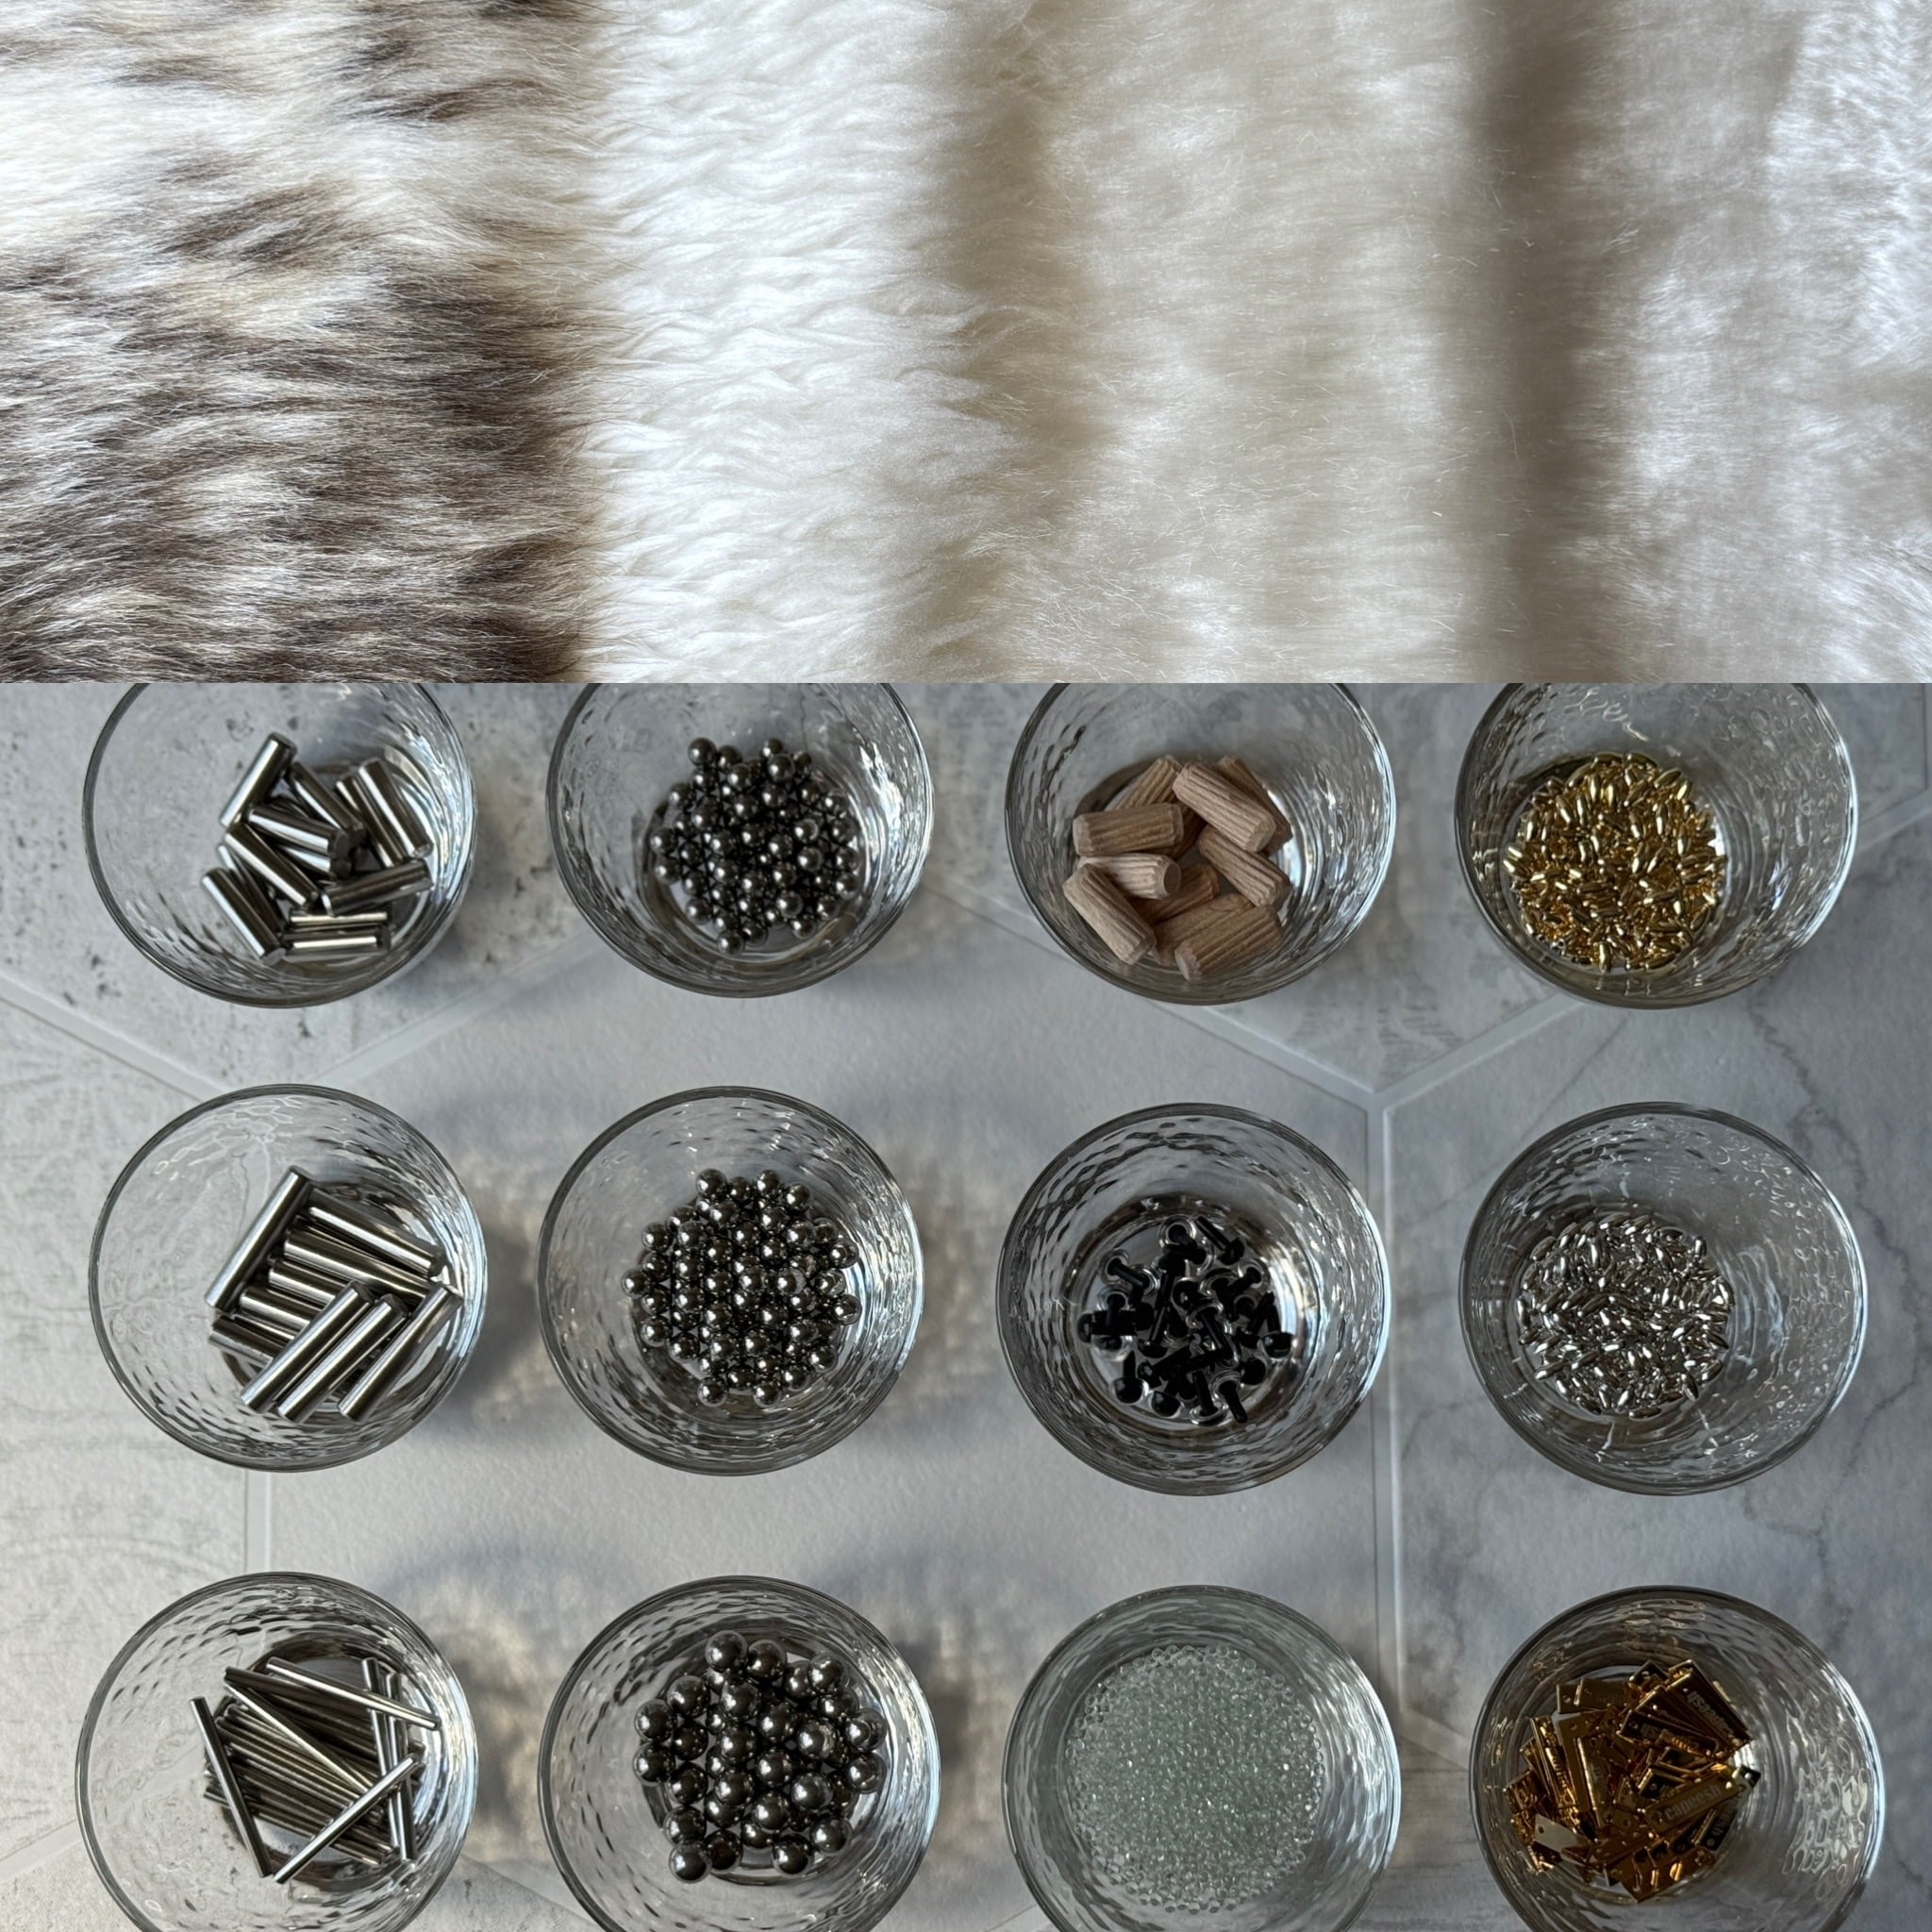
・Stainless steel beads
・glass pellets
・stuffing
・fabric
《Body structure》
・Stainless steel rods,
・stainless steel beads
・ungsten beads
・wooden rods
・glass pellets
・stuffing
・fabric
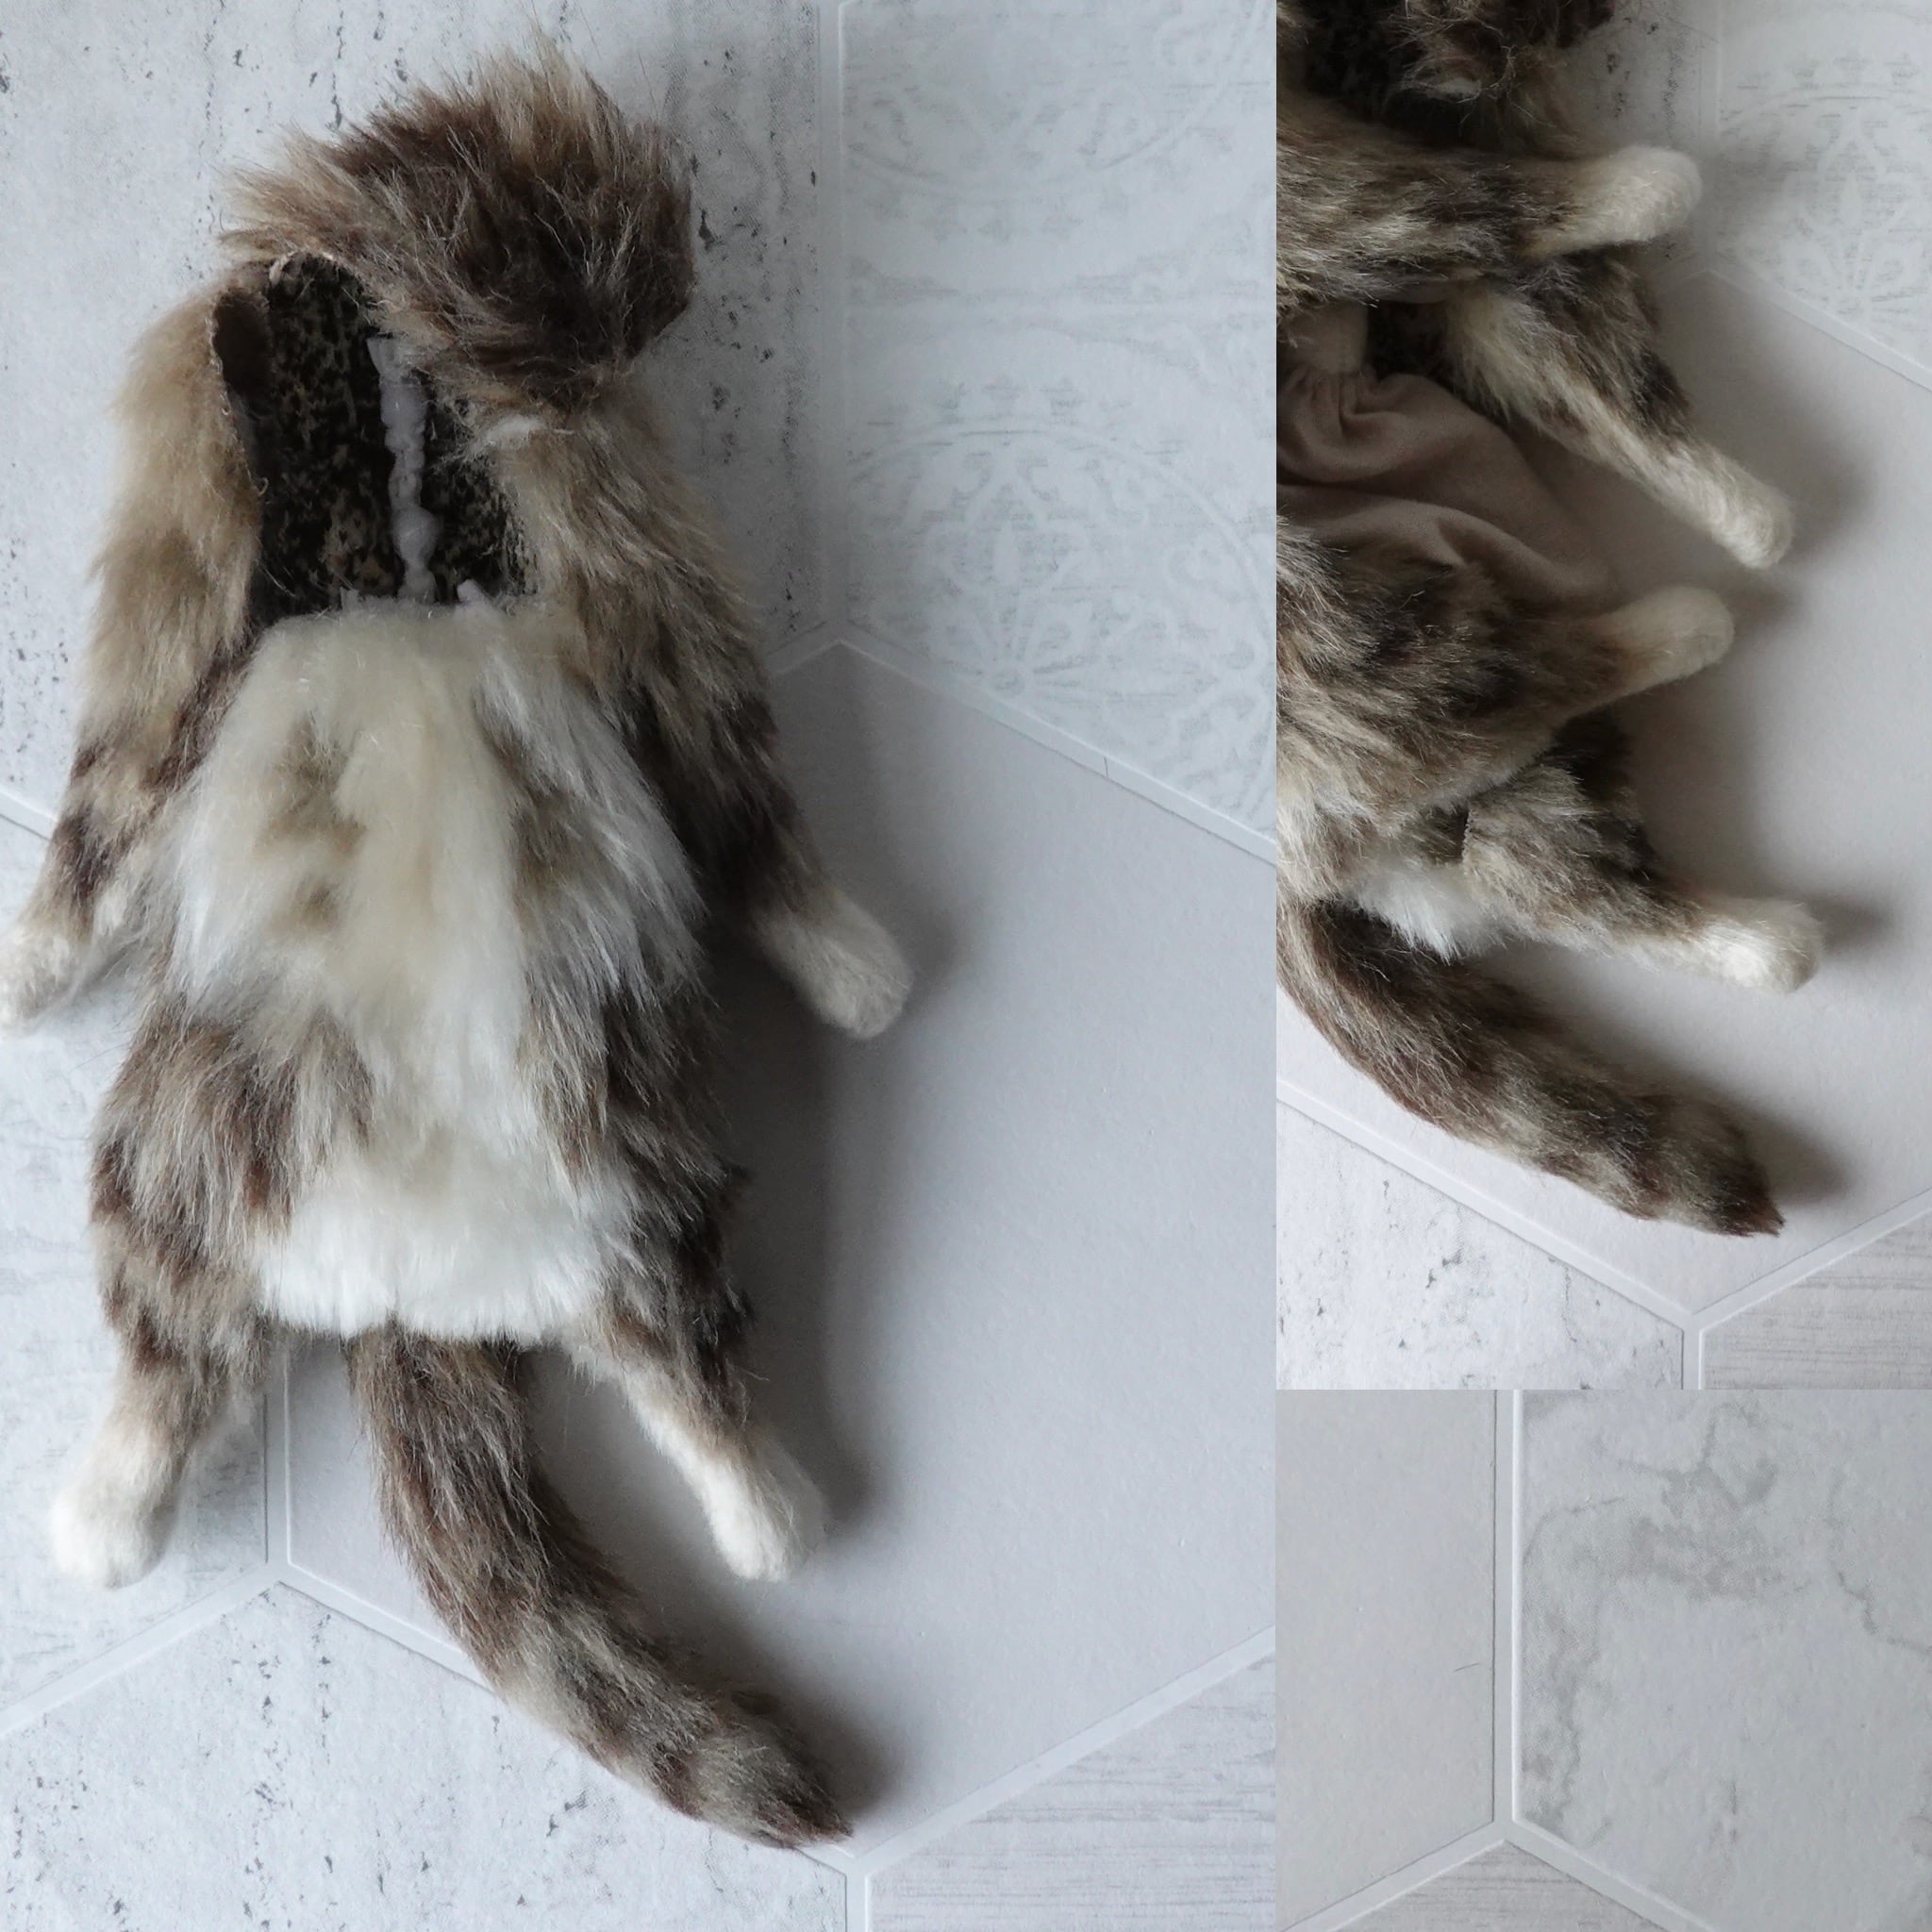
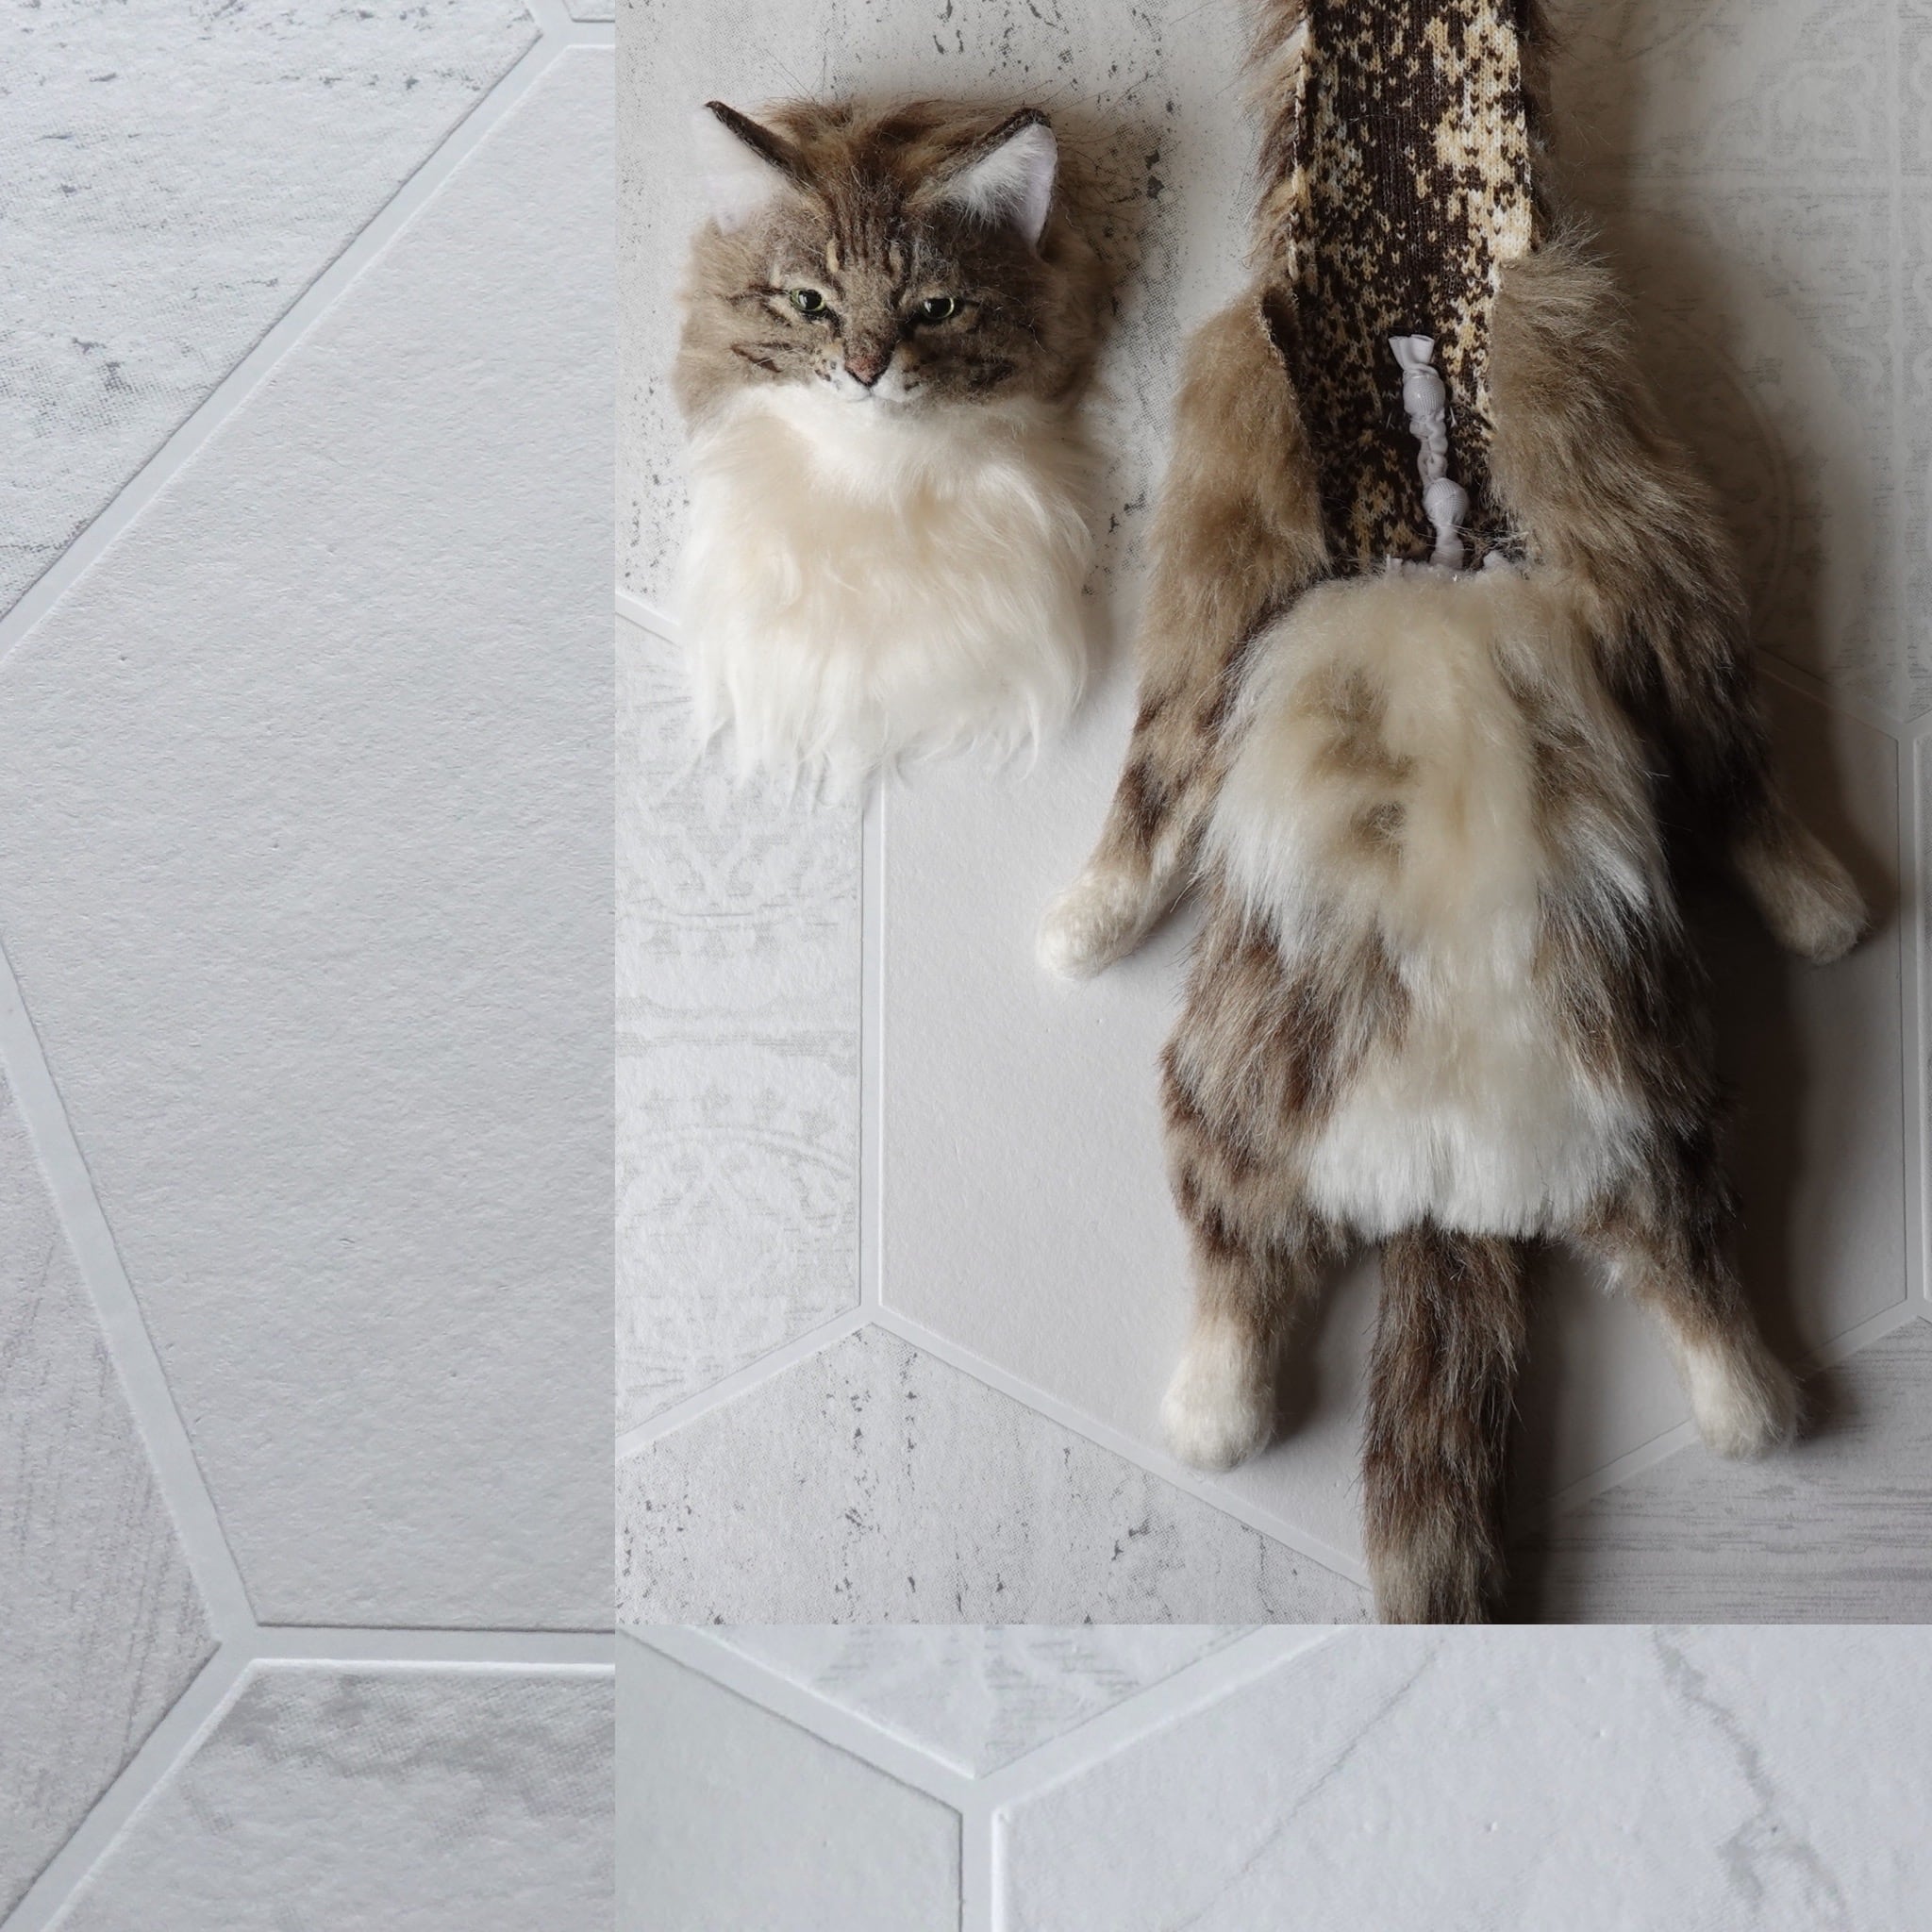
The internal “bones” serve both as a true skeletal armature and as weighted elements that give each body its natural balance. Depending on the area, we use stainless steel, tungsten, or wood, wrapping each piece in felt or stretch fabric. We construct bones corresponding to the skull, spine, tail vertebrae, rib cage, pelvis, limbs, and even fingers, though some shapes follow real anatomy closely while others are abstracted for sculptural function. The skull and rib cage contain stainless beads or glass pellets to fine-tune the center of gravity, allowing the head to tilt upward or downward naturally. The sternum also carries weight for posing stability. For the arm and leg bones, we use stainless dowel pins rather than wood. These industrial precision rods—normally used in molds and jigs—come in many diameters and lengths. Over time, we have assembled a wide selection to match each unique skeletal design.
🐈⬛ Column 🐈⬛: The Path to Dowel Pins
The first time I placed “bones” inside a plush, it was simply to keep the form from swelling or collapsing as stuffing shifted. A cat’s shape is fluid—round one moment, elongated the next—never resting in a single outline. I wondered if holding on to the “unchanging core” beneath that softness might preserve the true essence of a cat. My sculpture studies in university guided that thought. When I wrapped the bone structure in fur for the first time, the result was unexpectedly soft and endearing, a gentle looseness with life in it. But wooden bones could not overcome the resistance of the fabric backing; the limbs never relaxed into the perfect “floppy” drape I imagined. I sought weight—bones that could surrender to gravity. It wasn’t something a simple web search would easily reveal. Asking around through different fields and acquaintances eventually led me to stainless dowel pins. Heavy, precise, and just right for the softness I was chasing.
🐈⬛ Column 🐈⬛: The Path to Tungsten
In the beginning, I used only stainless steel beads for the tiny bones inside the paws. That worked for adult cats, but when I began sculpting kittens—short limbs, delicate frames—I encountered a challenge. Stainless was too light; the fabric pushed back, and the little legs would not fall naturally. Yet increasing the size for more weight was impossible—kittens must have small paws, not larger ones. I needed a material that obeyed gravity more faithfully, without growing in size. So I searched for a metal heavier than stainless at the same volume. That journey led me to tungsten, with a density roughly 2.5 times greater than stainless steel. Gold shares a similar density—but of course, that option was immediately dismissed. Tungsten, I learned, is used for fishing lures, to sink quickly and cleanly through water. I order it from tackle suppliers. There is a quiet kinship, I think: anglers seeking weight to cut through water, and a plush sculptor seeking weight to let tiny paws surrender to gravity. Today, I use tungsten not only for kittens, but for all cats, pairing it with stainless to create that perfect, gentle “flop.”
⚫︎Organs
We refer to the internal filling that gives volume and life to the body as “organs,” echoing the role of real anatomy.
・Glass pellets
・Fabric
For the “organs,” we place glass pellets inside small fabric pouches and connect them to the internal bones, setting them within the abdomen as weighted elements. Depending on the desired belly shape and expected poses, we adjust the pouch size, shape, and number. When the pellets move as intended inside the body, the silhouette and posture settle into natural, lifelike balance. Plush dolls are called “stuffed animals”—yet capeesh pieces are not tightly stuffed at all. Instead of being packed full of filling, many areas are intentionally hollow to preserve softness and flexibility. The inside consists mainly of fabric-wrapped metal, wood, and glass pellets, with only minimal stuffing, allowing the body to relax and breathe in a way that feels quietly alive.
⚫︎Flesh
We refer to the soft material that forms volume between the bones and skin as “flesh,” echoing the role of real muscle and fat.
・Eco-fur (acrylic, polyester)
・Stuffing
We use small amounts of stuffing around the head and paws, and wrap fur around the limbs to adjust their proportions. A touch of stuffing is also placed in areas like the neck to balance softness and stability—neither too floppy nor too firm—so the piece holds its shape while remaining quietly relaxed.
⚫︎Eyes
・Acrylic inset eyes
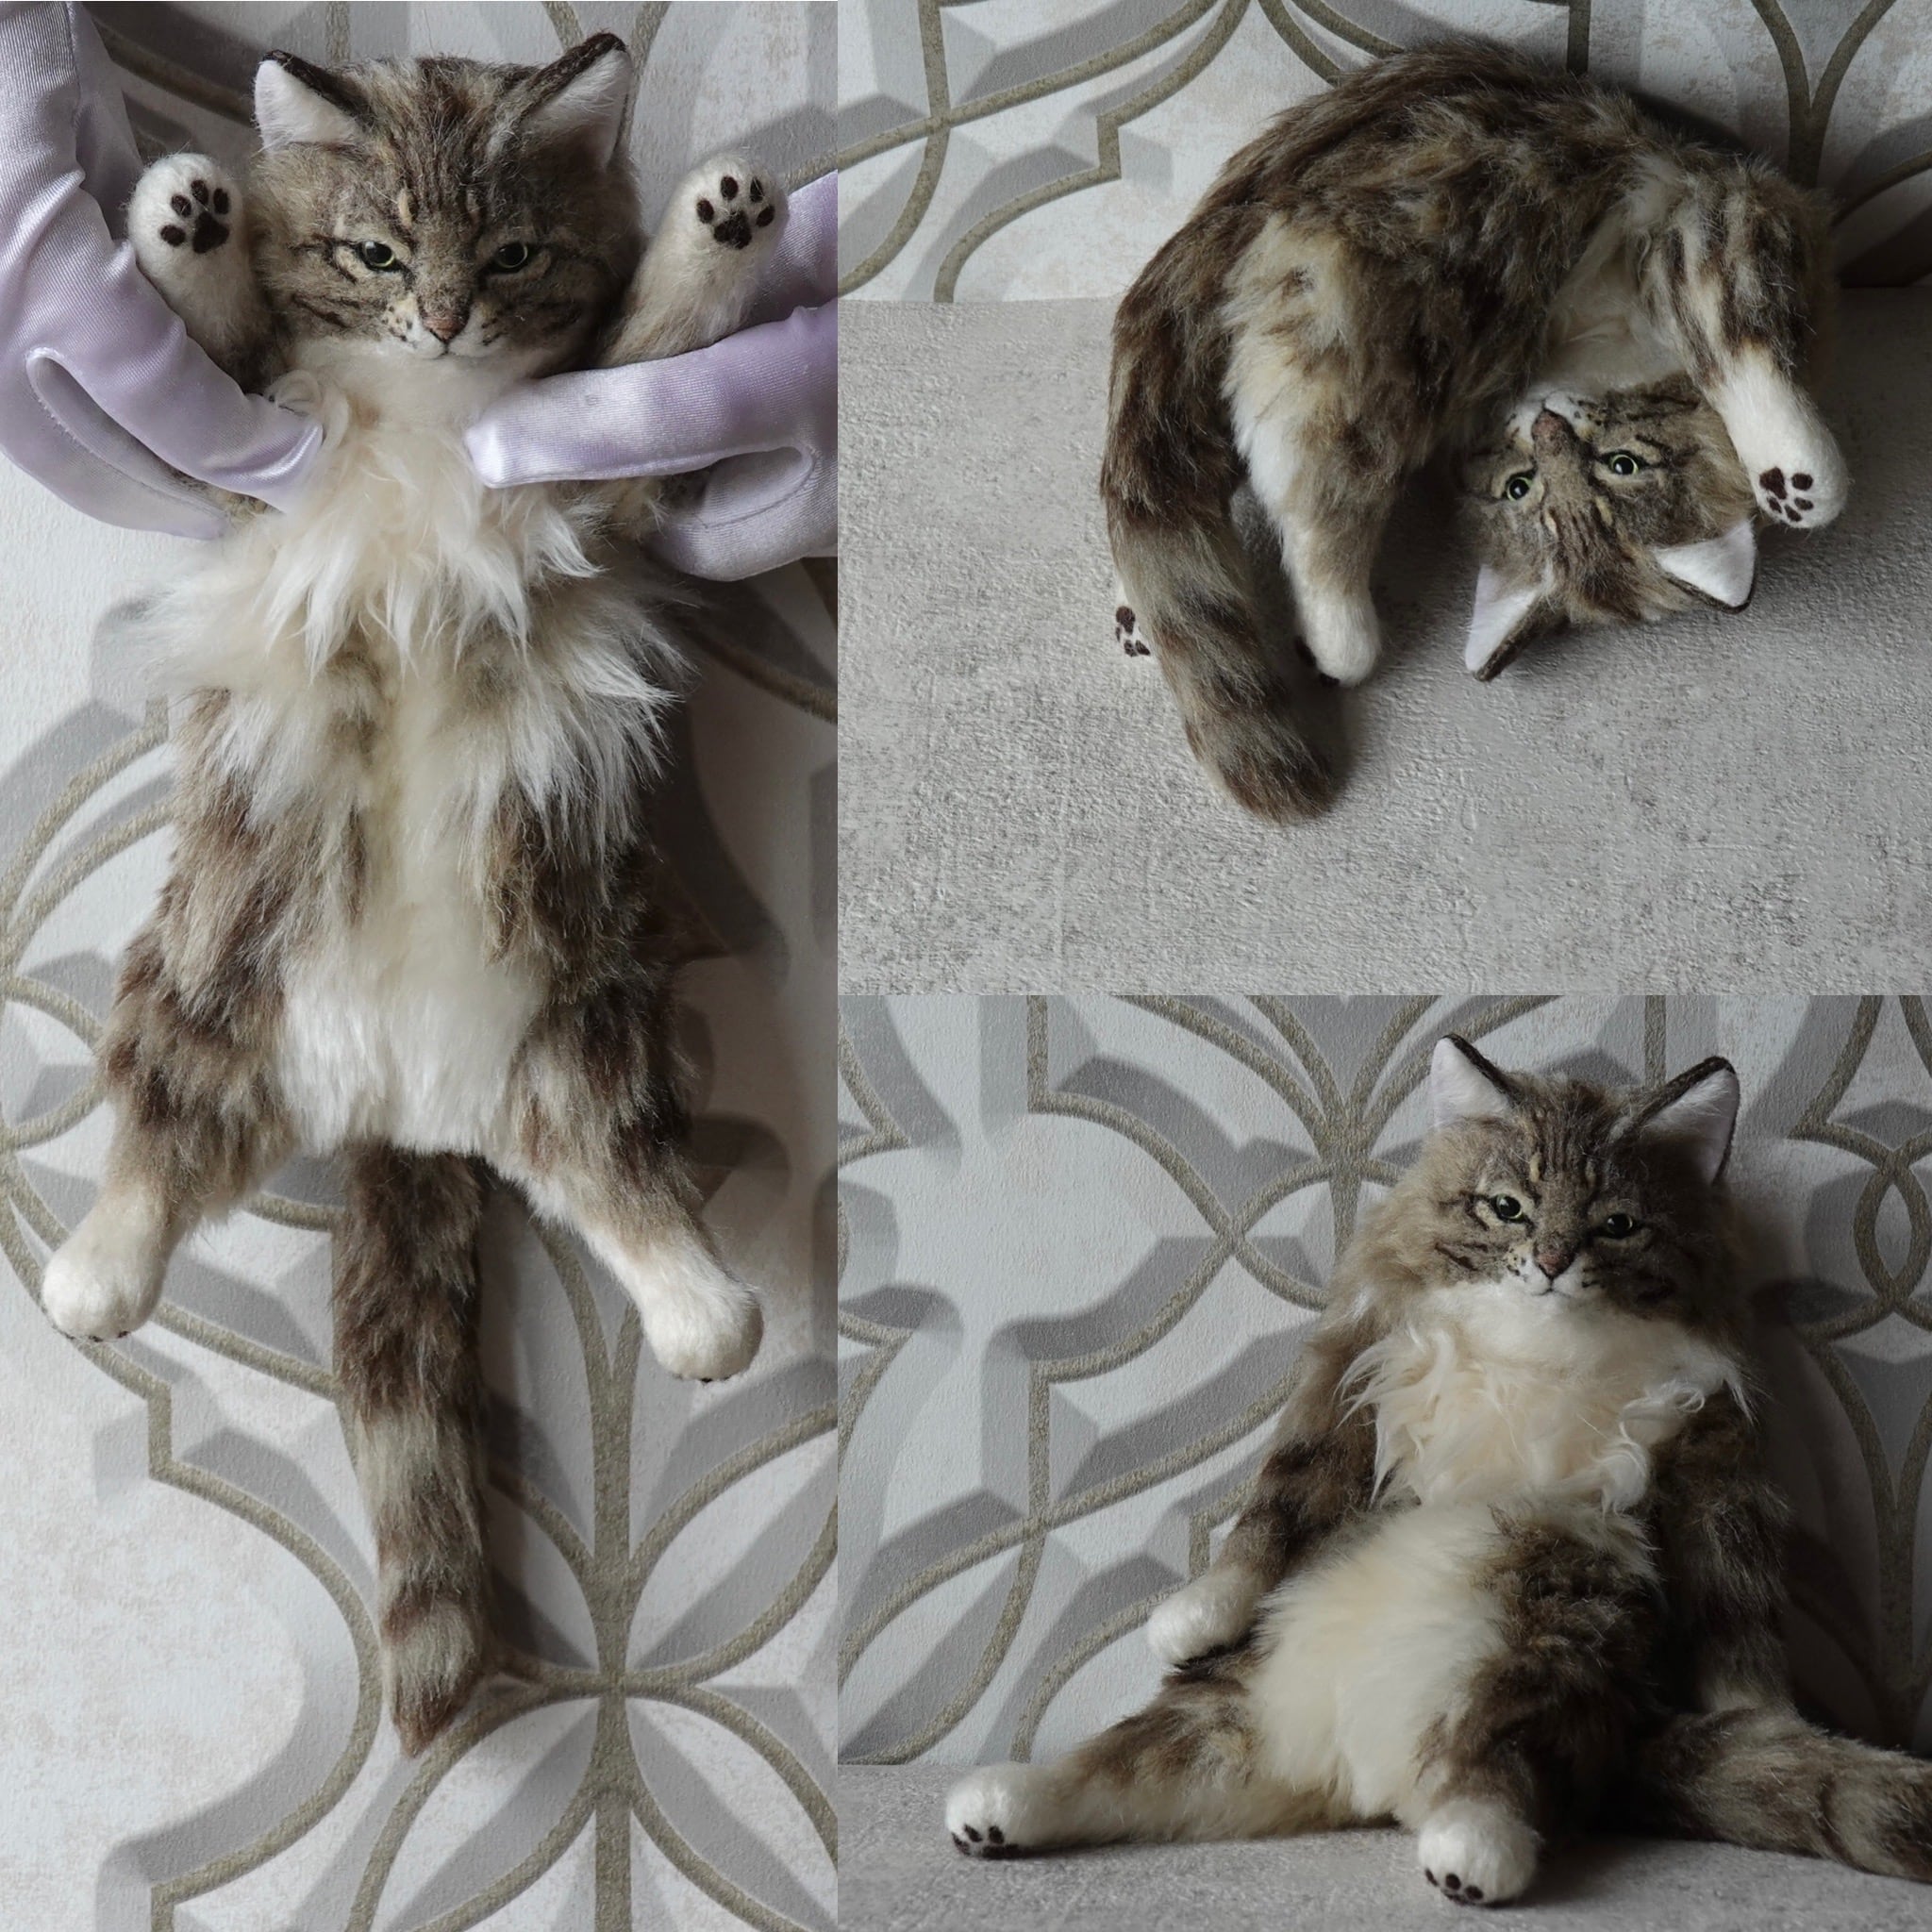
We select from four sizes—4.5 mm, 6 mm, 7.5 mm, 9 mm, and 10.5 mm—depending on the piece. At capeesh, we aim for an introspective, almost infant-like presence, so we intentionally use eyes that are slightly smaller than those of real animals. This subtle choice creates a quiet, thoughtful expression rather than a literal likeness.
⚫︎Ears
・Eco-fur (acrylic, polyester)
・Felt
The ears are built in a three-layer structure, with felt sandwiched between eco-fur. Fine tufts are added to the inner ear, and when appropriate, we also create lynx tips—those delicate hairs that extend from the ear tips, lending a quiet wildness to the expression.
⚫︎Paw Pads
・Needle-felted wool
・Beads
Paw pads are crafted either with needle-felting or with beads in gold or silver tones. Needle-felt offers a more realistic softness, but using tiny beads instead creates a deliberate contrast—hard little gems where softness is expected—adding a subtle glimmer and elegance to the feet. At times, we also use beads to represent claws.
⚫︎Tag
・Brass
A small brass tag is placed at the base of the tail — a quiet signature of the piece.
3. Preparing Materials
・Dyeing fur
Because commercially available fur comes in very limited colors, we custom-dye most fabrics and apply a finishing coat afterward to achieve the tone and depth we envision.
🐈⬛ Column 🐈⬛: The Challenge of Dyeing Fur
Most eco-fur has acrylic fibers and a polyester backing. The backing accepts dye relatively well, but the acrylic fibers have limits in how much pigment they can hold. Repeated dyeing can deepen the color, but doing so risks damaging the texture of the fur. Achieving consistent results is difficult: the outcome shifts subtly with the quality of the fur, the time in dye, water temperature, room temperature, and other variables. Colors also appear different when the fur is wet, so we often test-dye small cut pieces and dry them before committing to the final tone. We dye not only pure white fur, but also pre-colored fur; however, color cannot be “subtracted,” only gently added, so the range of achievable hues is limited. This is why securing the right fur must come before finalizing a design—our palette begins with what is possible, not merely what is imagined. When all the fur has finally been gathered, a quiet trace of the animal’s presence begins to emerge.
・Bone sleeves
We cut felt and stretch fabric to wrap each bone individually, then hand-stitch every piece. The patterns for these sleeves are continually refined and updated as the skeletal design evolves. Because these sleeves also function as joints that connect the bones, the spacing between them is crucial for achieving natural, lifelike movement.
・Organ pouches
We cut fabric to create pouches that hold the internal “organs.” The fabric must be soft enough for the glass pellets to move freely inside, yet thick enough to bear their weight. The number and shape of these pouches vary depending on the piece, allowing each body to carry its own balance and inner weight.
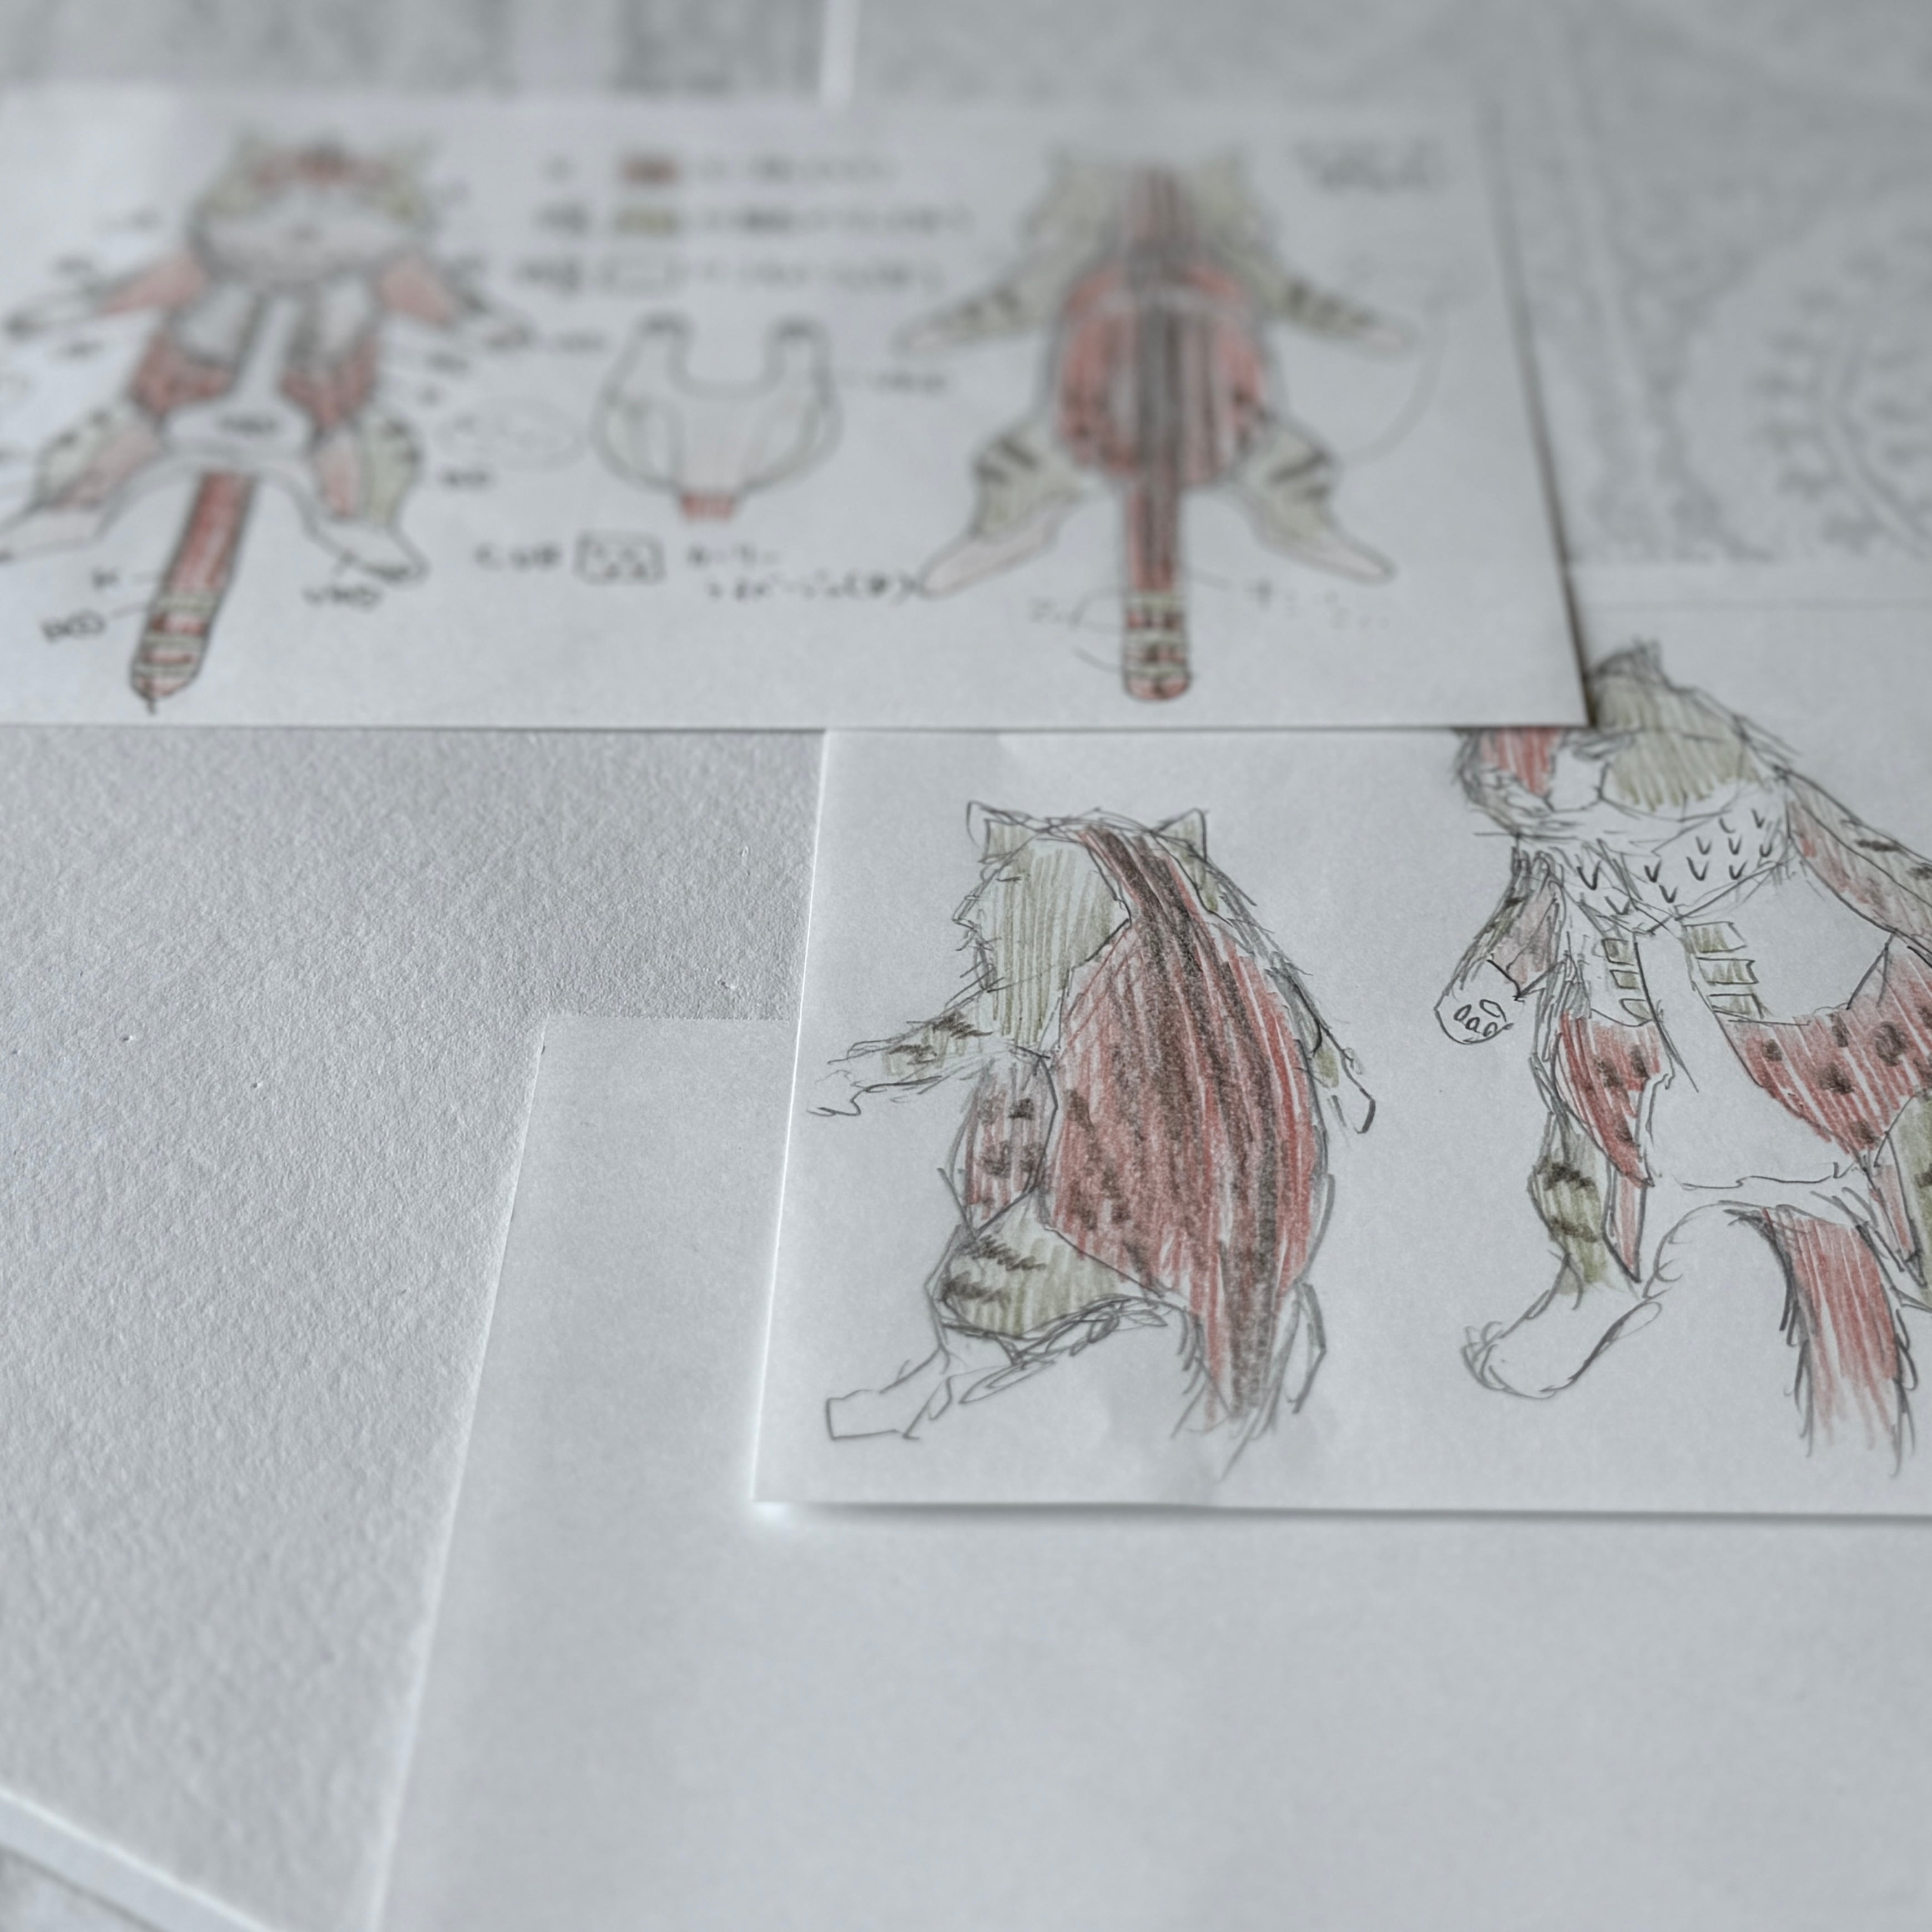
4. Creating the Blueprint
・Design blueprint
We draft the internal structure and bone connections according to the intended form. Using reference photos, sketches, and sometimes clay studies to confirm the imagined silhouette, we decide how to stylize and simplify shapes while preserving character and life. capeesh pieces are designed to sit in a teddy-bear posture as their natural resting pose, so that form is prioritized first; from there, we explore designs that also allow for relaxed poses such as lying on the back, facedown resting, or stretching with raised limbs. By refining each pattern to expand the range of motion, and adjusting bone weight and length as well as the number and placement of organ pouches, we design each individual piece so its poses appear effortless, natural, and quietly beautiful.
・Design drawing
Once the fur materials are gathered, we create the final design drawing to define the fur textures, pile lengths, and color placement. Often, the design evolves after the head is formed; the character and balance of colors become clearer at that stage, so the overall design is typically finalized only after a provisional head is completed.
5. Assembly & Sewing
From here, the true making begins.
⚫︎Creating the bones (except spine and tail)
The head bones are shaped with reference to real animal skulls, while also considering the layers of “flesh” that will later surround them. For animals with manes or naturally rounded heads, we may give the skull a gentle fullness at this stage so that the final form feels true and balanced. Determining the position and foundation for the ears at the bone stage is one of the most delicate parts of the process.
The other bones are crafted according to the blueprint. To preserve the relaxed, gentle “flop” of the body, the joints are not fixed, so construction methods are carefully devised to allow natural looseness while preventing the limbs from bending unnaturally.
⚫︎Creating the organs
We fill fabric pouches with glass pellets to form the “organs.” The size of each pouch, the amount of pellets, and the number of pouches vary for each piece. For example, in a polar bear with a softly rounded belly whose weight naturally shifts backward when sitting, we place two pouches—one at the lower belly and one slightly above it. When the body leans back, the pellets flow toward the spine and pelvis, creating a stable balance; when leaning forward, the pellets settle toward the belly near the ground, supporting the posture from the front. In this way, the internal weights guide each pose, allowing the body to respond quietly to gravity.
⚫︎Creating the pattern
Using the blueprint as a guide, we draft the sewing pattern. For animals being made for the first time, we begin with a provisional pattern and refine it gradually while observing how the form behaves during sewing. Although we have a foundational “standard cat” pattern, it is continuously updated, and because each fur pattern is reflected into the template, almost no two pieces share exactly the same pattern. The visible markings shift by the length and movement of the fur pile, so the pattern is adjusted accordingly to ensure the intended expression emerges on the finished body.
🐈⬛ Column 🐈⬛:The Evolution of Patterns
In the early stages of development, I drafted patterns to minimize visible seams as much as possible. Once we identified the ideal fur length—one that naturally conceals seams—we were able to prioritize anatomical realism in the pattern. But if the pattern becomes too detailed, the outer “skin” stiffens and the balance is lost, so each pattern is shaped with careful attention to that delicate middle ground. In some cases, when the design calls for more seam lines due to markings, we intentionally alter the original pattern so that the color transitions themselves help sculpt the three-dimensional form.
⚫︎Forming the head
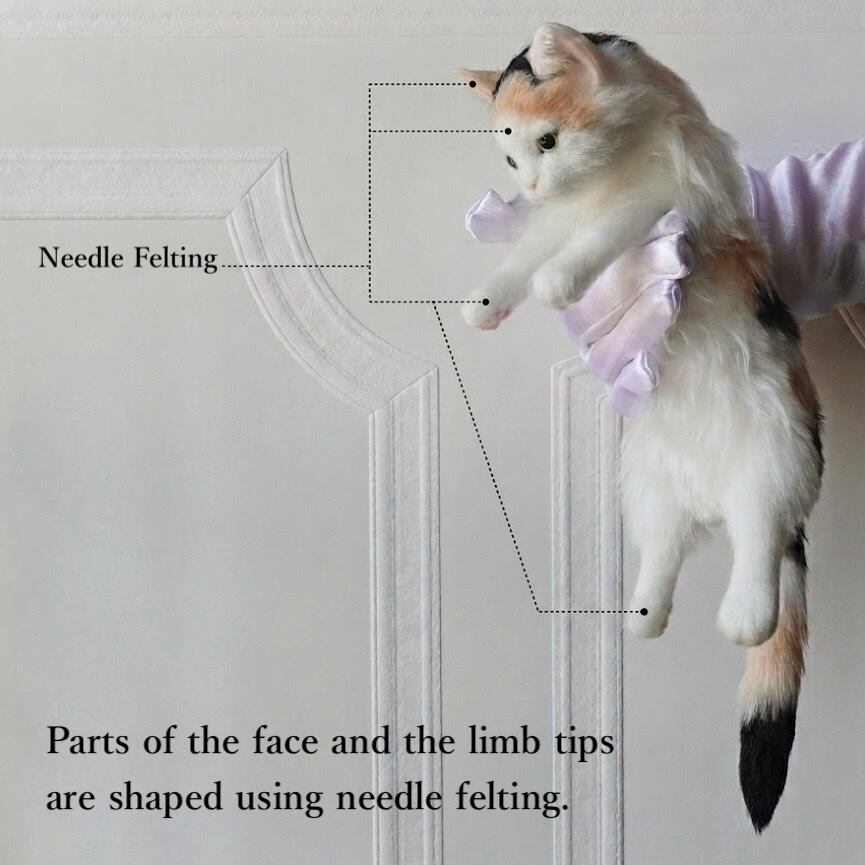
The head is created by building on the pre-constructed bones, layering fur over the structure. The bones are weighted to give the head a natural heaviness so it can gently tilt downward or lift toward the sky, just as a real animal would. After establishing the internal form with stuffing, we determine the eye placement and then begin applying the fur. Certain areas of the face rely on the natural length and flow of the fur, while others are refined through needle-felting to shape delicate features. To avoid scratching or clouding the eyes during the process, temporary eyes are used and then replaced with the final ones just before completion.
🐈⬛ Column 🐈⬛:Needle Felting
When needle felting first arrived in Japan, I was delighted and made many things with it. The technique felt similar to sculpting clay—intuitive and enjoyable—but over time I began to feel that it was “too direct” for me, too immediate. I realized I wanted more constraints, more uncertainty, so I moved toward plush making instead. As the level of realism in my plush work increased, however, I found that achieving natural facial curves and subtle expressions purely by sewing required countless tiny pattern pieces and ultra-short-pile fur—details far too fine to stitch cleanly. And so I returned to the felting technique. Now, I use it for faces and the tips of the limbs. Once again, I find myself appreciating the depth, challenge, and quiet fascination of felting.
⚫︎Shaping the back and tail
Following the pattern, we cut and sew the fur pieces. As we stitch, we refine the silhouette so the profile forms a graceful curve and no bumps appear unnaturally. If the fur is too soft to hold a clean line, a backing layer is added for subtle support. Once the markings along the back take shape, the presence of the animal suddenly begins to emerge.
🐈⬛ Column 🐈⬛:Stitching Patterns
In the beginning, I worked mostly with solid colors or simple two-tone markings like tuxedo cats. As my ambitions grew—“next, let’s try a calico…”—the number of sewn pattern pieces increased, and now even subtle gradients within a single color are part of the work. The greatest challenge in patchwork-like pattern sewing is making the finished form look as though the fur originally grew that way—natural, seamless, without distortion. Yet every time I turn the piece right-side out after stitching according to the design drawing, I am moved by how beautifully the pattern has come together, often more than I imagined. The dense, uniform fur and markings of living animals truly feel miraculous to me. Some creators form the shape first in a single color and then paint the markings, but no matter how much time and effort it takes, I remain committed to expressing markings through sewing—through cloth, needle, and thread.
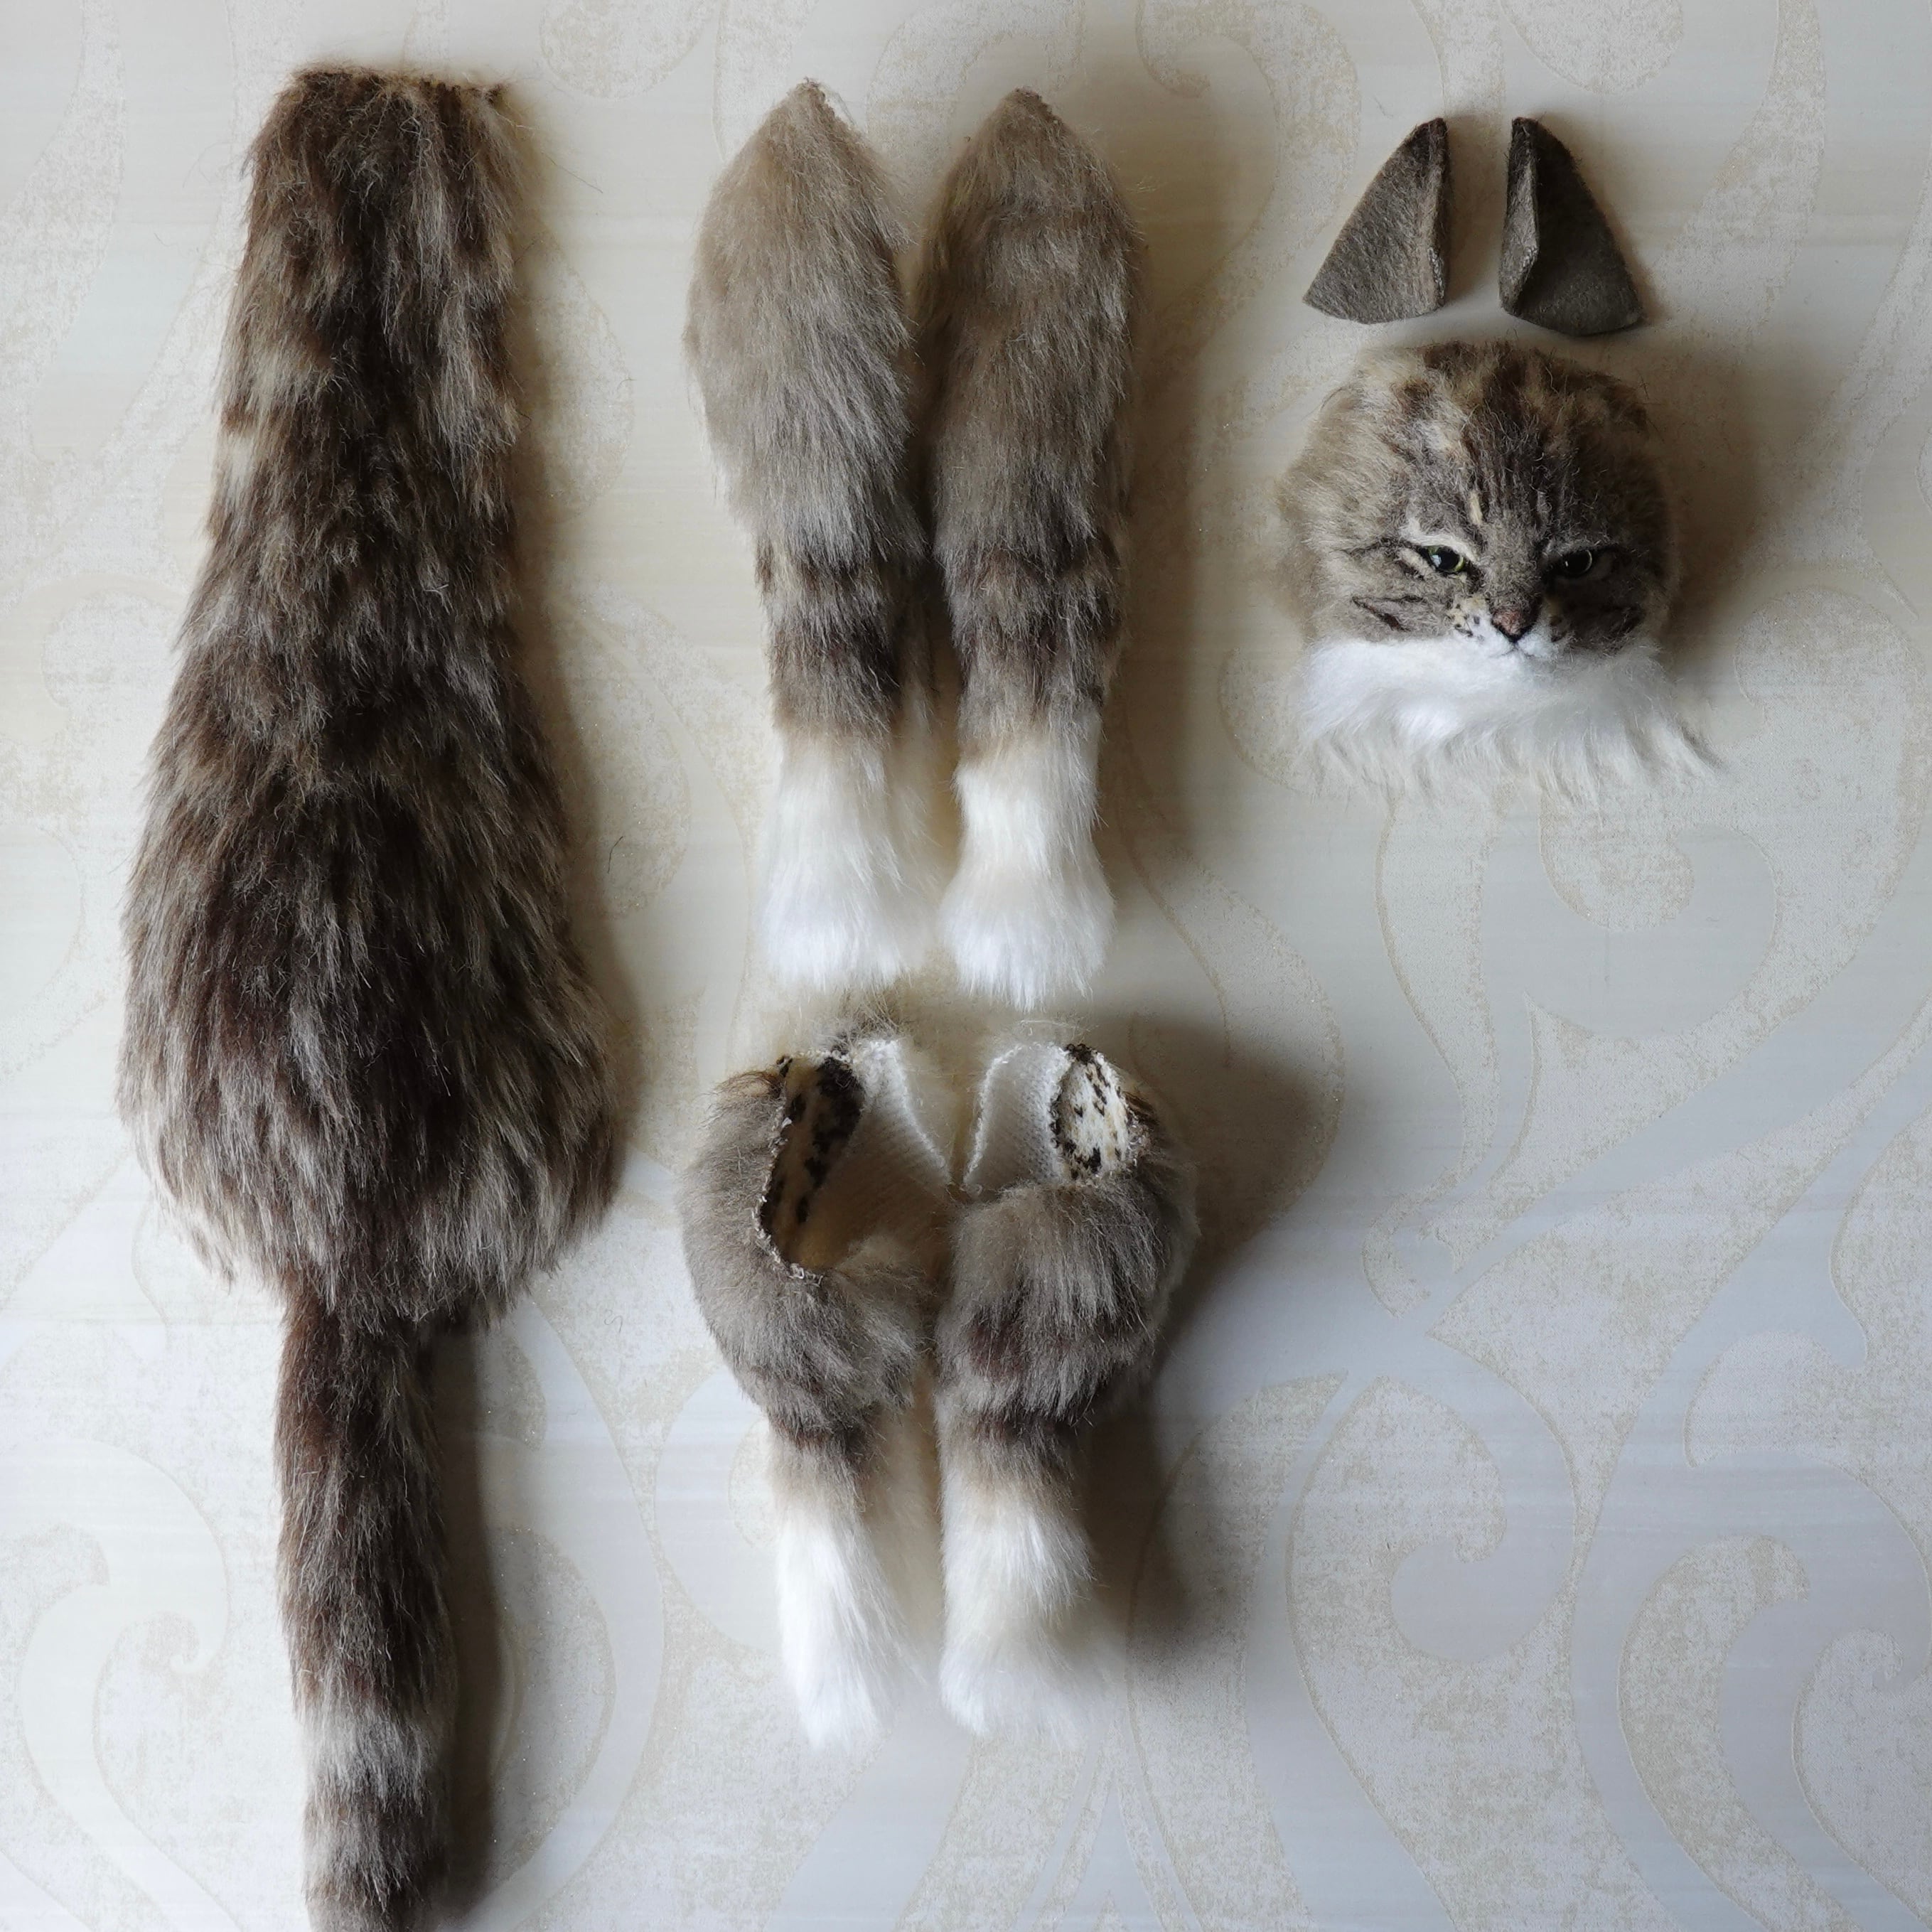
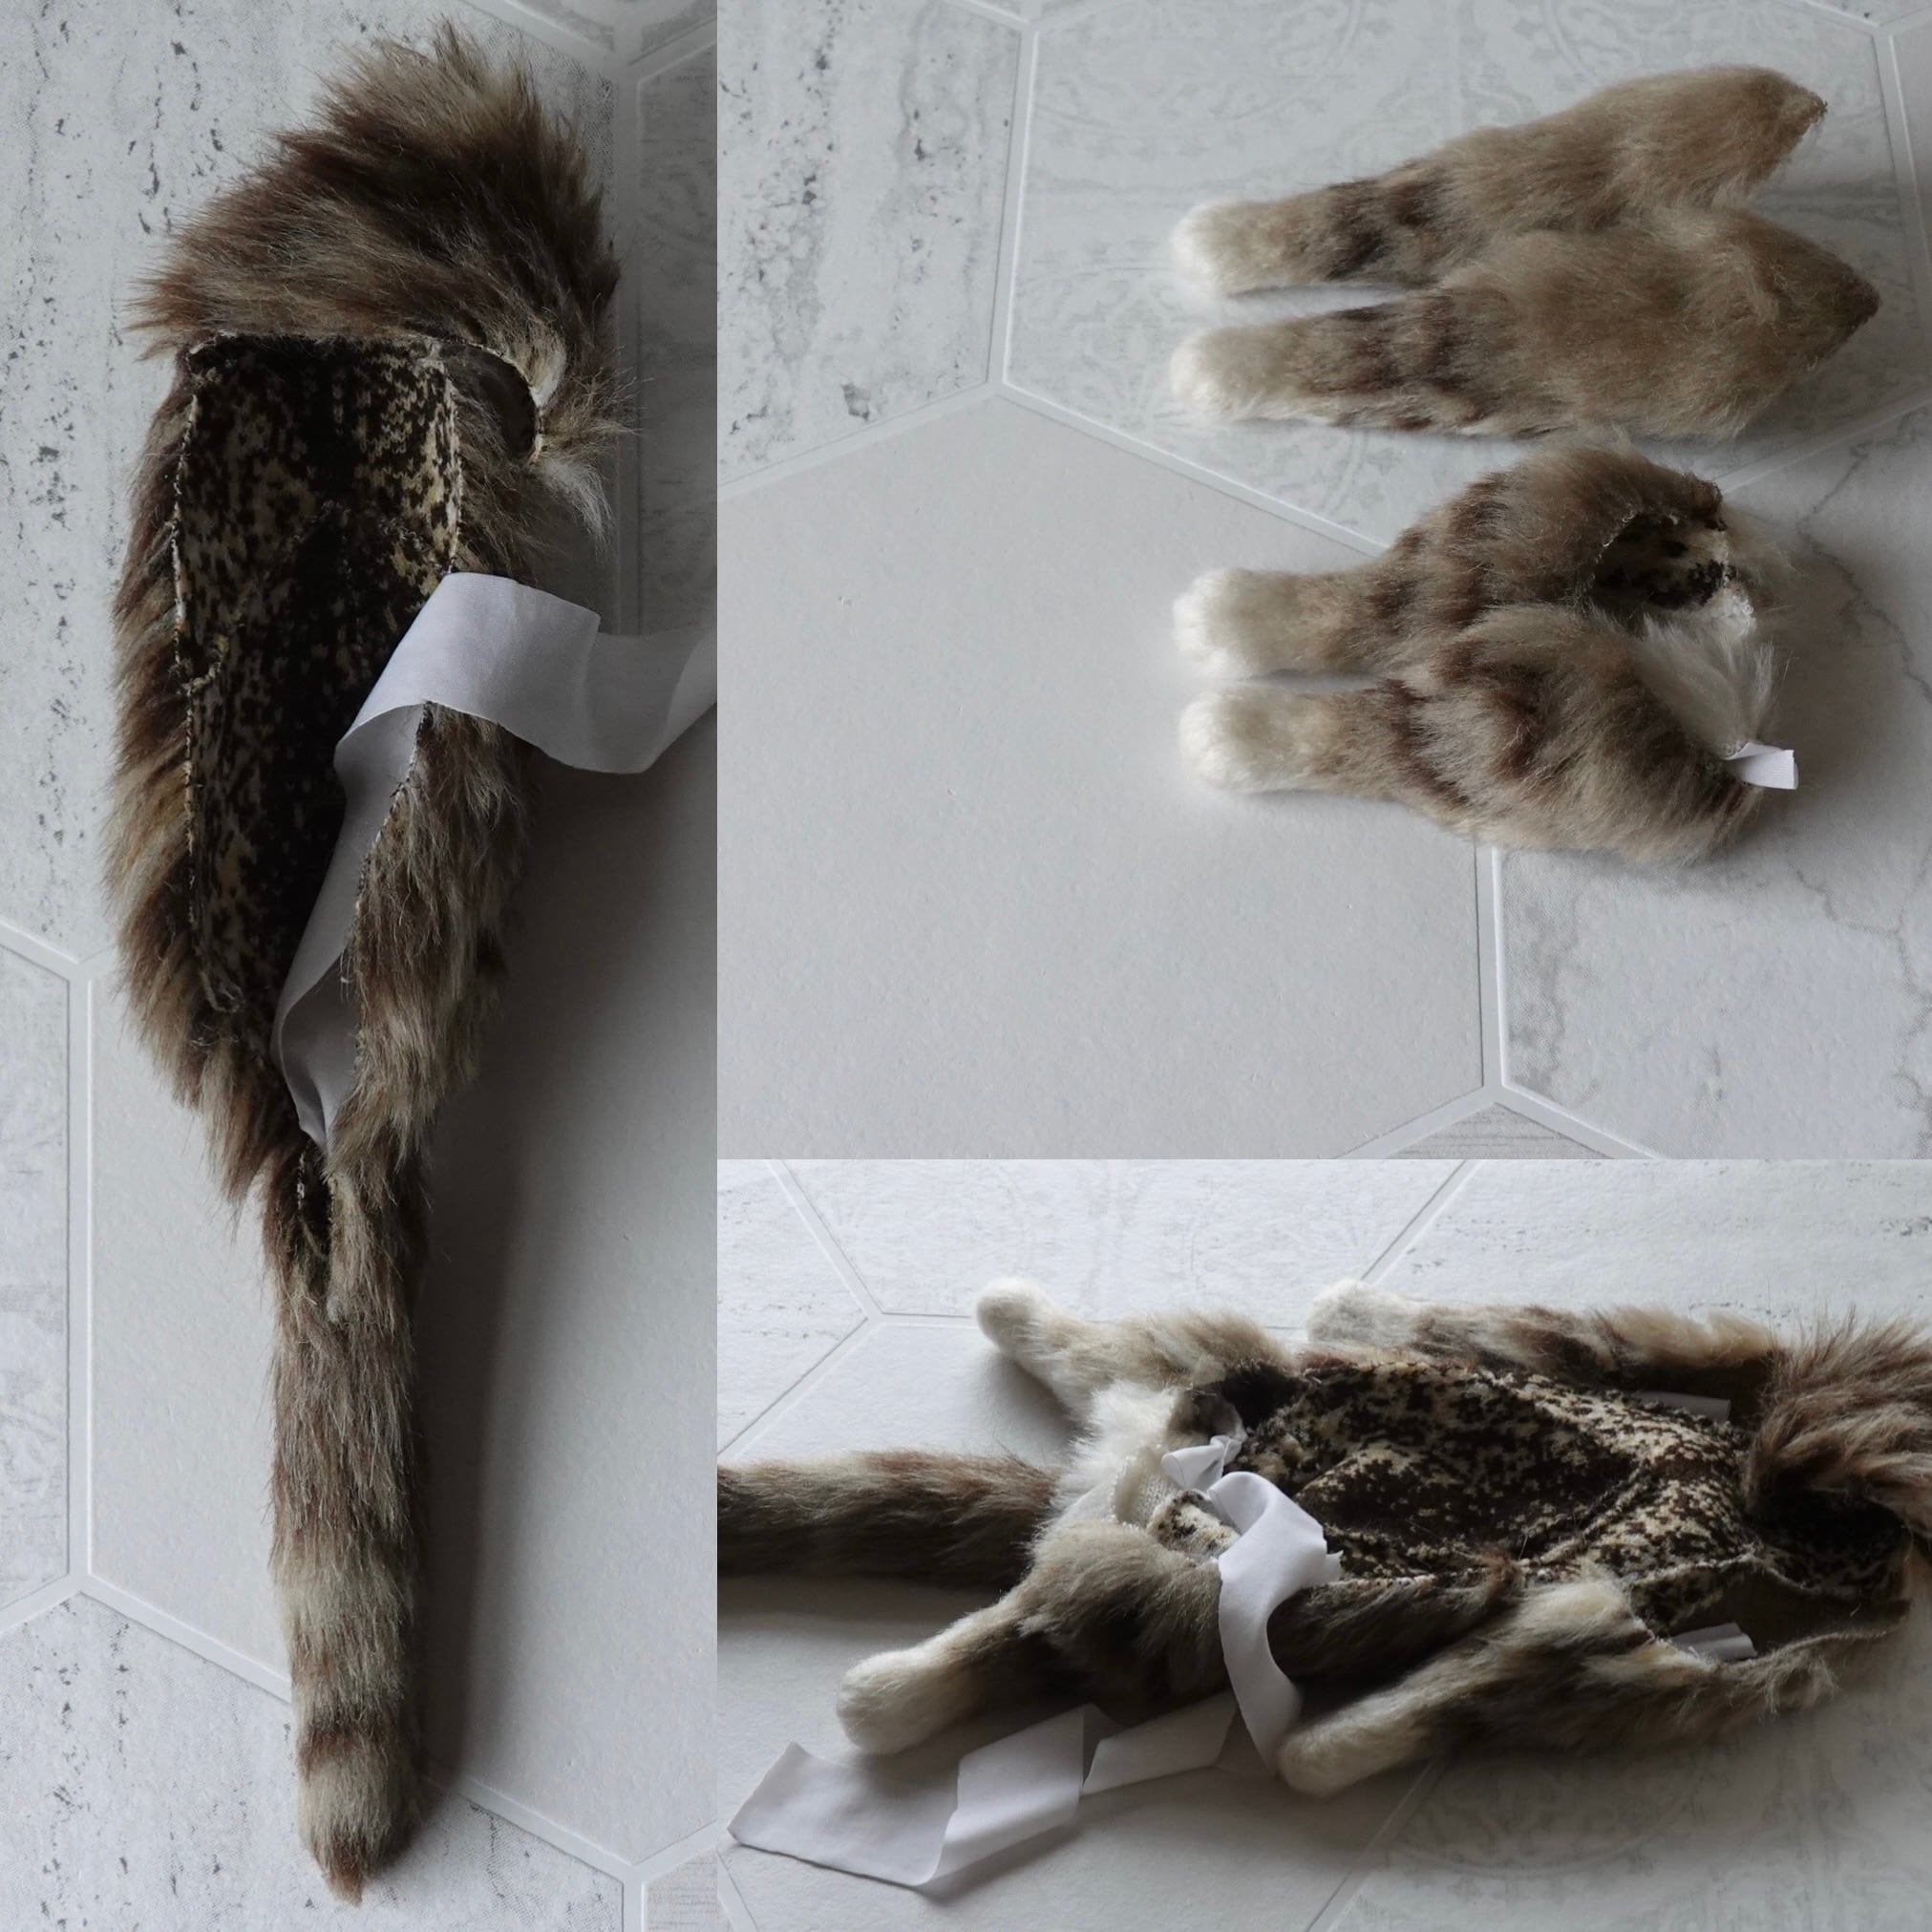
⚫︎Shaping the limbs
Following the pattern, we cut and sew the fur for the limbs. Before inserting the bones and closing the seams, the darts are stitched and the fur surface is carefully arranged so that the shape holds natural volume and form even before the structure is inside.
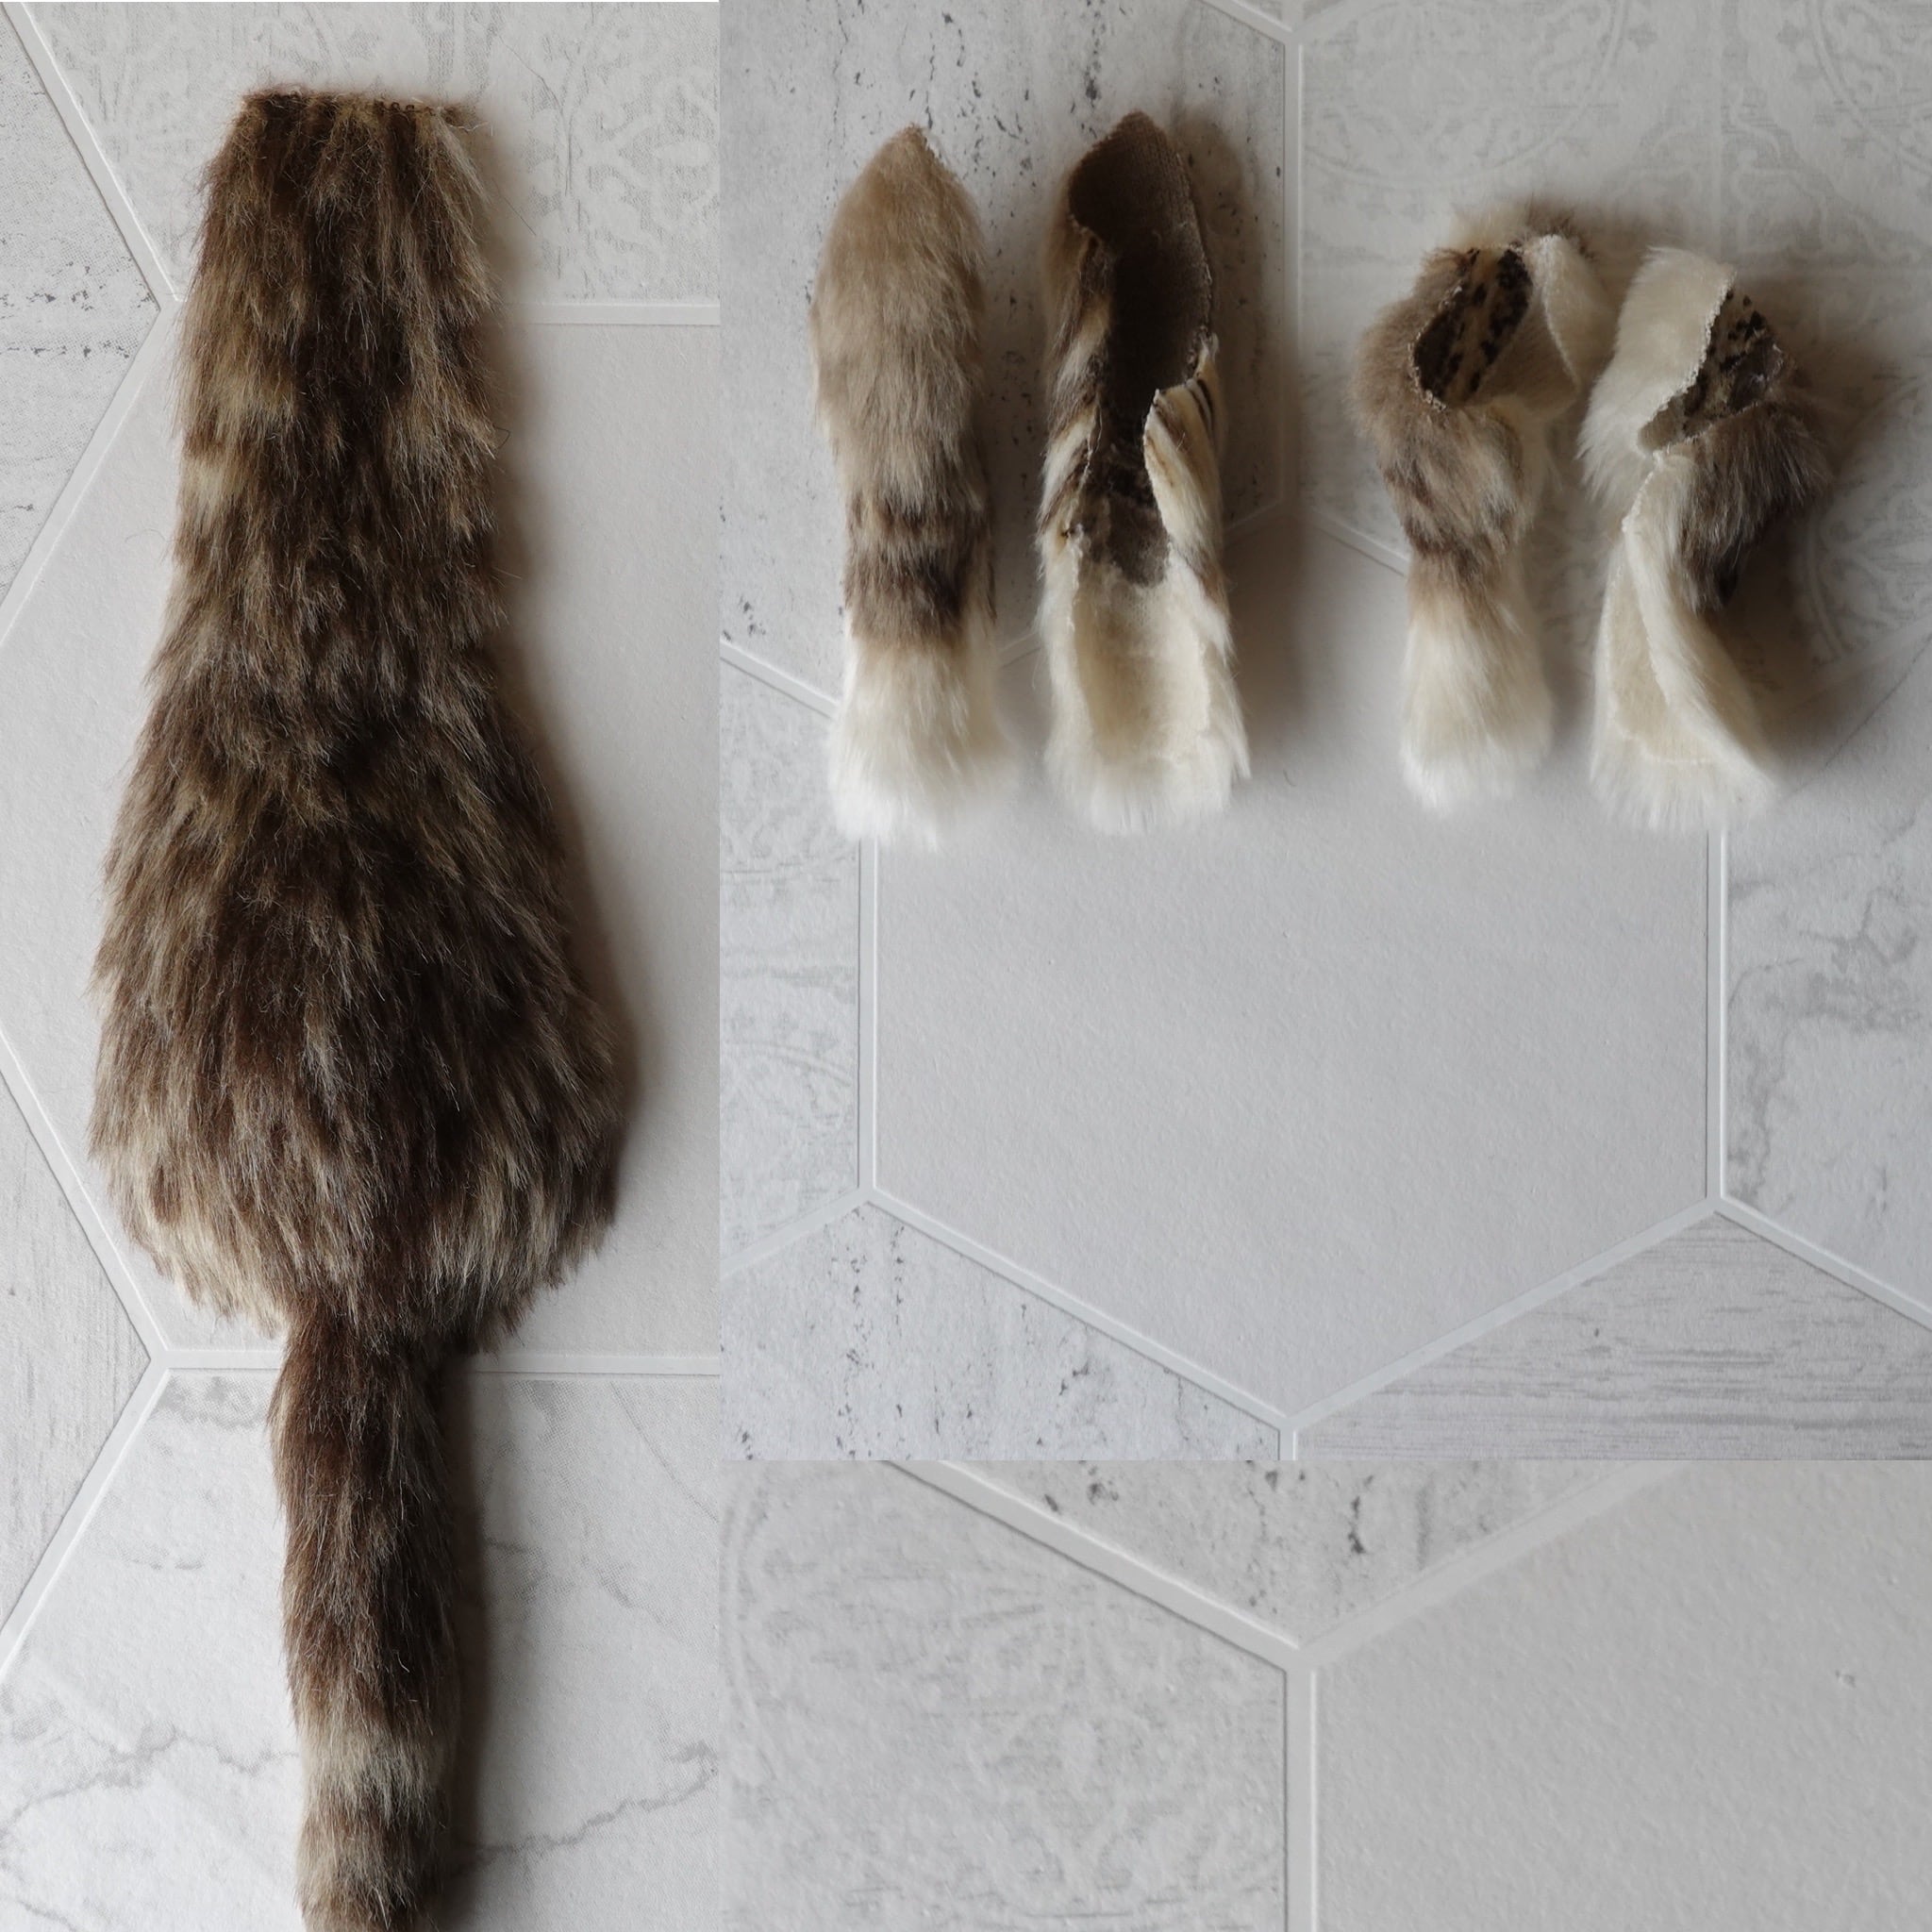
⚫︎Finishing the limbs
We insert the bones into the fur-covered limbs and shape the paws into a gentle curl. Following the structure of the internal bones, the spaces between each toe are stitched to define the form, and needle felting is used to refine the details. Through this felting work, we aim to capture the subtle, species-specific expression of real animal paws.
⚫︎Finishing the tail
The tail is shaped by arranging the fur according to the design and inserting a bone structure suited to its thickness. Fluffy, full tails are supported with stuffing, while curled tails—such as those reminiscent of Shiba Inu—use technorote (a polyethylene wire) inside to hold their form.
⚫︎Attaching the limbs to the back panel and closing the rear
Because the “skin” connects across the entire body, we complete the lower half first to avoid distortion in the final form. At this stage, we carefully confirm that the piece can sit in the teddy-bear posture as intended. For animals with small tails that tuck toward the body, we pay special attention to the rear area while seated, ensuring the silhouette remains clean and natural.
⚫︎Building the core body: attaching the ribs, organs, and pelvis to the spine, then securing them to the back panel
The spine is sewn into the “skin.” When you touch the back of the finished piece, you can feel the subtle bumps of the vertebrae beneath your fingers. By anchoring the other bones and organ pouches to the spine, each part moves naturally with changes in posture, allowing the back and body to respond softly and believably to motion.
⚫︎Connecting the limb bones to the spine
The arm bones are secured to the rib cage, and the leg bones to the pelvis. At this point, the entire skeletal structure is fully connected.
⚫︎Constructing and attaching the belly panel
We finish the underside of the body. Since the belly becomes the front surface when the piece sits in its teddy-bear posture, we place particular care on its design. Real animals often have complex directional shifts in the fur on their underside, which we frequently express using curly fur to capture that natural variety. Many animals also have intricate belly markings; when present, we treat them as distinctive features and highlight them thoughtfully. For kittens, we use fur with a softly pink-tinted backing to evoke a gentle sense of warmth and lifelike freshness.
⚫︎Making and attaching the eyes
We trim and hand-paint the inset eyes, then replace the temporary ones and fix them in place. The size, shape, color tone, and subtle angle of the eyes transform not only the expression and mood, but the very personality of the piece, making this one of the most critical steps.
⚫︎Making and attaching the ears
The ears play a major role in defining character. In real animals, ear direction shifts with attention and emotion, so there is always a slight hesitation in fixing them in a single position. Even so, we seek an angle that feels true to the piece—quietly alert, present, and alive.
⚫︎Creating the “muffler” (the fur from neck to chest) and attaching it to the head
Quadrupeds have a naturally developed chest that pushes forward from the base of the forelegs. When adapting the form to a teddy-bear sitting posture, the challenge lies in determining how far to simplify and stylize that volume. To preserve the gentle fullness when the body leans forward, a backing layer is added for support.
⚫︎Attaching the head to the body
The fur at the back of the head and the muffler section are sewn to the body simultaneously. Care is taken so that the neck does not appear unnaturally long or short from either the front or the back, while also ensuring the neck remains free and not rigidly fixed in place.
🐈⬛ Column 🐈⬛:The Most Critical Moment
In capeesh pieces, the “skin” runs continuously from the crown of the head to the tip of the tail, just as in real animals, and the “bones” are fully connected as well. Each element gently pulls or yields to the others, and this balance allows for the wide range of natural poses. Although the head, chest, and back are constructed separately and later joined, everything ultimately converges beneath the ears, where the head’s structure meets the body. I often feel that this point determines not only the movement of the arms and neck, but also how the fur beneath the ears is attached—an adjustment that seems to influence much of the body’s mobility. When trimming any excess fur at this stage, I proceed with constant checking and a racing heartbeat. It is the moment of greatest tension, the point in the entire process where the most irreversible decisions must be made.
⚫︎Attaching the paw pads
When creating paw pads with needle felting, we often blend multiple colors and shape them while observing the natural tones and contours of real paws. To avoid a flat appearance, the pads are gently embedded into the paw to give a soft, rounded volume. Sometimes we intentionally express the pads with beads instead—hard little gems standing in for softness. Gold or silver beads catch the light at the tips of the feet, adding a quiet, elegant accent.
⚫︎Attaching the tag
A small brass tag engraved with the “capeesh” logo is sewn at the base of the tail. It is positioned carefully so it never interferes with the silhouette or the way the piece feels when held.
⚫︎Trimming
In pieces that combine long and short fur, the borders are trimmed and blended so the silhouette remains soft and harmonious. At this point, the piece reaches its provisional completion.
6. Inspection, refinement, and final adjustments
Even at this stage, adjustments may require opening seams and reworking internal elements. Some pieces do not meet our standards and do not proceed to completion or sale. Each work must carry integrity in form, movement, and presence before it is considered finished.
🐈⬛ Column 🐈⬛:Final touch
Before the final adjustments, I step away from the work and prepare both the studio and myself so I can return with clear eyes. Then, using needles and other tools, I refine the form so it looks right from every angle. I always check the piece once outdoors in natural light; holding a small animal-shaped plush in my arms and trimming the fine fur around its paws often feels like clipping a kitten’s tiny nails. At the end, I use warm air from a dryer to bring out the natural beauty of the fur—much like drying a freshly bathed cat. This moment is always a quiet joy. For those who welcome one of these animals home, gently blowing warm air over the fur from time to time will make it bloom softly again.
7. Completion
We select a backdrop that complements the piece and photograph it, using natural light whenever possible to honor the quiet presence and texture of the work.
Through continual trial and refinement, this is the method we have reached today — and we will continue to evolve it with curiosity and courage.
In pursuit of the ideal plush.