制作工程|Making Of
最終更新2026.3.4
英語版はこちらからご覧いただけます。
→ Making Of (English)
ぬいぐるみの中身を知っていますか?
カワ(皮)・ホネ(骨)・ナイゾウ(内臓)・ニク(肉)…。
実際の動物の身体構造に着想を得ながら、カピーシのぬいぐるみは、彫刻のように設計・構築されています。
金属製の「ホネ」に、ガラスペレットの「ナイゾウ」や綿などの「ニク」を取り付け、エコファーの「カワ」で覆う。
理想の一体を目指し、試行錯誤を重ねながらたどり着いたこの構造には、柔らかさと造形美の両立を実現するための工夫が詰まっています。
ここでは、カピーシのぬいぐるみがどのようにして生まれるのか——
代表的なネコ作品を例に、その制作工程の詳細をご紹介します。
各パートの合間には、試行錯誤の記録や制作裏話なども「🐈⬛ Column(コラム) 🐈⬛」としてご紹介します。
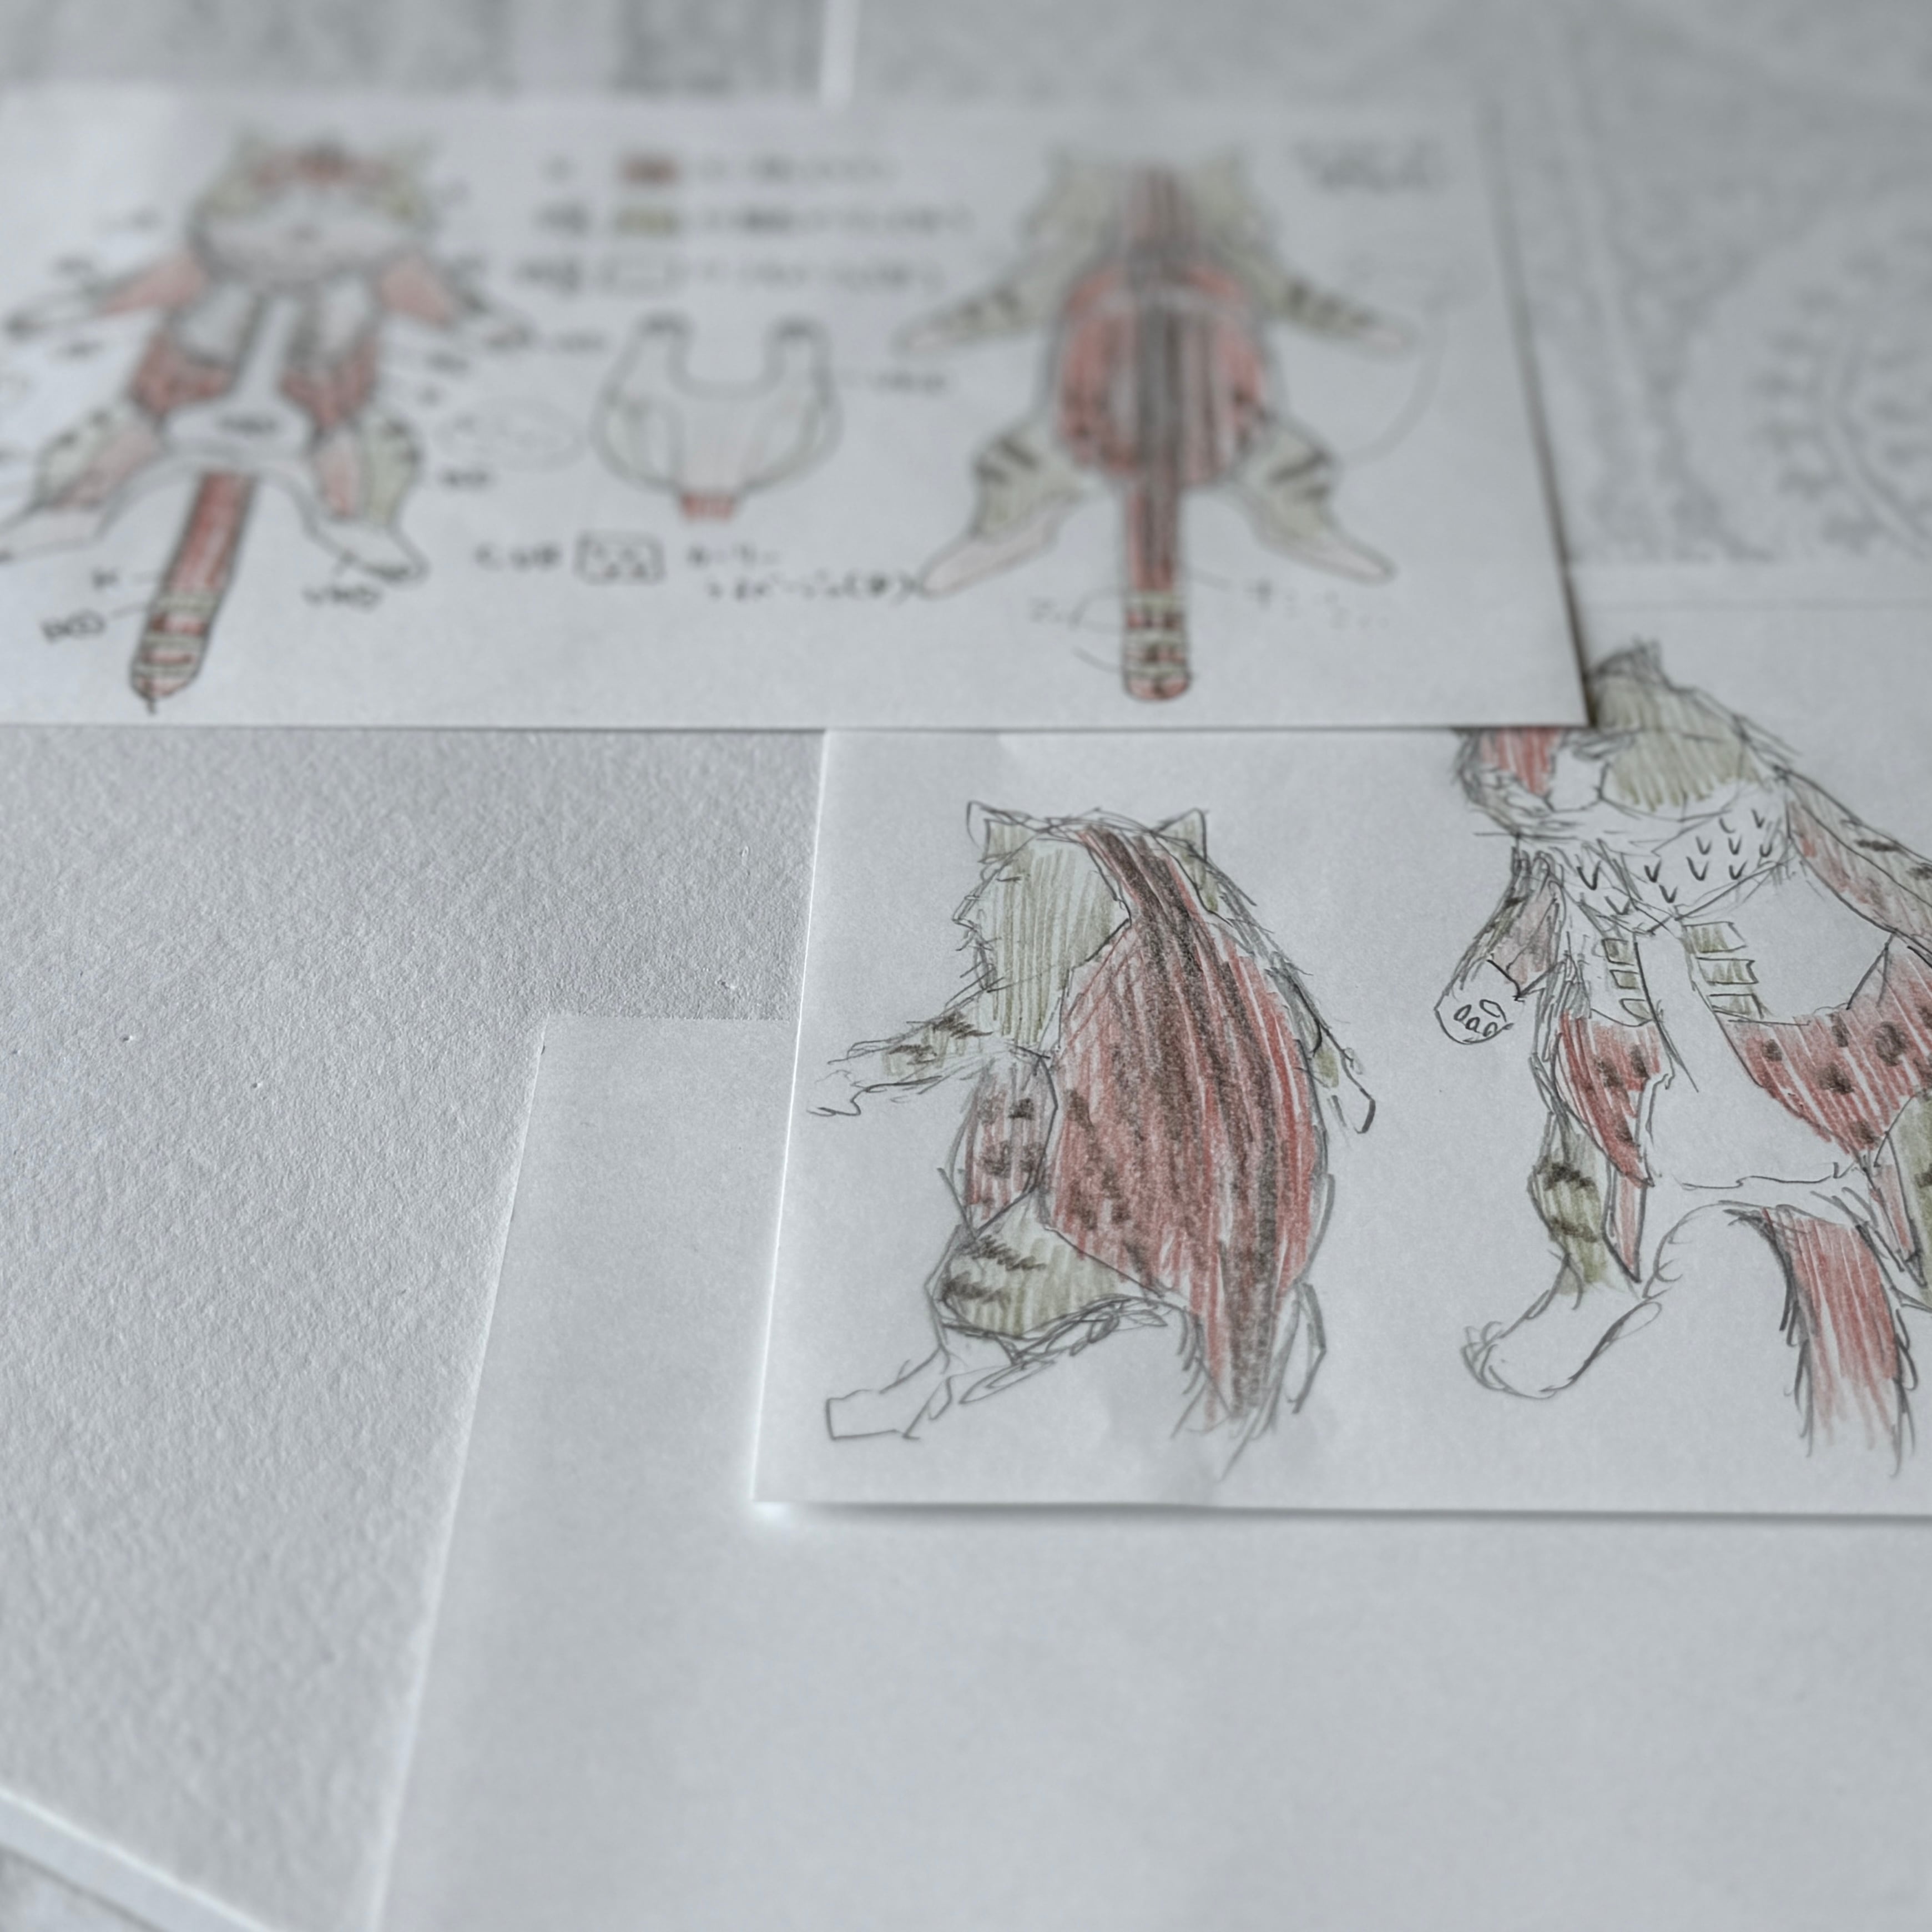
1. 粗デザインの作成
どんな作品を制作するかを企画した後、複数の資料や画像を元に粗デザインを作成し、どんなフォルムでどんなファーを使用するかをざっくり決めます。初めて制作する動物についてはその生態・習性なども参考にします。
通常販売の作品の場合は特定の一体をモデルにすることはなく、骨格はこのコを参考に、模様はこのコを参考にという形で要素別にモデルを選び、強すぎる個性は抑え、ある程度普遍的なデザインにします。
オーダー(フルオーダー)作品の場合は、ご要望を最大限反映しながらカピーシのコンセプトに則った形でデザインします。
2. 材料確保
使用部位別に各材料を紹介いたします。
⚫︎カワ
実際の動物の毛皮に相当する部分を「カワ」と呼びます。
・エコファー(アクリル、ポリエステル)
色々な毛質(直毛・短毛・カーリーファー等)、毛の長さ(長毛・短毛)、毛の色(一部柄物も含む)のファーを使用し、一つの作品に複数の毛質・長さのファーを使用することが多いです。
どのファーを使うかで作品の全体像が決まるため、適したファーが入手できなければ、あるいは染色しても望む色味にならなければ、作品の制作を断念します。実際、企画したもののファーが確保できずに制作に至ってない作品も多く、ファーの製造会社様あってのカピーシです(カピーシでは動物由来のファーは使用していません)。
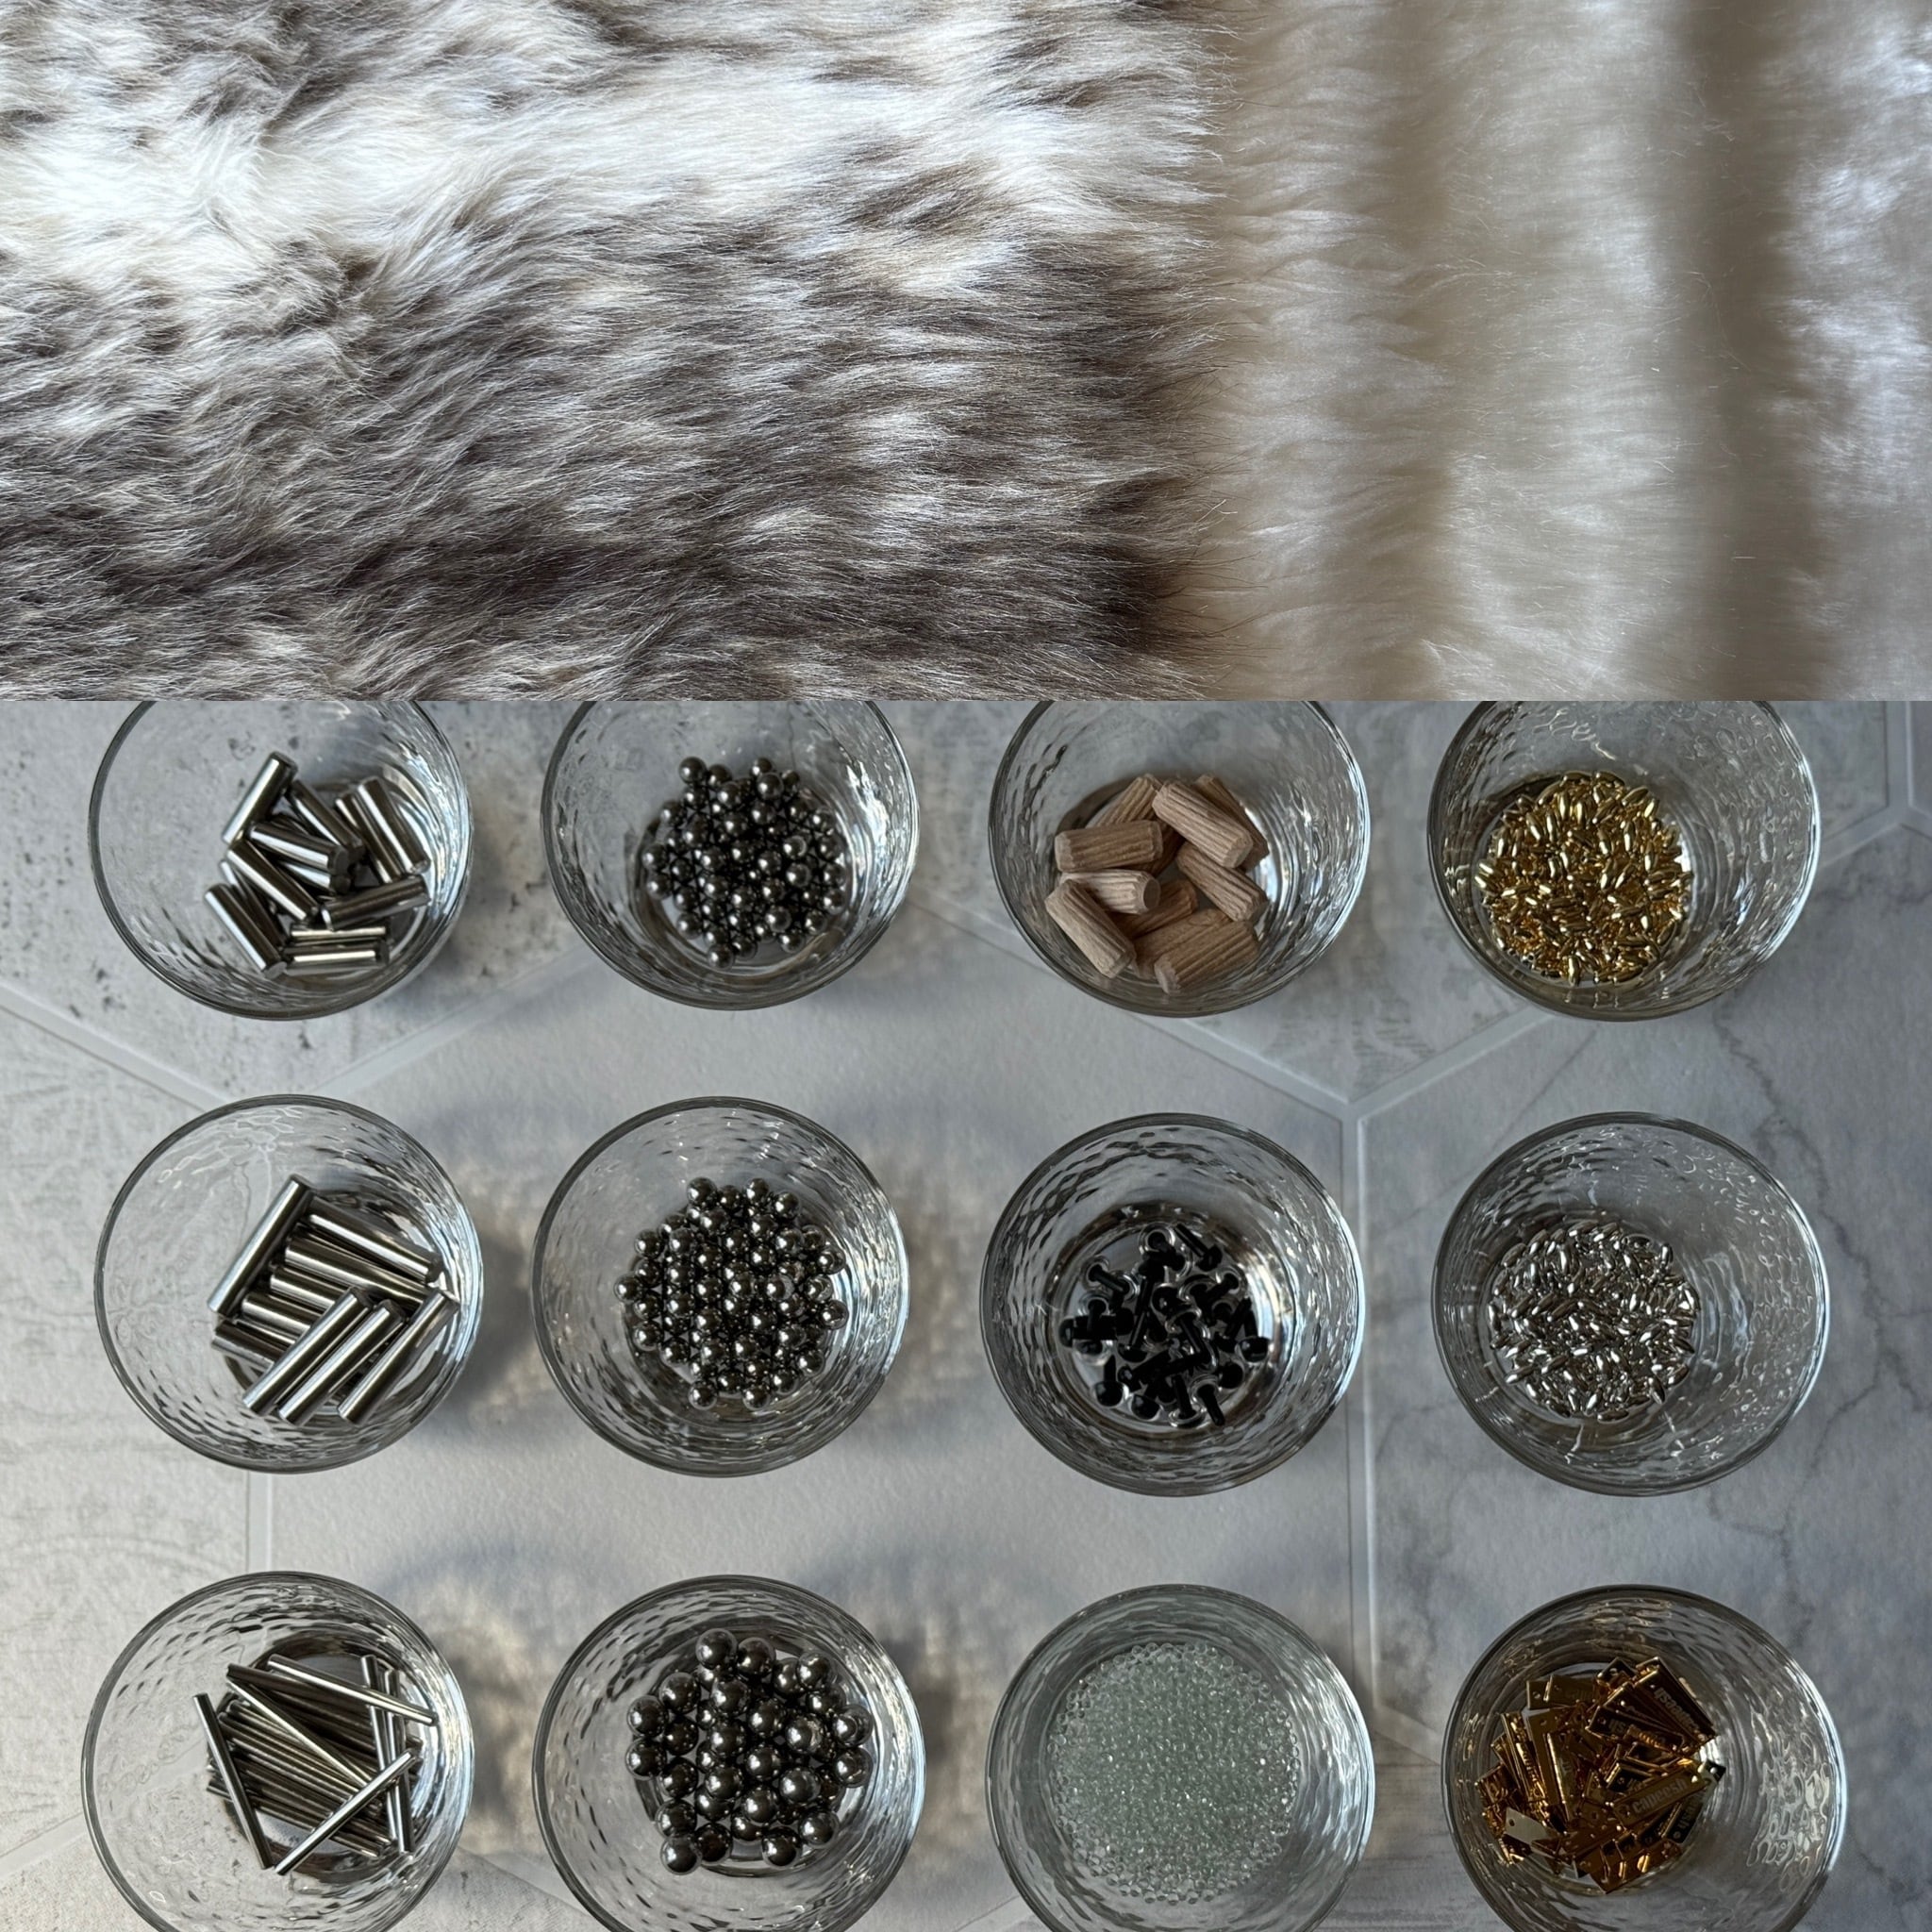
ちなみにほとんどのエコファー(フェイクファー)はリアルファー(毛皮)の構造を模して製造されて、長い刺し毛と短い綿毛の二層構造になっています。この綿毛の層は密度が高く、この層がないとボリュームを失い毛が寝てしまいます。
⚫︎ホネ
実際の動物の骨格に相当する部分を「ホネ」と呼びます。
《頭部のホネ》
・ステンレス球
・ガラスペレット
・綿
・布
《頭部以外のホネ》
・ステンレス円柱
・ステンレス球
・タングステン球
・木製円柱
・ガラスペレット
・綿
・布
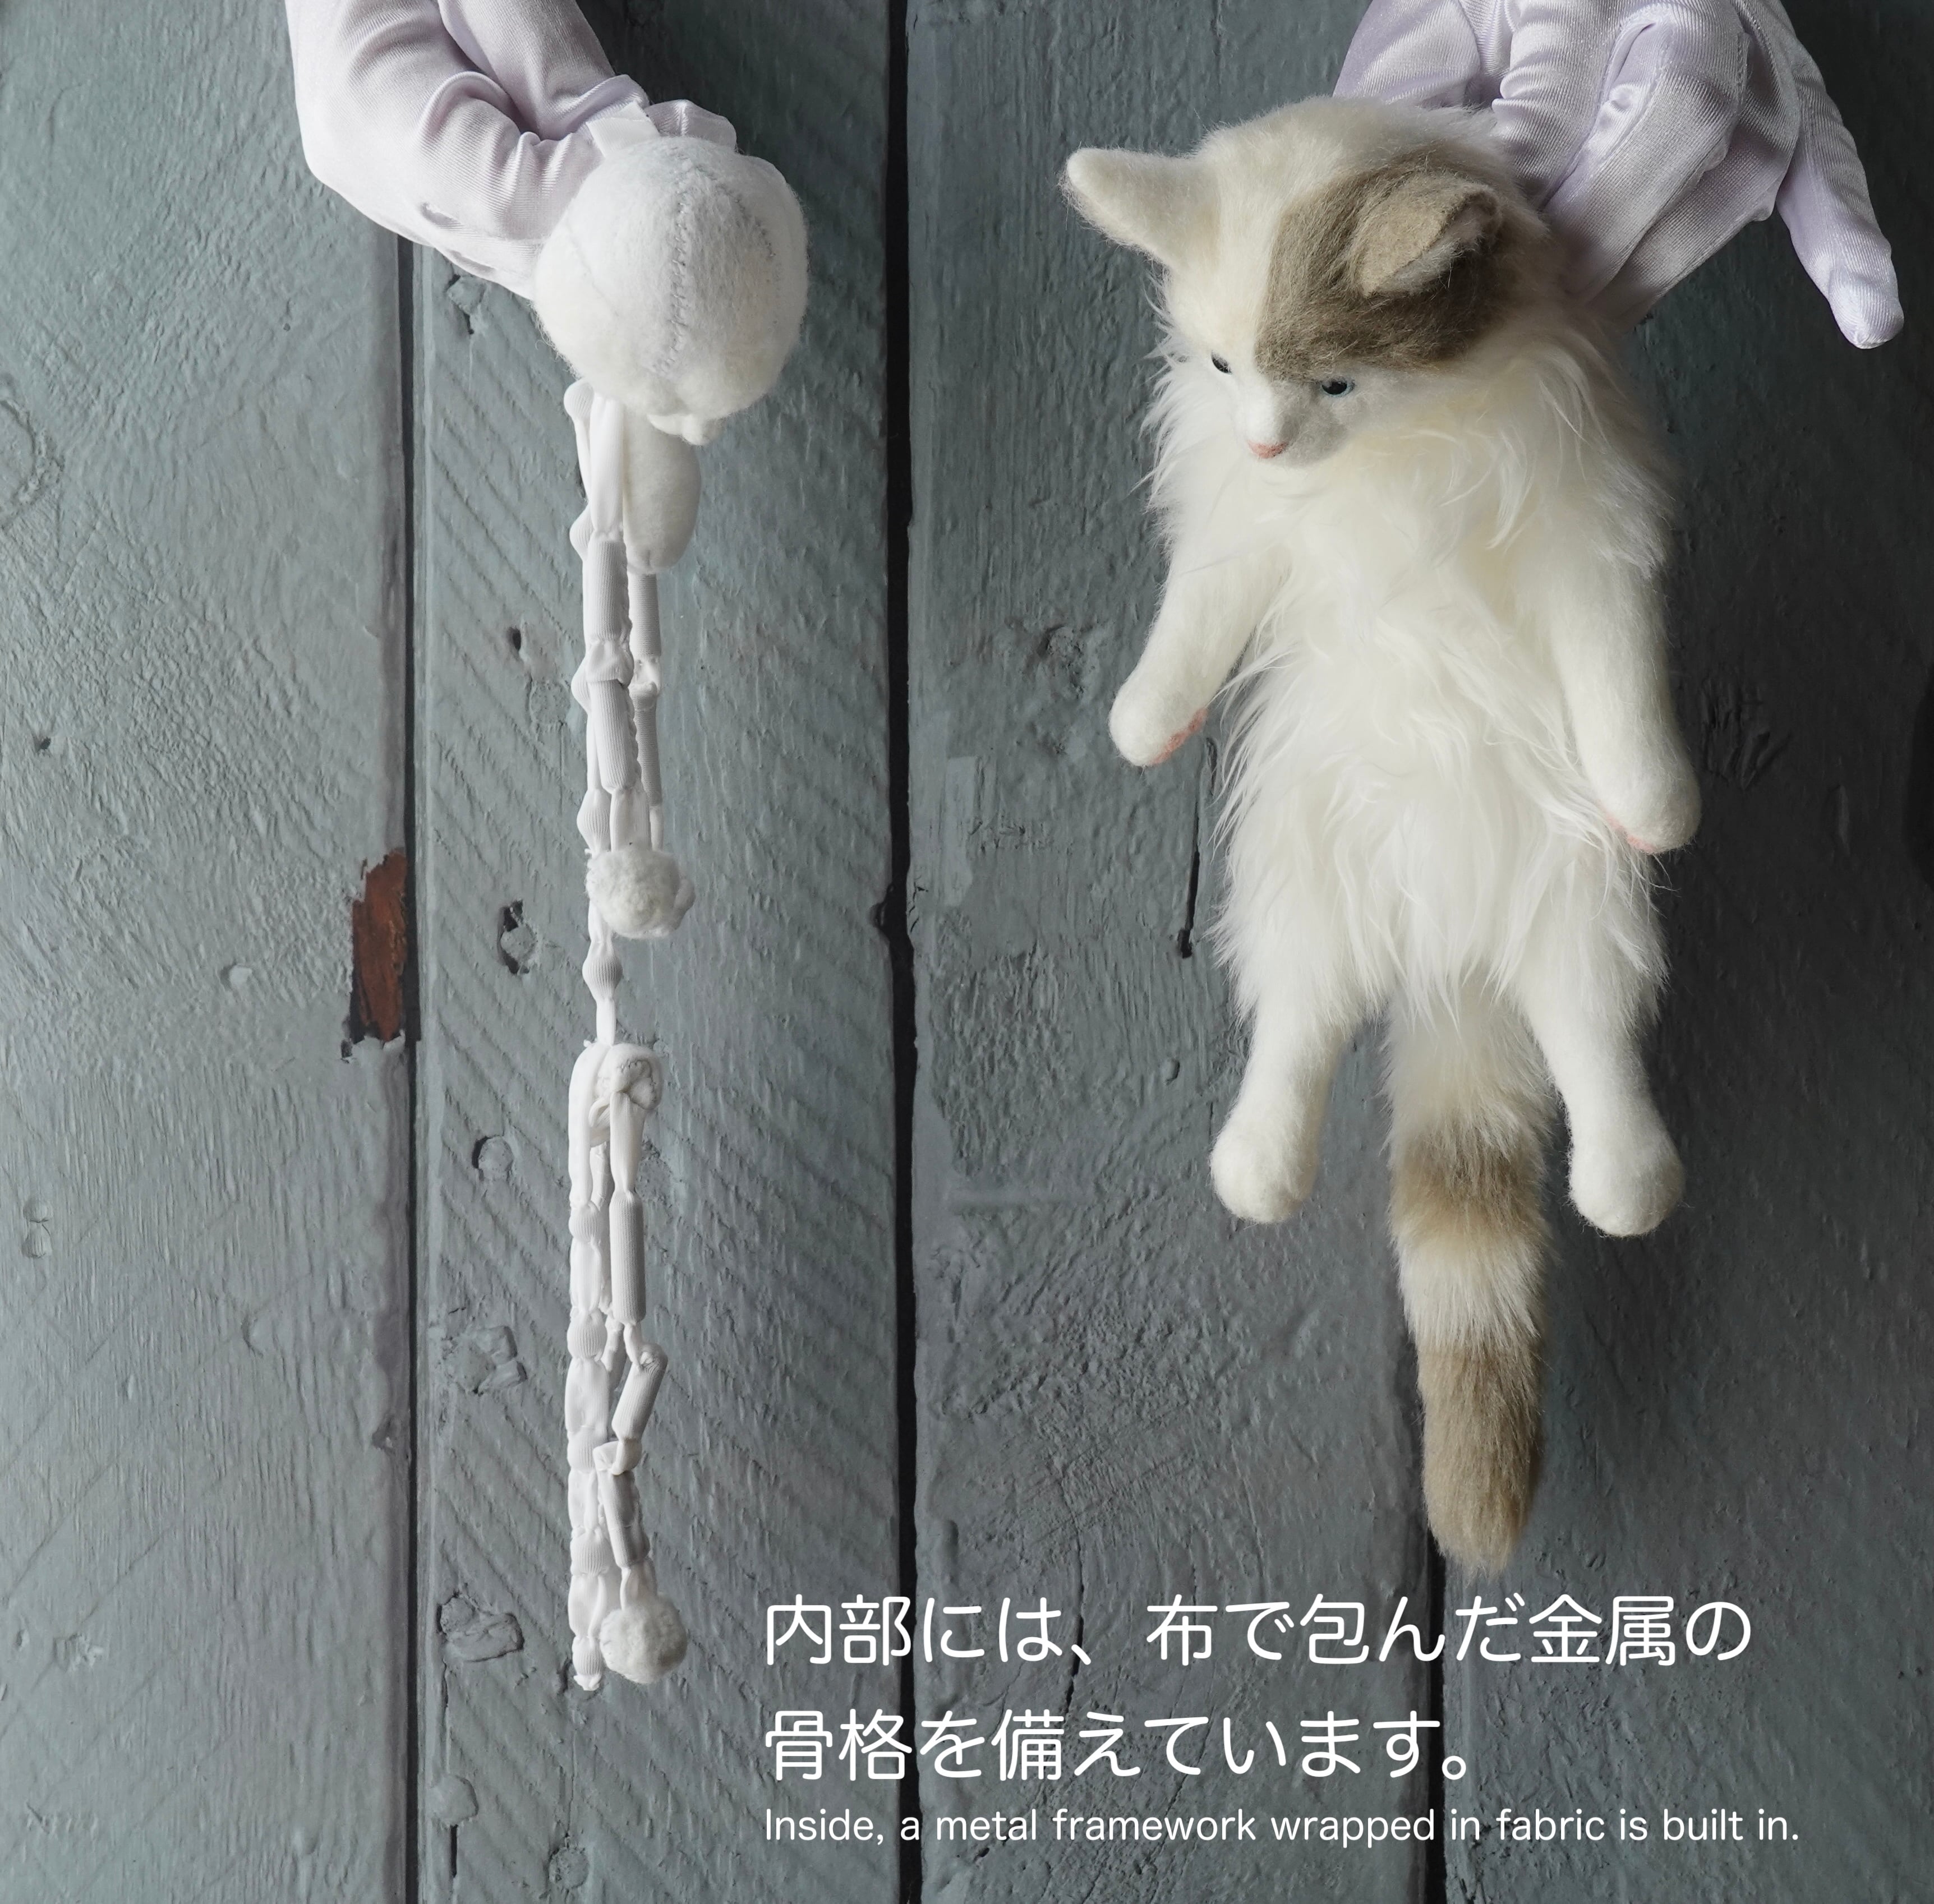
身体の内部に入れるホネは文字通り骨格(スケルトン)の役割とオモリの役割を担っています。素材は部位によってステンレス・タングステン・木材を使い分け、その一つひとつをフェルトや伸縮性のある布で包んでいます。
頭骨・背骨・尾椎(尻尾の骨)・胸郭(胸骨+肋骨)・骨盤・四肢の骨・指骨にあたるホネをそれぞれ制作していますが、解剖学上の実際の骨とは形が似ているものとそうでないものがあります。
頭骨と胸郭には、ステンレス製の球やガラスペレットをオモリとして入れ重心を調整することで、上を向いたり下を向いたりしたポージングができるようにしています。同様に胸骨にもポージングのバランスを取るためのオモリとして中にガラスペレットを入れています。
腕と脚のホネは木製ではなくダウエルピンというステンレス製の円柱を使っています。ダウエルピンは主に高精度が要求される金型部品や治具を接合する際に使われる部品で、太さも長さも色々あって、今では骨格のデザインに合わせて選べるようにたくさん常備しています。
🐈⬛ Column 🐈⬛: ダウエルピンに至るまで
最初にぬいぐるみの中にホネを入れたのは、綿を詰めた作品の形状が安定せず、膨らんだり歪んだりするのを制御するためでした。
ネコの形状は流動的で、丸くなったり長くなったりして捉えにくい。でも、中にある「絶対に変わらない骨格の部分」を押さえておけばネコの本質を見失わないのではないか、と考えたのです。この辺りは大学で学んだ彫塑の考え方が役に立ちました。
ホネを外側のカワで包んでみたら思いの外「くったり」していて可愛いのです。でも、木製のホネではファーの裏地の反発に負けてしまい手足が理想の「くったり」「だらーん」にはなりません。そこで「もっと重いホネを」と探し求め、その存在を見つけるまで、web検索では簡単には見つけられず、いろんな方面の知人に訊いたりする中でダウエルピンにたどり着きました。
🐈⬛ Column 🐈⬛: タングステンに至るまで
以前は指骨(手足のポーのホネ)にステンレスの球のみを使用していました。成猫ではそれで問題なかったのですが、四肢が短くて細い仔猫を制作する際に問題にぶつかりました。ステンレスではオモリとして軽くファーの生地の硬さに負けてしまい思うように四肢が下に垂れない。
かといって、より重いステンレスを使用するにはその分ポーを大きくしなければならない。仔猫なのでむしろポーは小さくしなければならないのに。もっと「重力に素直な」素材はないのか。
そこで同じ大きさでもステンレスより重い素材を探すことになります。
重くて入手しやすい金属を探す中で、比重(同じ体積の水の質量との比率)がステンレス(7.5~8.0)の2.5倍ほどのタングステン(19.3)にたどり着きました。金もほぼ同じ比重ですが、当然却下。
タングステンは、タイ釣りなどのルアー(擬似餌)の素材として使うものだそうで、釣具店から取り寄せています。
「水の抵抗が小さいままルアーを素早く深くに沈めたい」という釣り人と「小さいぬいぐるみでも手足をくったりさせたい」というぬいぐるみ作家による重力への想い。
今では仔猫だけでなく成猫も含め全ての作品のポーにもステンレスと組み合わせる形でタングステンを使用しています。
⚫︎ナイゾウ
実際の動物の内臓に相当する部分を「ナイゾウ」と呼びます。
・ガラスペレット
・布
ナイゾウとしてガラスペレットを布袋に入れたものをホネに繋げる形で腹部に入れています。これはお腹の中でオモリの役割を担います。
大きなお腹、予想されるポーズによっては、袋の形状や個数を変えています。内部のペレットが計算通りに動いてくれると、自然な姿勢や形状が保たれます。
そもそもぬいぐるはstuffed animals(詰め込まれた動物)。一般的にもぬいぐるみは、中にパンパンに綿を詰め込んでいるイメージが強いですが、カピーシの作品の内部は、柔軟性を維持するために空洞が多く、綿はむしろ少なく、布で包まれた金属や木材やガラスペレットが入っています。
⚫︎ニク
実際の動物の筋肉・脂肪に相当する部分を「ニク」と呼びます。
・エコファー(アクリル、ポリエステル)
・綿
頭部やポーに綿を付けたり、四肢にファーを巻くことで大きさを調整し、首などの一部に綿を入れることで「くったりし過ぎず、硬くなり過ぎず」の調整をしています。
⚫︎目
・差し目(アクリル)
作品によって、現在直径4.5mm、6mm、7.5mm、9mm、10.5mmの4種を使い分けています。
カピーシでは内省的な雰囲気・ヒトの赤ちゃんのような佇まいを意識して制作しており、その表現の一つとして、本物の動物よりやや小さい目を使用するようにしています。
⚫︎耳
・エコファー(アクリル、ポリエステル)
・フェルト
ファーでフェルトを挟む三重構造。耳の内側にはタフト(耳の毛)をつけています。
場合によって、リンクスティップと呼ばれる耳先から飛び出た毛も制作します。
⚫︎肉球
・ニードルフェルト
・ビーズ
肉球は、ニードルフェルトか、ビーズ(色はゴールドまたはシルバー)で表現しています。
ニードルフェルトの方がリアルですが、柔らかい肉球を敢えて硬いビーズにして足元にキラリとアクセントを加えた作品も魅力的です。また爪をビーズで表現することもあります。
⚫︎タグ
・真鍮
この作品の静かな署名として、尻尾の付け根に真鍮タグを添えています。
3. 材料の加工
・ファーの染色
入手できるファーでは、色の選択肢が著しく少ないため、多くの場合はファーを染色し、その後コーティング処理を行います。
🐈⬛ Column 🐈⬛: ファーの染色の難易度
多くのエコファーは、毛はアクリル製、裏地はポリエステル製です。裏地は比較的色を吸収しやすいのですが、毛は色素の定着に限界があります。染色を繰り返すことで濃くすることもできますが、そうするとファーの毛質が劣化しかねません。
また、染色は再現が難しく、ファーの質、染料に漬ける時間、水温や室温等によって、色味が微妙に異なってきます。また、濡れた状態では発色が異なるため、小さくカットしたファーを染めて乾かすという染色実験を経る場合もあります。
白いファーだけでなく、最初から着色されたファーも染色しますが、引き算(脱色)はできず、小さい足し算(染色)しかできないため、色の幅には限界があります。その限られた選択肢の中から動物の色を決めるため、デザインより前にファーの確保が必要になります。
ようやくファーが揃うとそこに動物の気配を感じられるようになります。
・ホネ袋
それぞれのホネを包むためのフェルトと伸縮性のある布を切り出し、一つひとつを包んで縫っていきます。このホネ袋のための型紙も適宜更新しながら改良しています。
このホネ袋は、ホネとホネを繋ぐ関節の役割も果たすため、その間隔の開け方も非常に重要です。
・ナイゾウ袋
お腹の中に入れるナイゾウのための布を切り出します。布には、ガラスペレットが内部で流動させられるような柔らかさと、その重みを抱えることのできる厚さが必要です。
ナイゾウは、作品によって、その数や形状が異なります。
4. 設計図の作成
・設計図
フォルムに合わせて構造やホネの繋ぎ方を設計図に起こします。
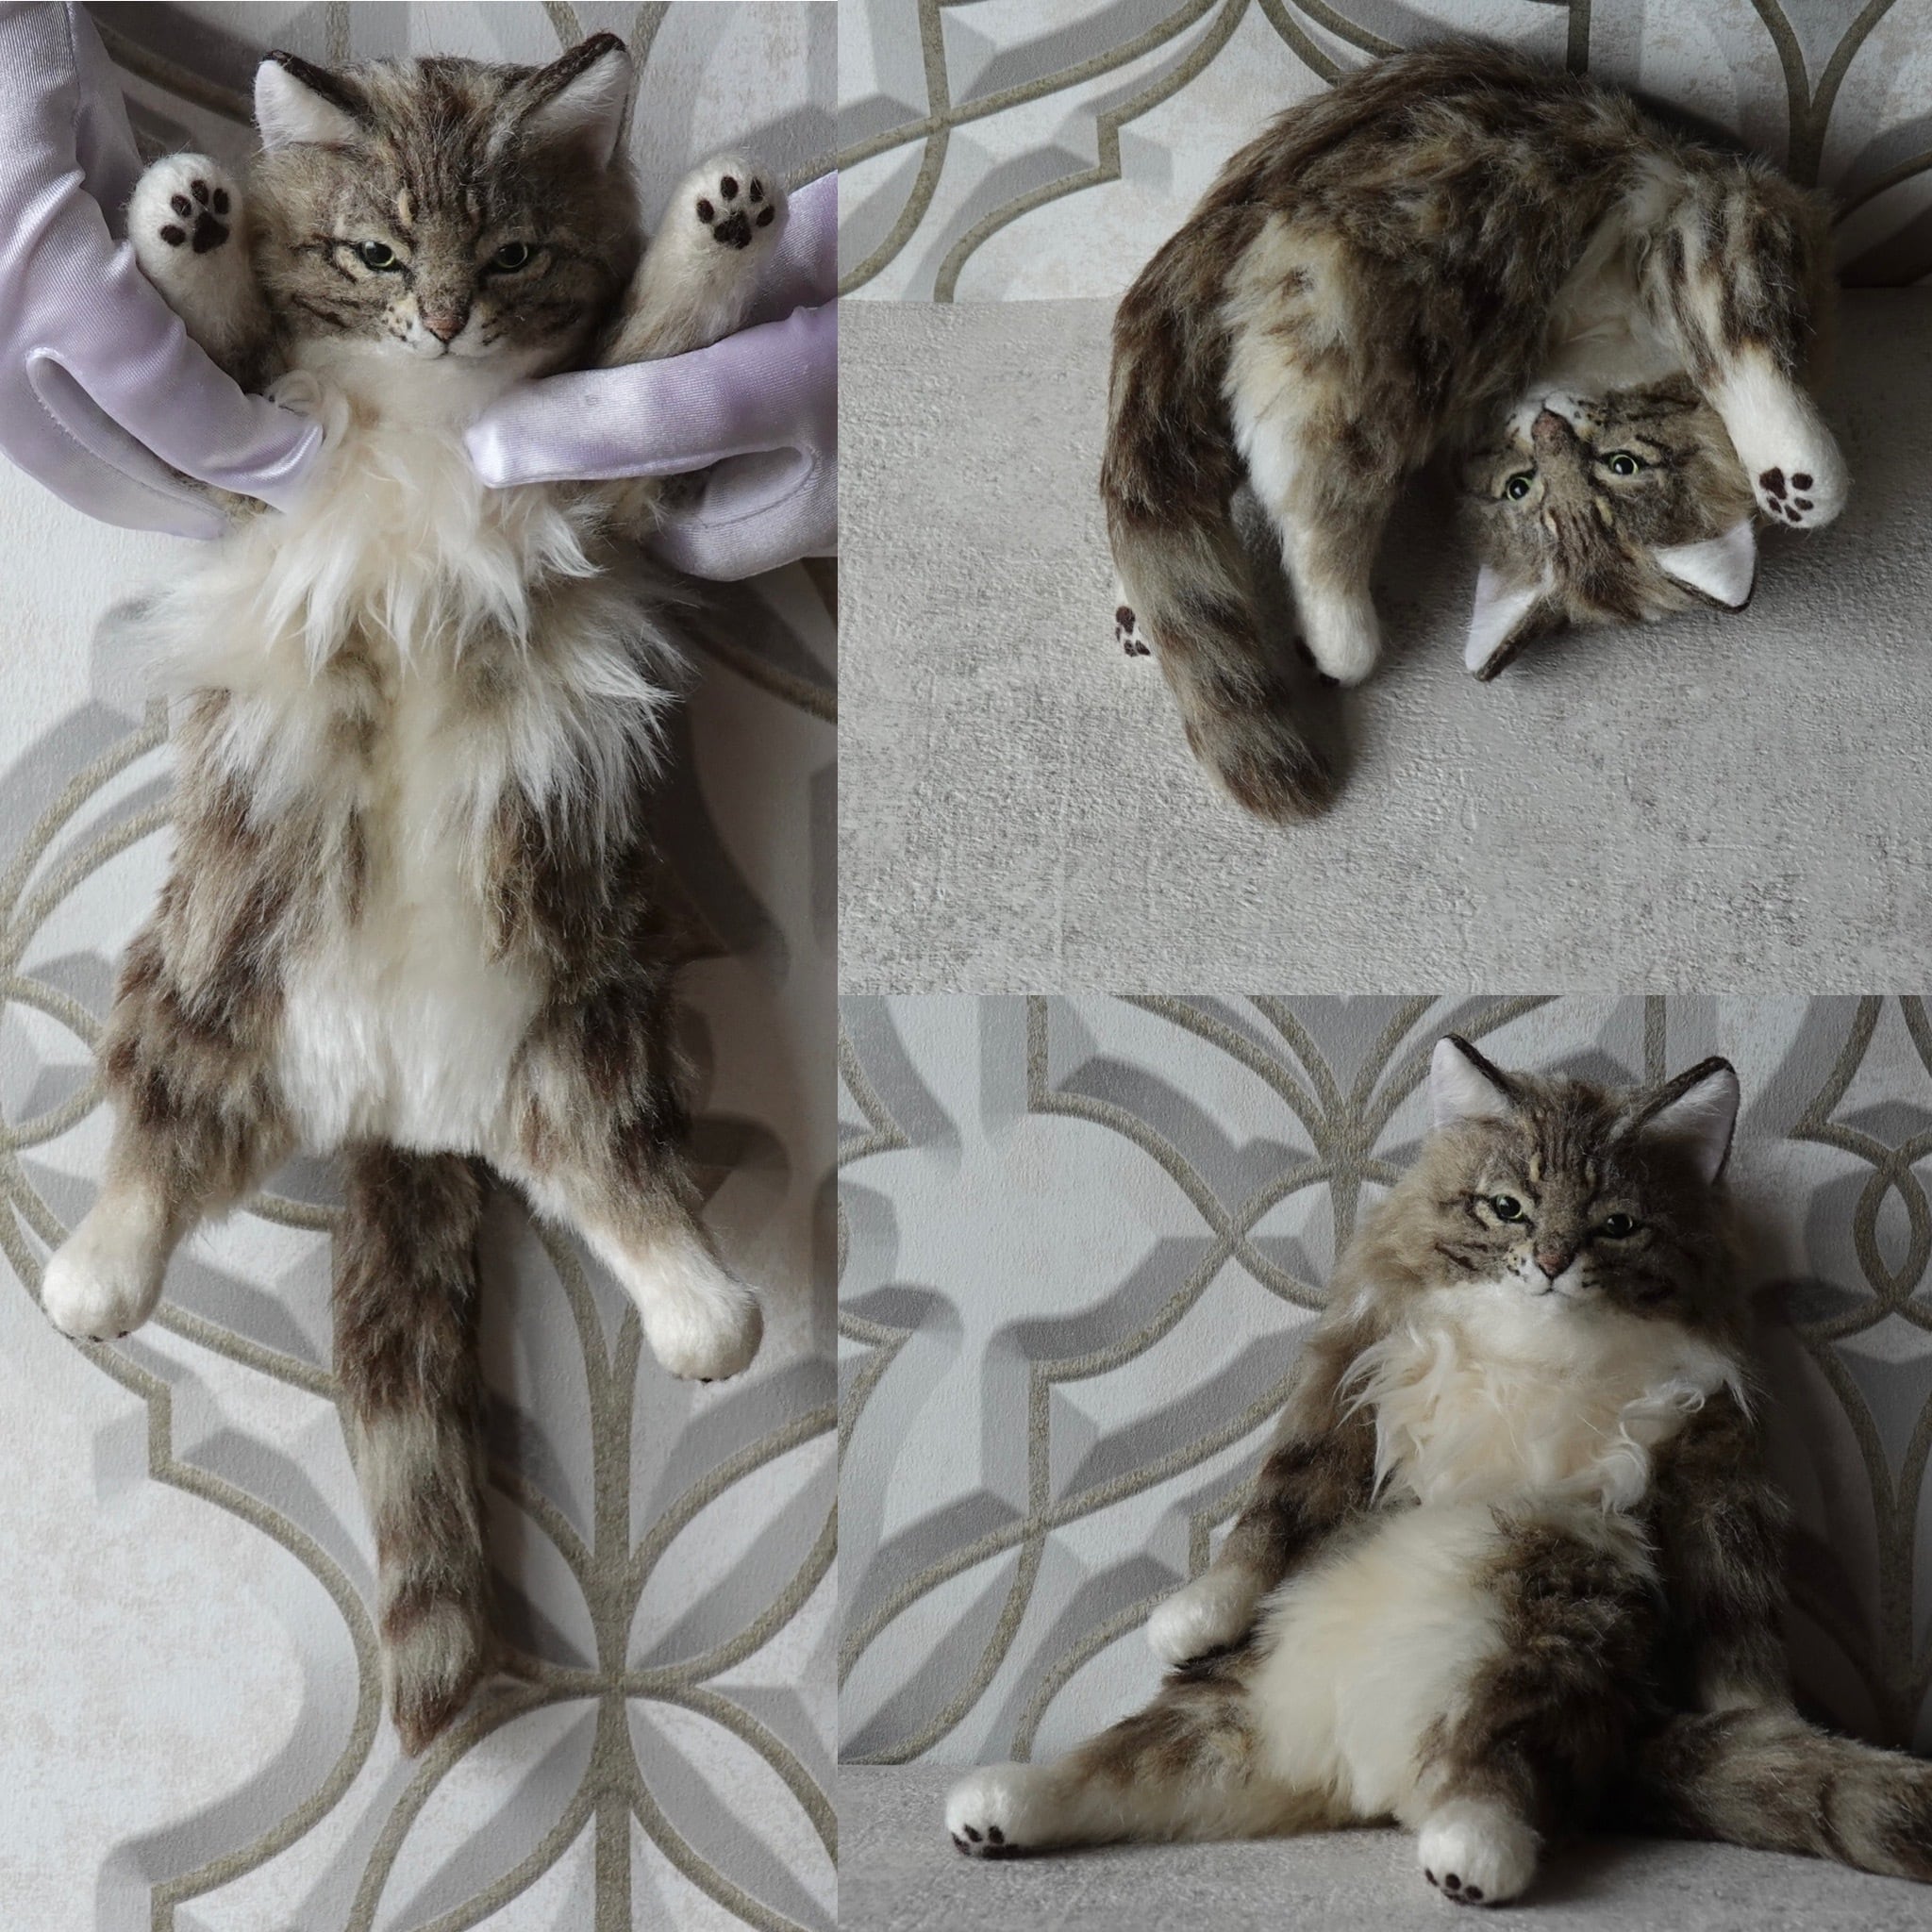
資料写真やデザイン画、時には粘土でイメージフォルムを確認しながら、どのような形状にデフォルメして制作するかを決めます。カピーシのぬいぐるみは、テディベア座りで飾っていただくことを前提にしているので、その形状を第一に考え、合わせてへそ天やうつ伏せ、バンザイなども最大限可能になるような形状を模索します。型紙の工夫によって可動域を広げたり、ホネの重さや長さ、ナイゾウ袋の個数や位置などを工夫することで、ポーズが自然に美しく出来るよう、ひとつひとつの個体ごとに設計します。
・デザイン画
使用するファーを揃えて、ファーの質・毛足の長さ・色を指定するための最終的なデザイン画を作成します。頭部ができてからそのキャラクターや色の配分によってデザインを調整することも多く、実際に全体のデザインが確定するのは頭部の仮完成後になります。
5. 組立・裁縫
ここから本格的な制作に入ります。
⚫︎背骨・尻尾以外のホネ(頭骨・四肢・肋・骨盤・尻尾)を作る
頭のホネは、元になる動物の頭骨を参考にし、これからの作業工程を考えながらニクの部分も考慮して作ります。タテガミなどで下膨れに見える頭は必要に応じてホネの段階で下膨れにしておくこともあります。耳の取り付け位置をホネの段階で決めて土台を確保しておくのが難しいところです。
その他のホネは設計図通りに作成します。くったり感維持のため関節を固定しないので、出来るだけあらぬ方向に関節が曲がらないよう製法の工夫をしています。
⚫︎ナイゾウを作る
布で出来た袋の中にガラスペレットを入れて作ります。袋自体の大きさ、ペレットの分量、取り付け個数はそれぞれの個体によって違います。例えば、お腹がふっくらしていて座るときに後ろ側に重心が来るシロクマなどは、お尻とその少し上のお腹、2箇所にナイゾウ袋を取り付けます。上体を後ろに倒した時はお腹のペレットが背中側へ流れ骨盤辺りで重心となり、前傾姿勢の際はお腹側の地面に近い部分で上体を支えています。
⚫︎型紙を作る
設計図を元に型紙をおこします。
初めて制作する動物などは仮の型紙を作成し、縫製時の様子を見ながら少しずつ微調整していきます。
デフォルトとなる「基本のネコ」の型紙はありますが、更新を繰り返しており、またカワの模様を型紙に反映するため、全く同じ型紙で制作することはほとんどありません。
表出する模様がファーの毛足の長さ分だけ型紙からズレるため、それを考慮して型紙に反映します。
🐈⬛ Column 🐈⬛:型紙の変遷
開発初期は、なるべく継ぎ接ぎしているとわかる箇所が少なくなるように型紙を取りました。
ちょうど良いファーの毛足の長さが特定され、継ぎ接ぎ部分の心配がなくなり、形状のリアルさを優先して型紙をとることができるようになりましたが、あまり細部まで作りこみ過ぎると、カワ全体が固くなり安定性も失われるため、そのちょうど良い塩梅を考えながら型紙を取ります。模様などの縫い合わせが多くなるなど場合によっては、元の型紙を変更し、模様の切り替えと一緒に立体を表現するよう工夫しています。
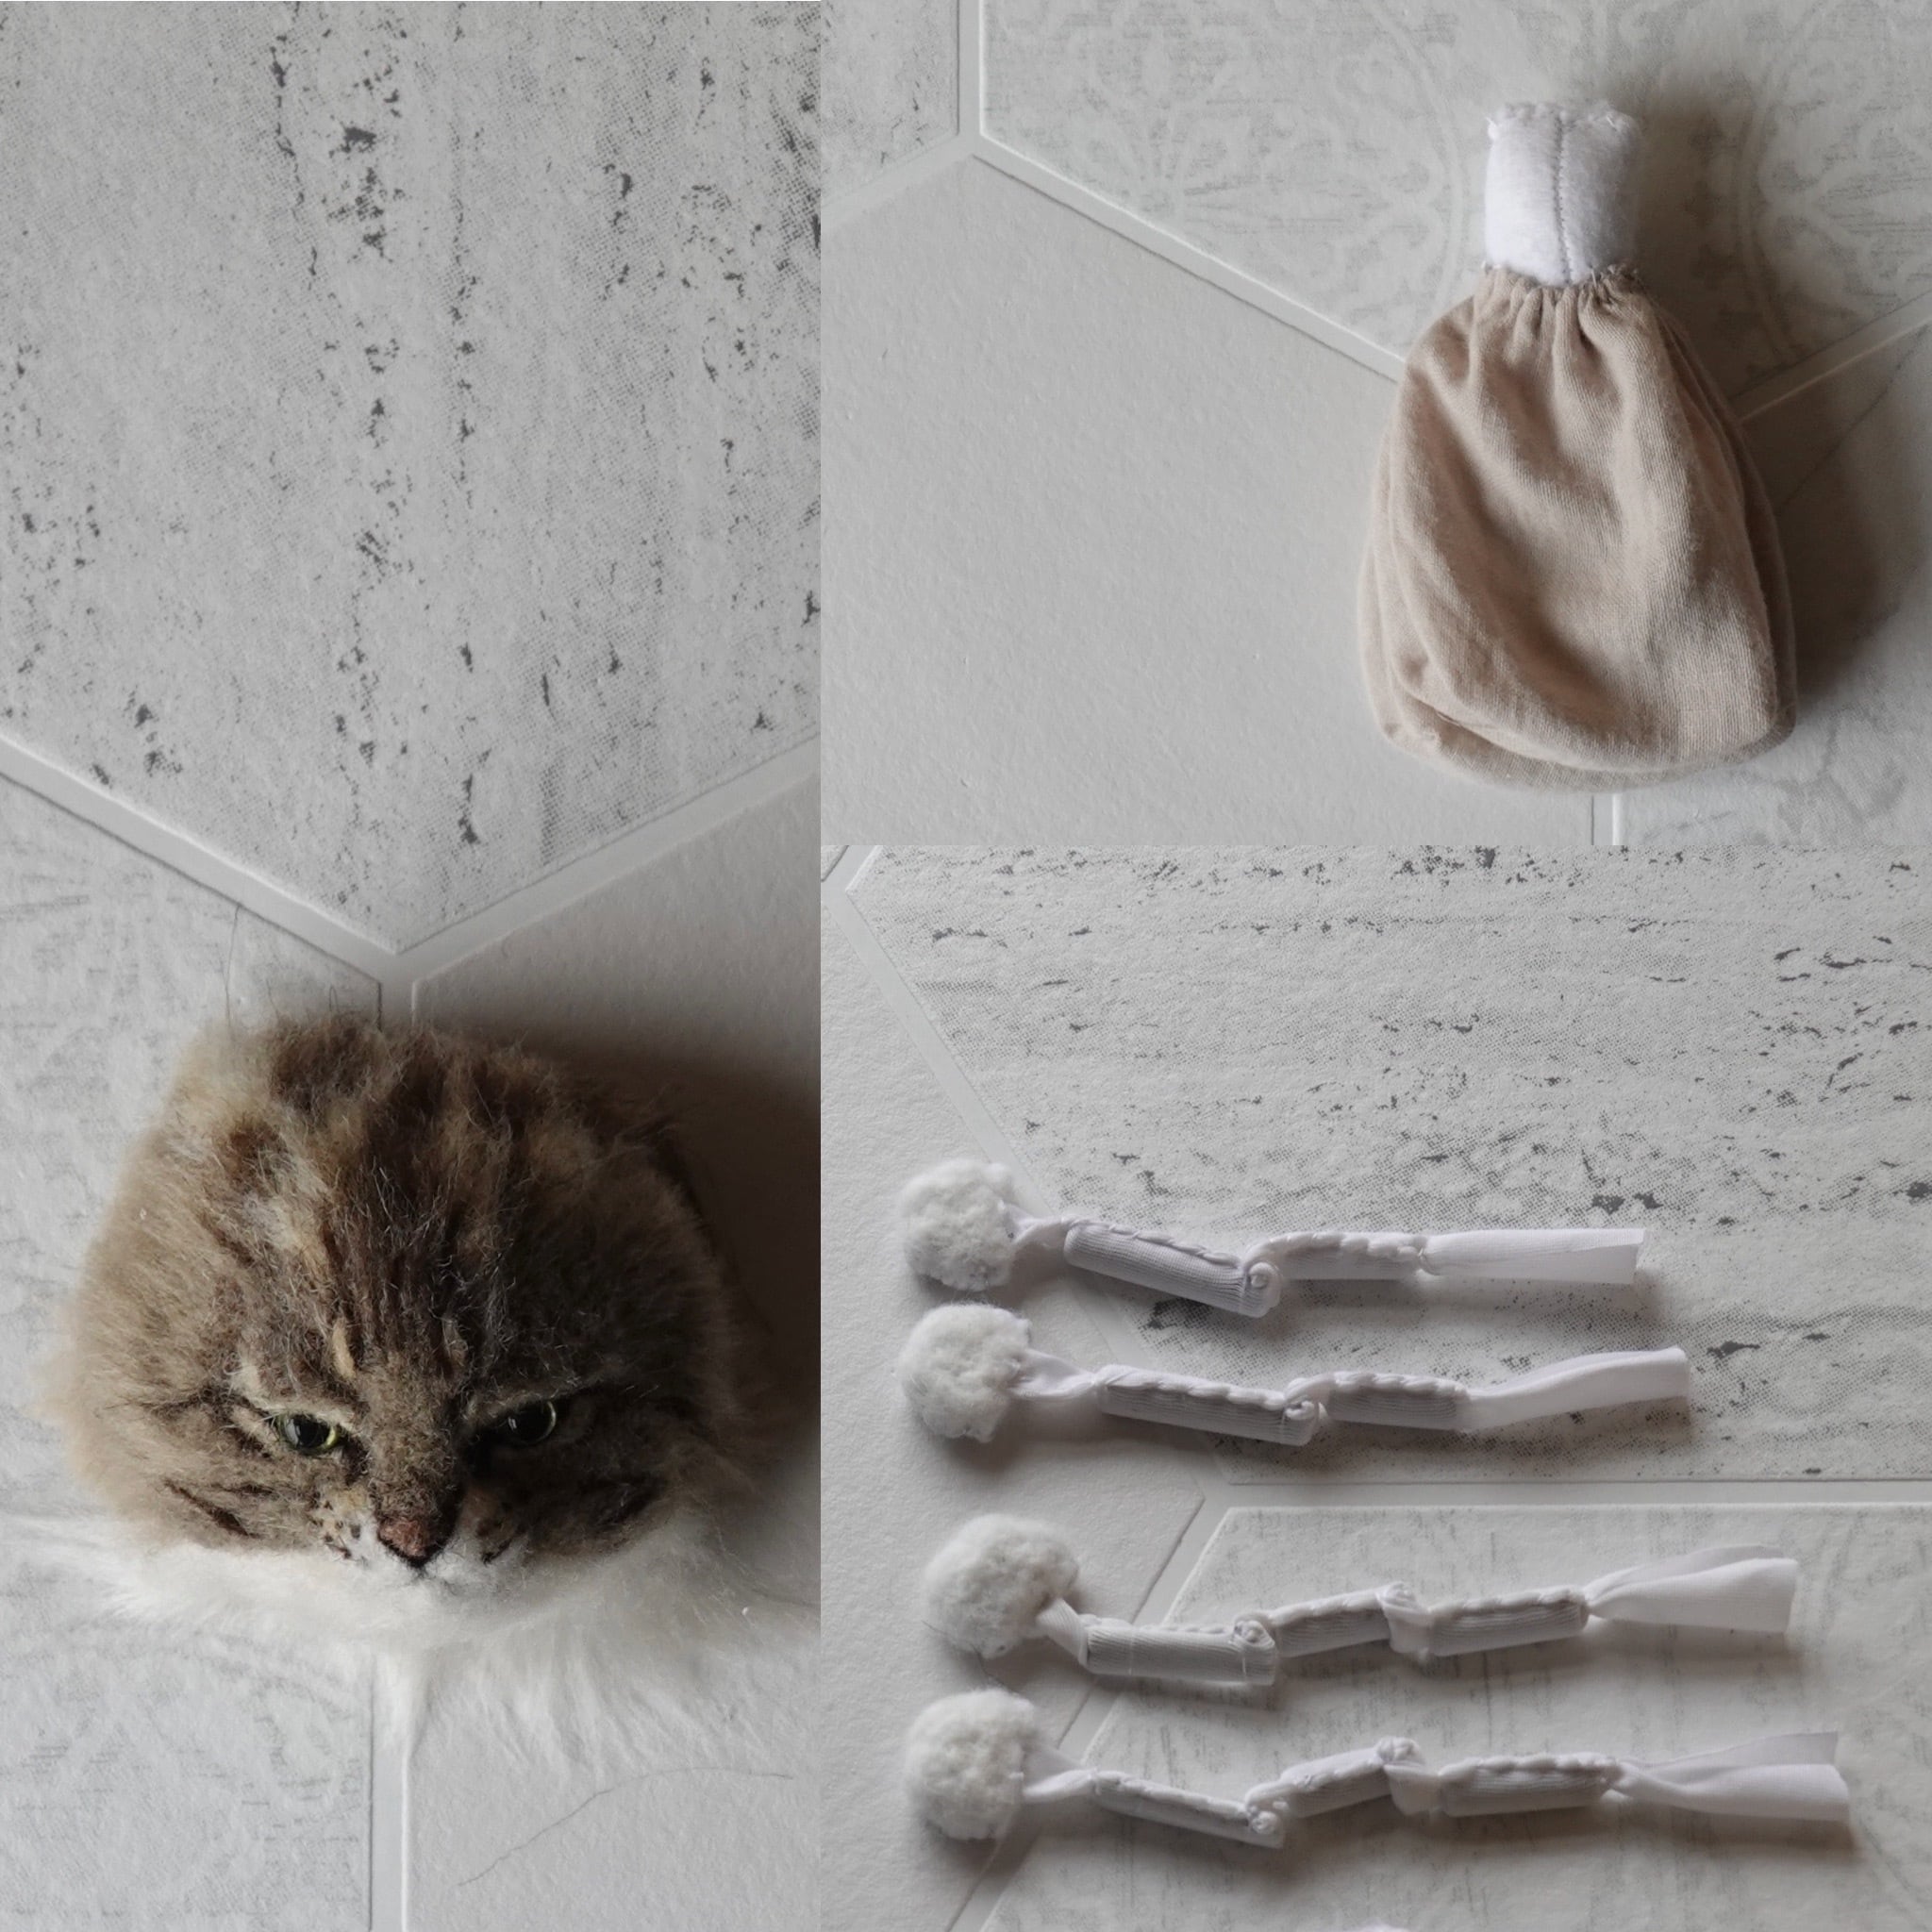
⚫︎頭部を作る
頭部は、あらかじめ作成したホネにファーを乗せていく要領で制作します。
ホネには頭部の重さを再現し、うつむいたり空を仰いだり出来るように各箇所にオモリを内臓します。
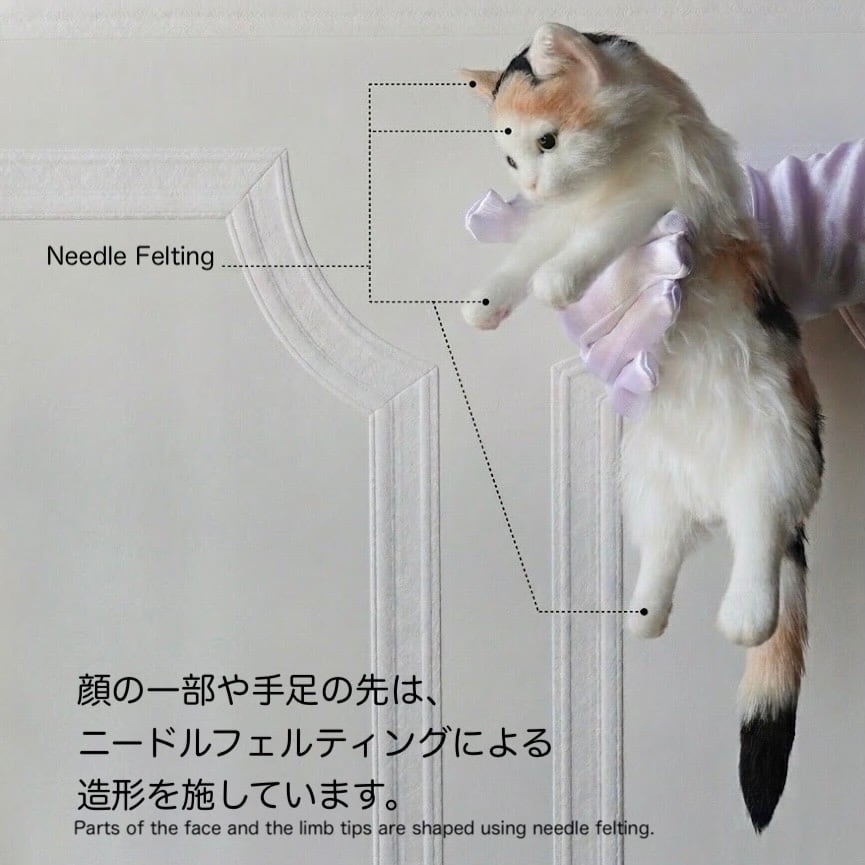
その後、ホネに綿で肉付けをし、目の位置を決め、ファーを乗せていきます。顔にはファーの毛足の長さを活かす部分とニードルフェルティングで細部を作り込む部分があります。
目は制作途中で傷が付く可能性があるため、仮の差し目を入れておき、完成直前に入れ替えます。
🐈⬛ Column 🐈⬛:ニードルフェルティング
ニードルフェルトの技法が日本に入ってきた頃、嬉々として色々なものを作りました。フェルティングの技法は粘土の彫塑に似ていて楽しかったのですが、次第にその製法が「直接的」だと感じ私には合わないように思うようになりました。
もう少し制約がある方がいい。もう少し不確実性がある方がいい。そこで、ぬいぐるみ制作に移行しました。ところが、ぬいぐるみの解像度が上がるにつれ、ファーを縫い合わせて顔のリアルな曲線や表情を出すためには、物凄くたくさんのパーツのはぎ合わせや超短毛のファーが必要となり、縫い合わせるにはあまりに細か過ぎる。
そうしてフェルティング技法を思い出すに至ります。今では顔と四肢の先はその技法を採用しています。改めてフェルティング技法の面白さと難しさ、その奥深さを実感しているところです。
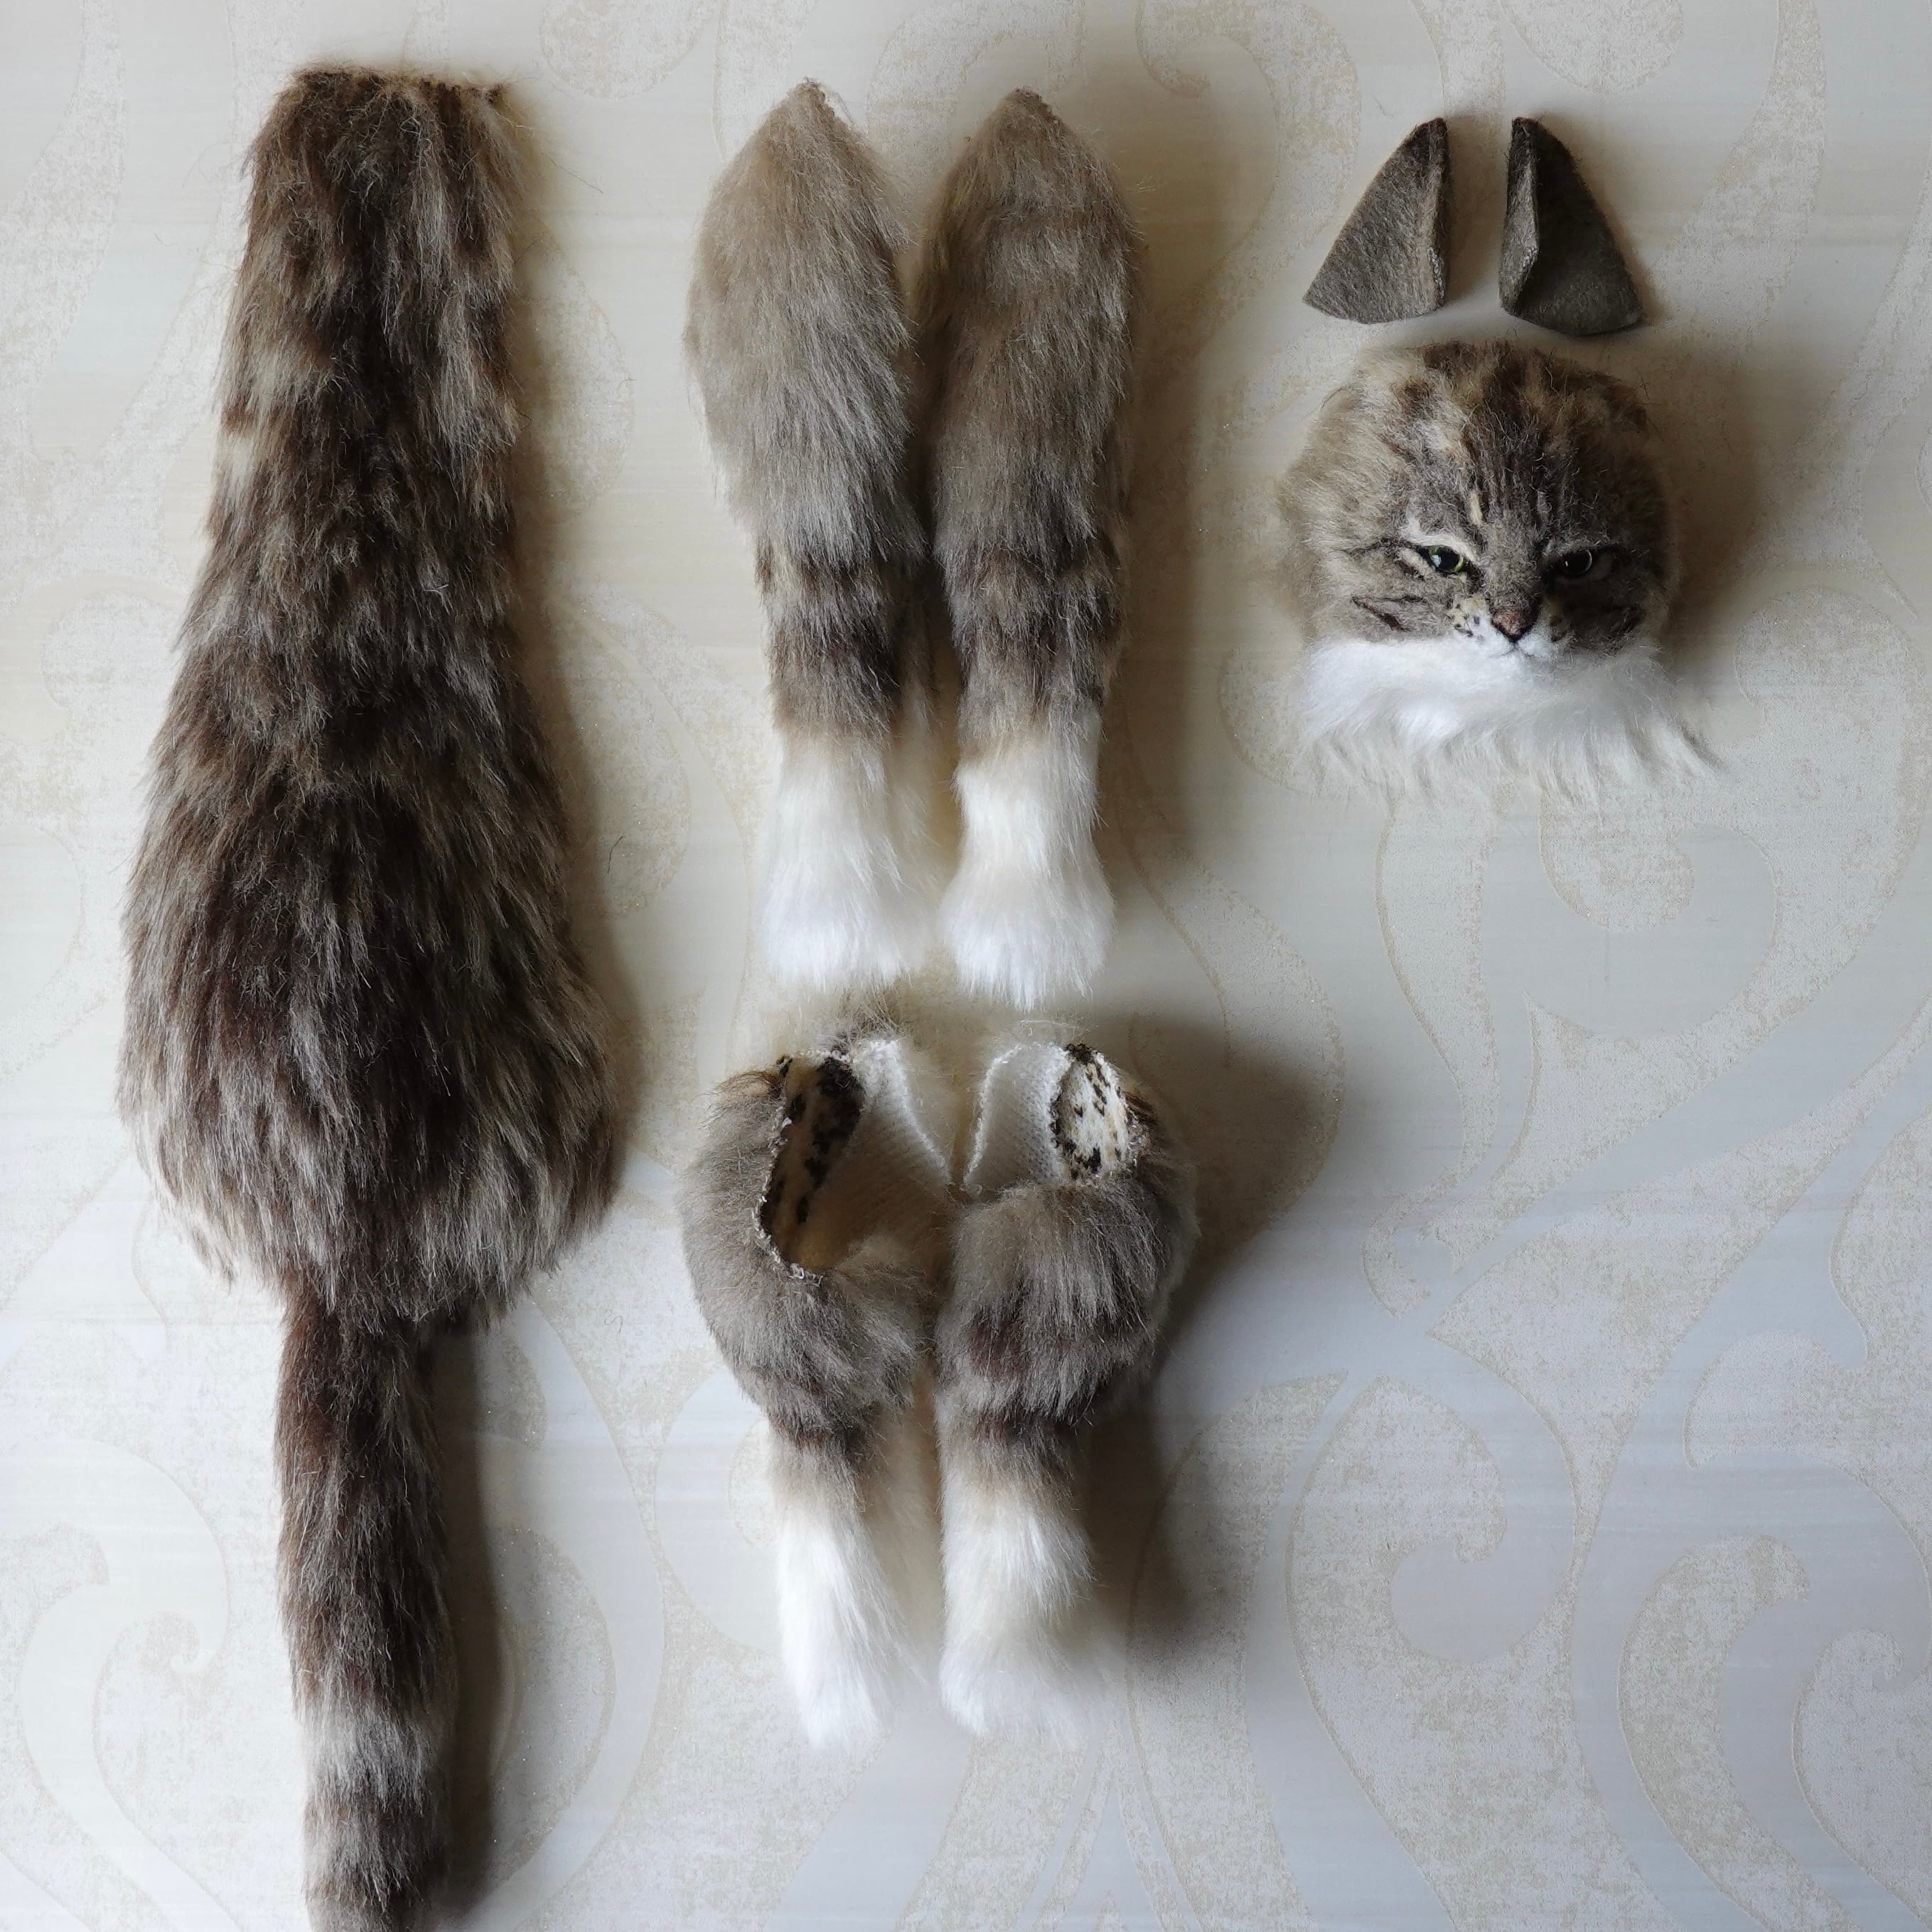
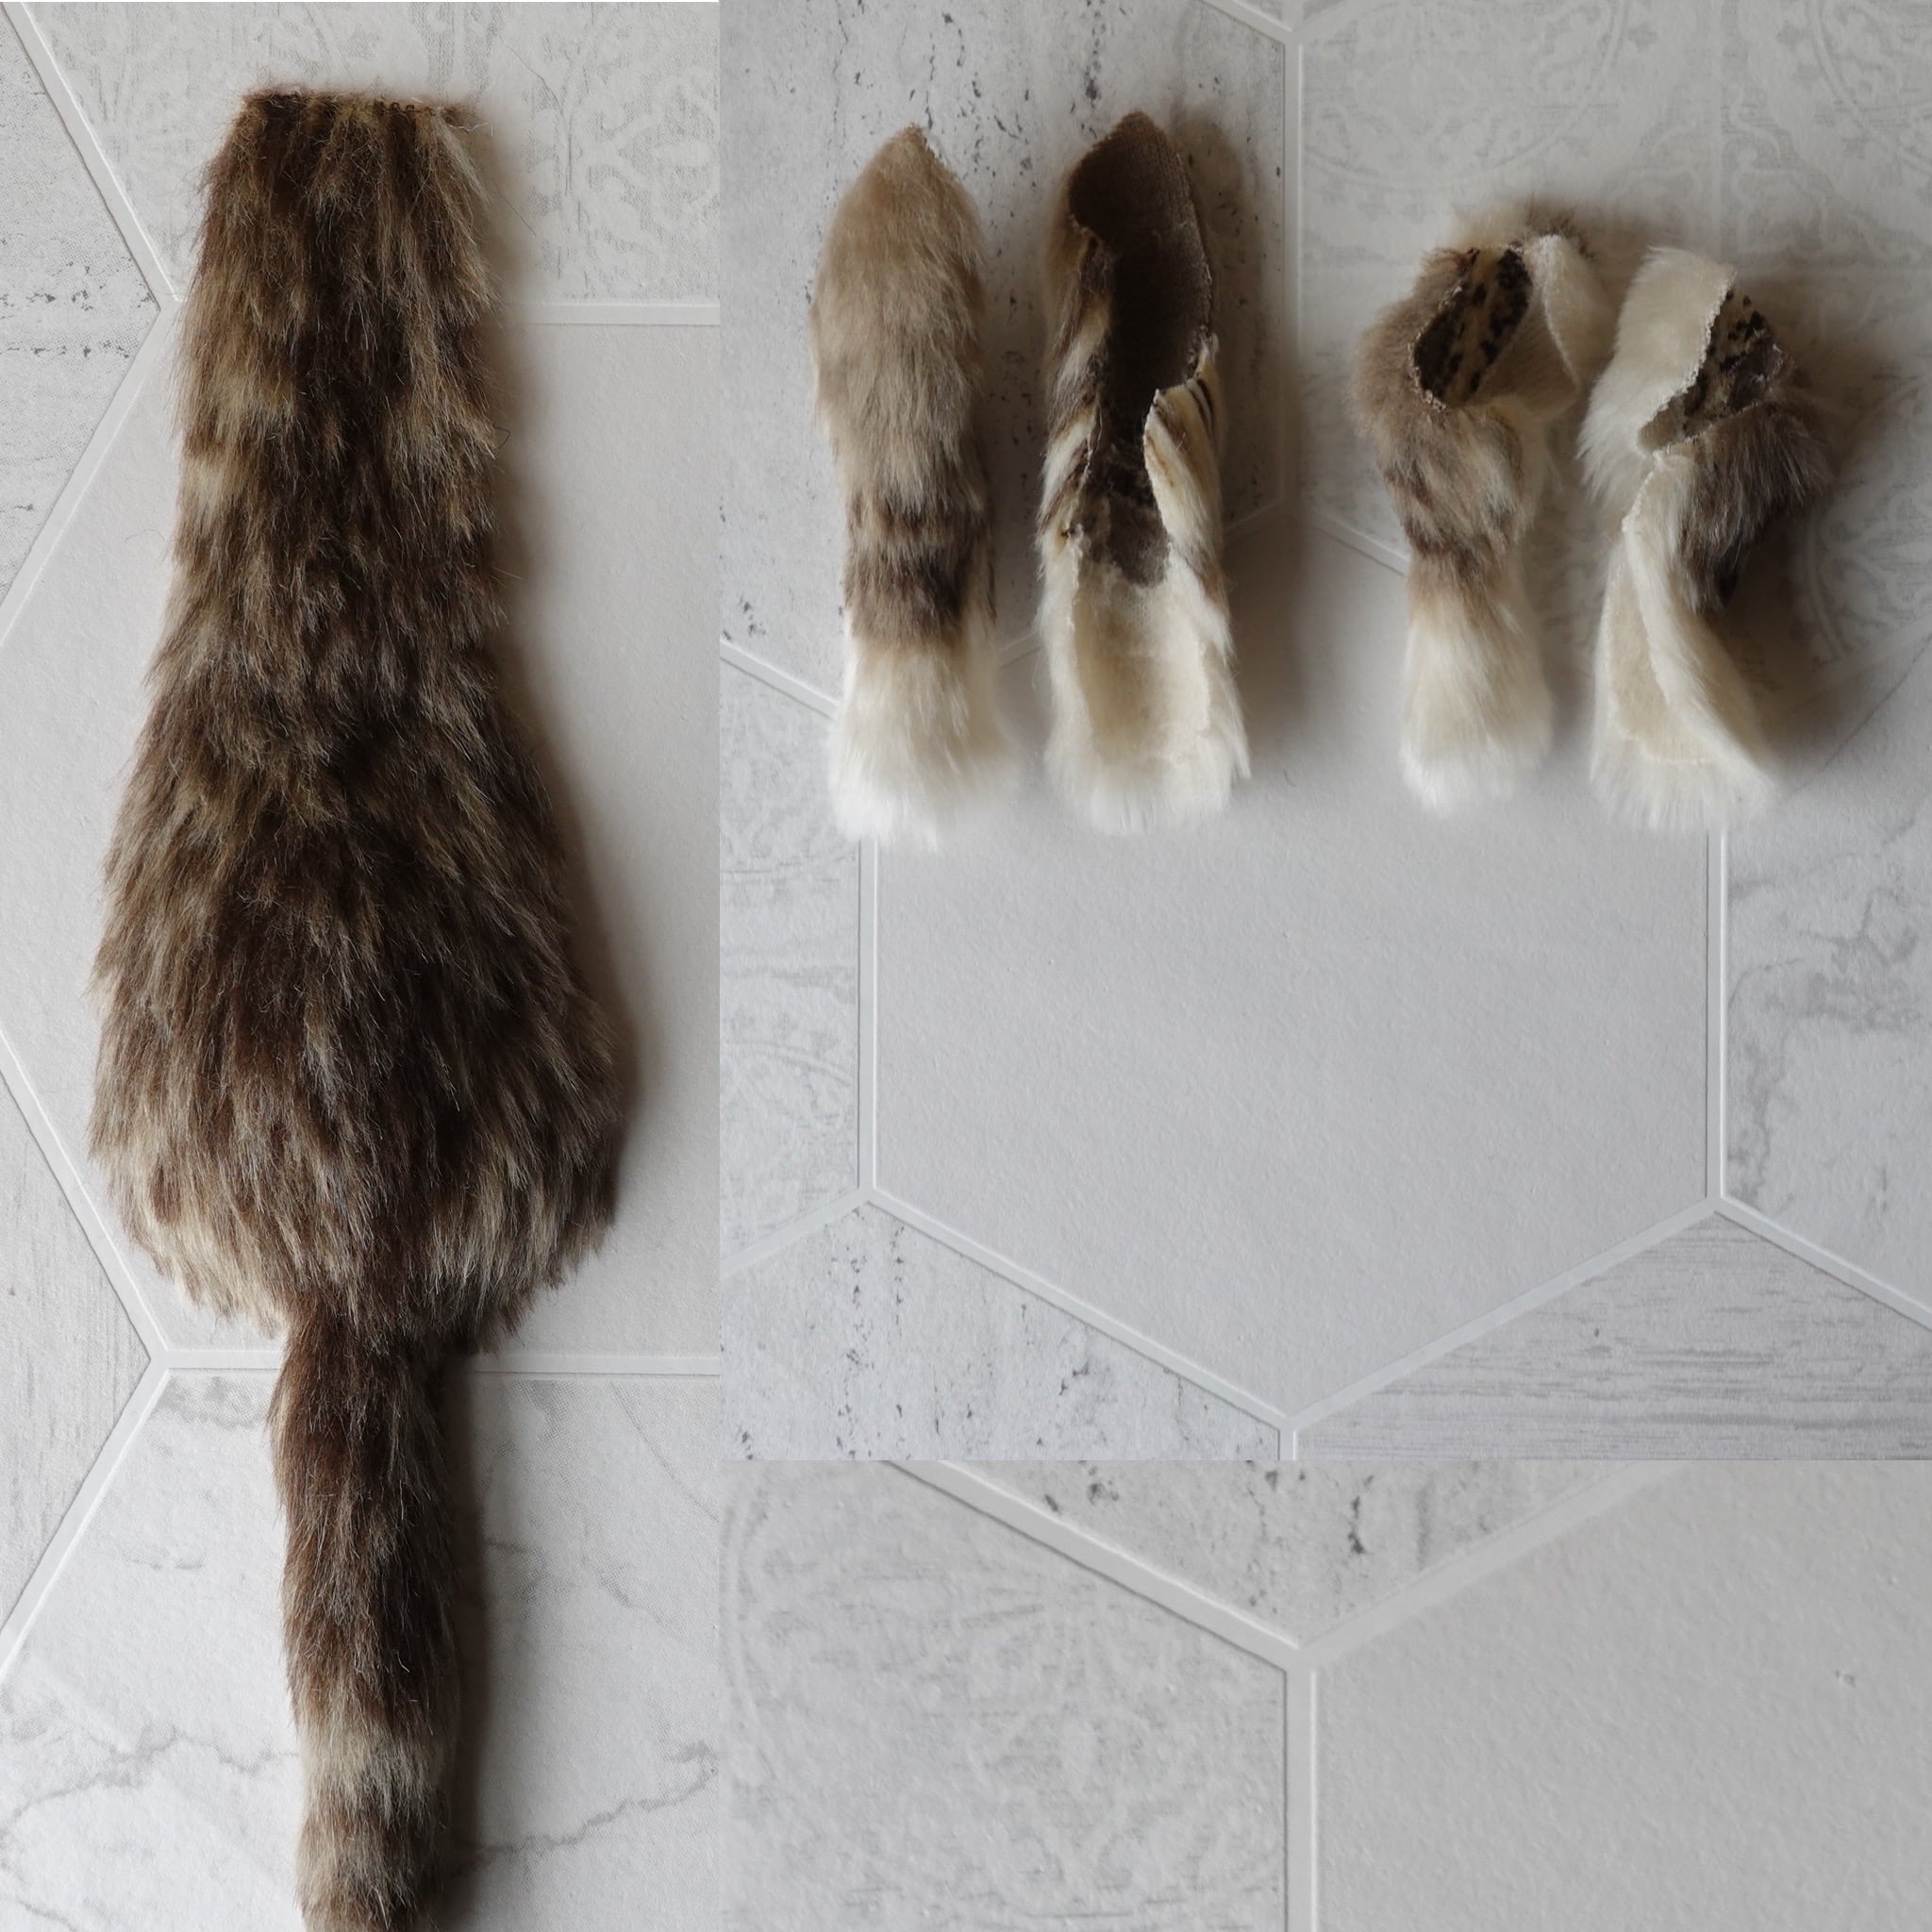
⚫︎背中から尻尾のカワを作る
型紙に従いファーを切り出し縫い合わせます。
横から見た時のラインが美しい曲線になるように、また、凹凸が不自然にならないように、シルエットを調整しながら縫っていきます。ファーが柔らか過ぎて綺麗な曲線が保てない場合は、裏張りをします。
背中の模様が仕上がると、途端に動物らしさが出てきます。
🐈⬛ Column 🐈⬛:模様の縫い合わせ
最初の頃は、単色かハチワレちゃんなど2色の動物を作るのでせいぜいでした。だんだん欲が出て「次は三毛猫に挑戦。。」などとやっているうちに、縫い合わせる模様が増えていき、今では「同じ色の中にもグラデーションがあって。。」なんて複雑なことに。
パッチワークみたいに模様を縫い合わせていく上で一番難しいのは、元々そんな模様のファーであったかの如く自然に歪みなく仕上げることです。でも、デザイン画の通りに縫い進めて表に返すと、想像以上に美しい模様に出来上がっているのにいつも感激してしまいます。それにつけても、生きている動物たちの持つ、そのびっしりと生えた均質な毛並みや模様の美しさは奇跡のようだと思います。
単色のファーで形を作り後で塗るという技法もありますが、どんなに手間と時間がかかっても布を縫って表現する「裁縫」にこだわっています。
⚫︎四肢のカワを作る
型紙に従いファーを切り出し縫い合わせます。
ホネを入れて綴じる前に、ダーツの縫い合わせによりカワだけでも美しく立体感がでるよう、表面の毛足を整えておきます。
⚫︎四肢を完成させる
四肢のファーにホネを入れポーを丸めて固めます。
ポーはホネの形状に沿って指と指の間の隙間を縫い縛り、ニードルフェルティングで形状を整えます。フェルティング技法では、その動物特有のリアルな手足の表情を制作するよう心がけています。
⚫︎尻尾を完成させる
尻尾はデザインに応じて毛並みを整え、その太さにあったホネを中に入れています。ふわふわな太い尻尾には綿を、シバイヌなどの巻き尻尾にはテクノロート(ポリエチレンのワイヤー)を入れます。
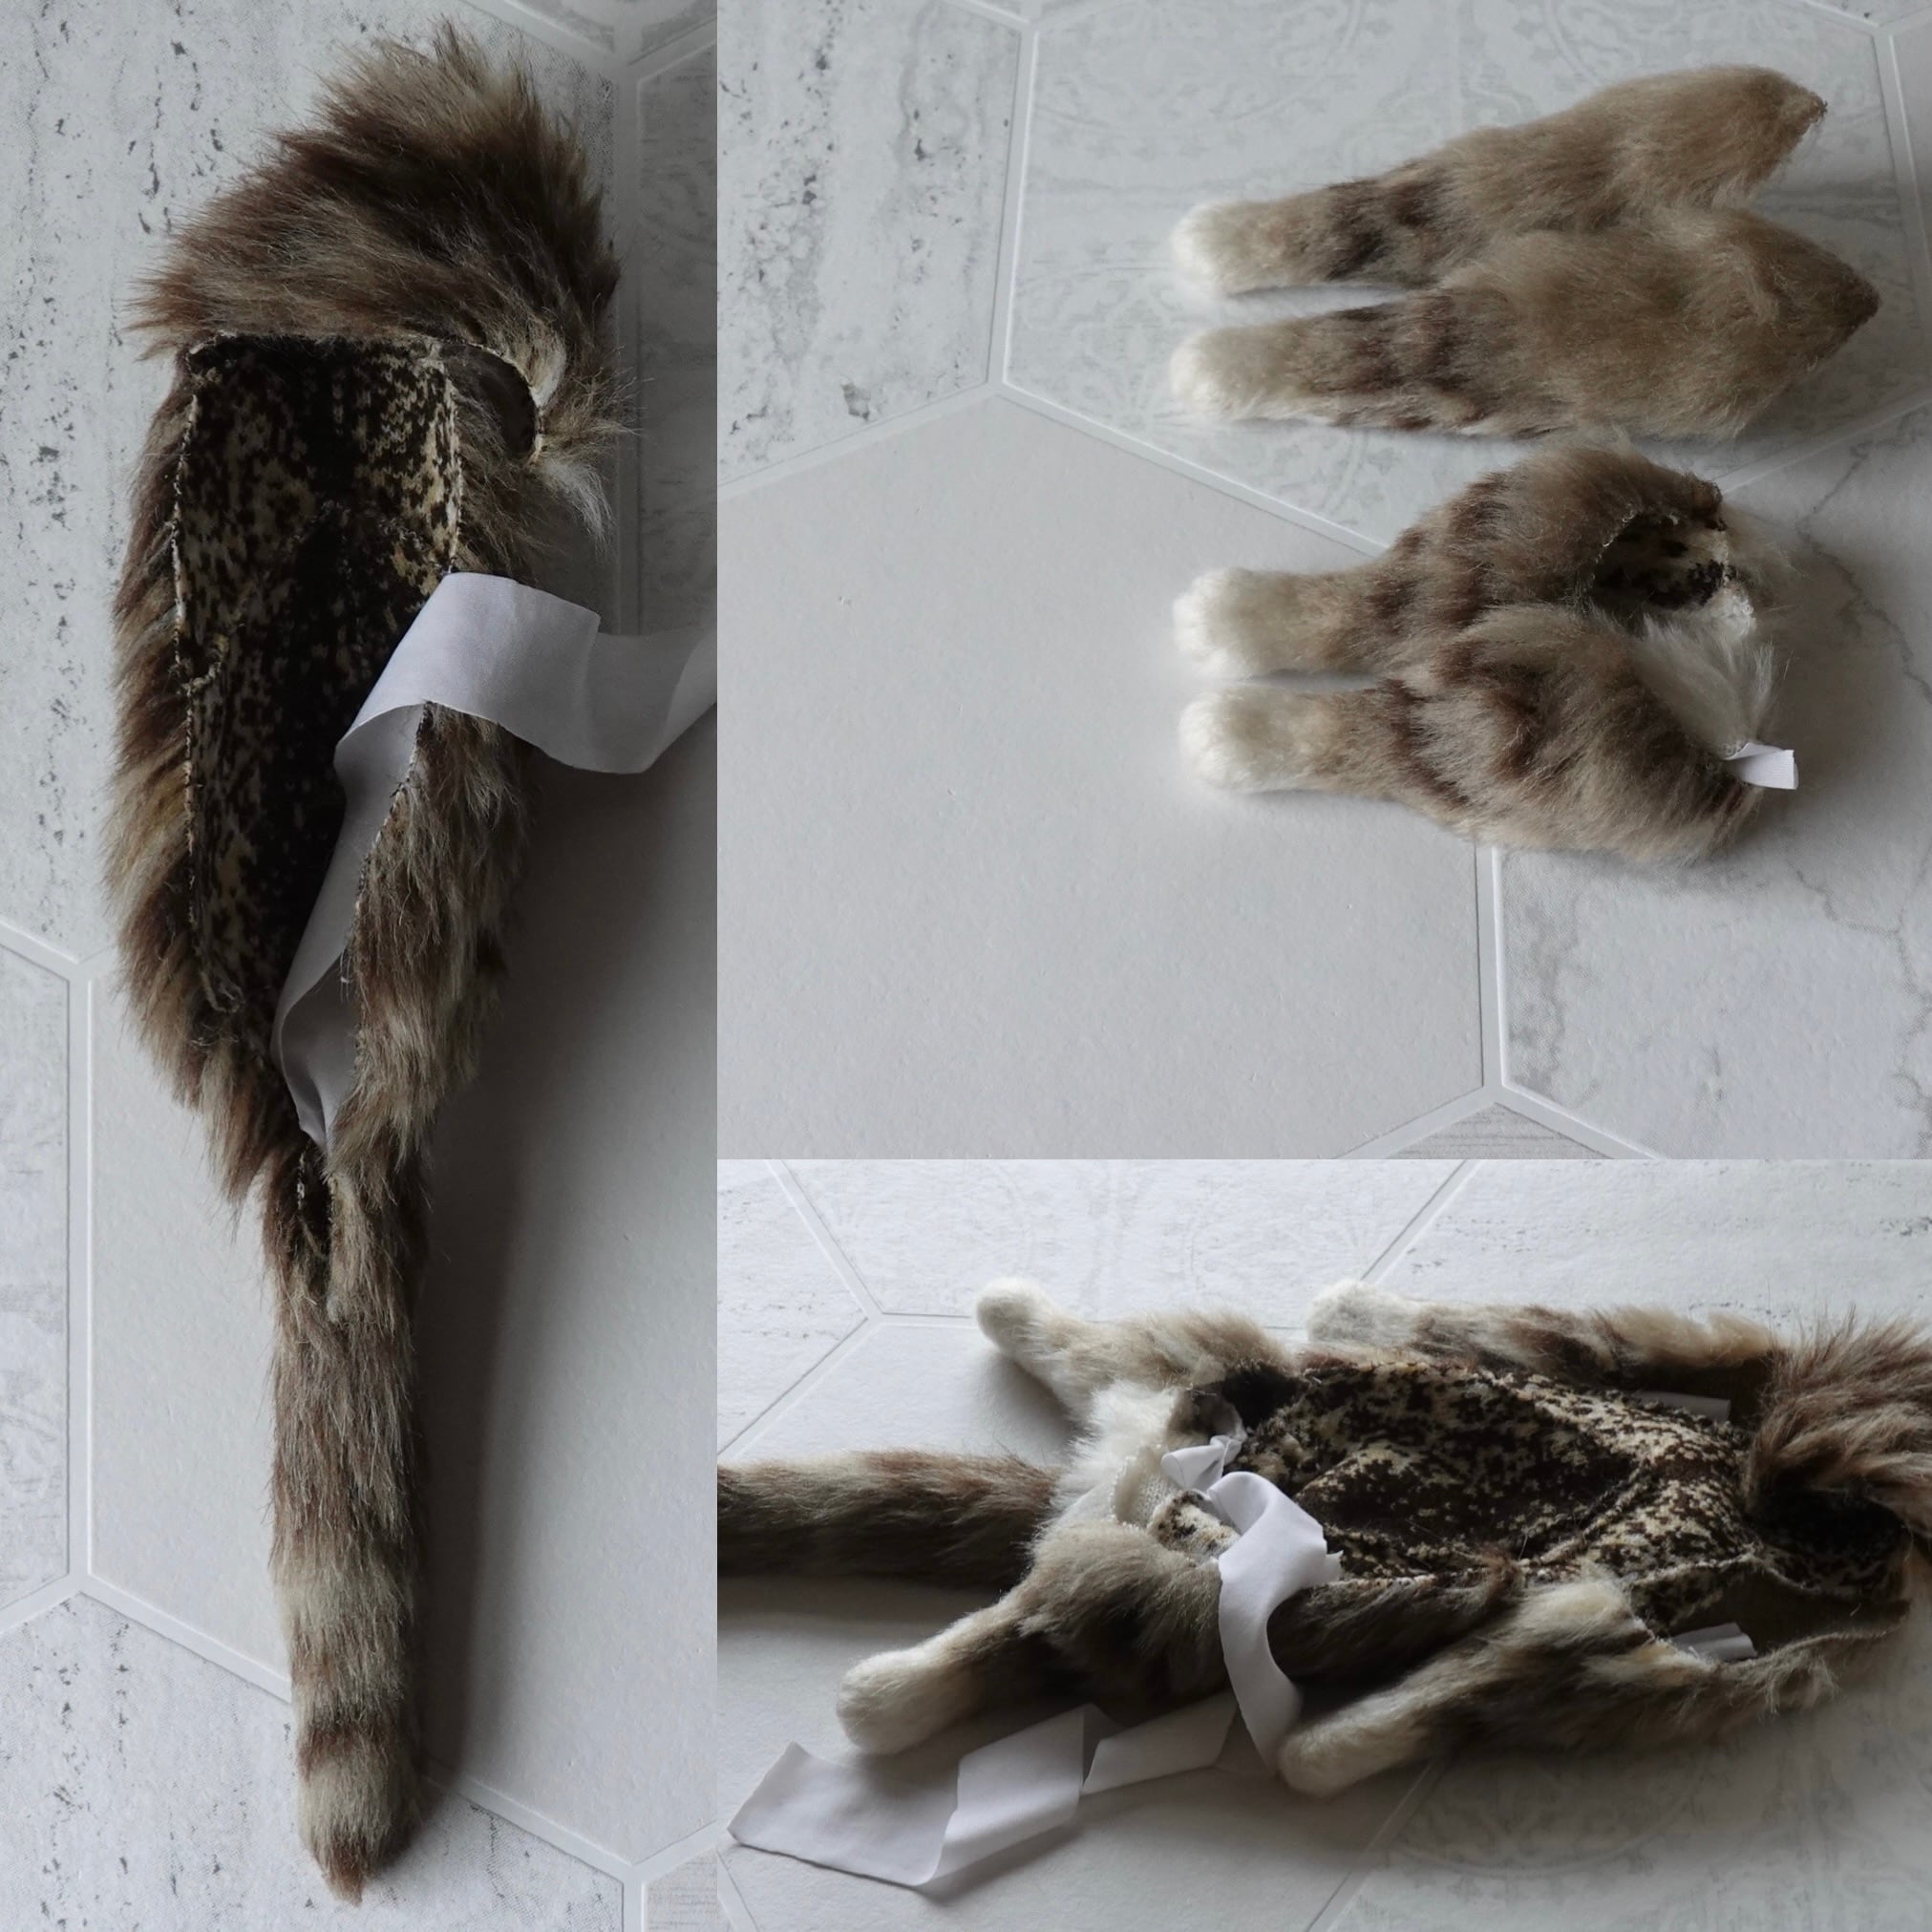
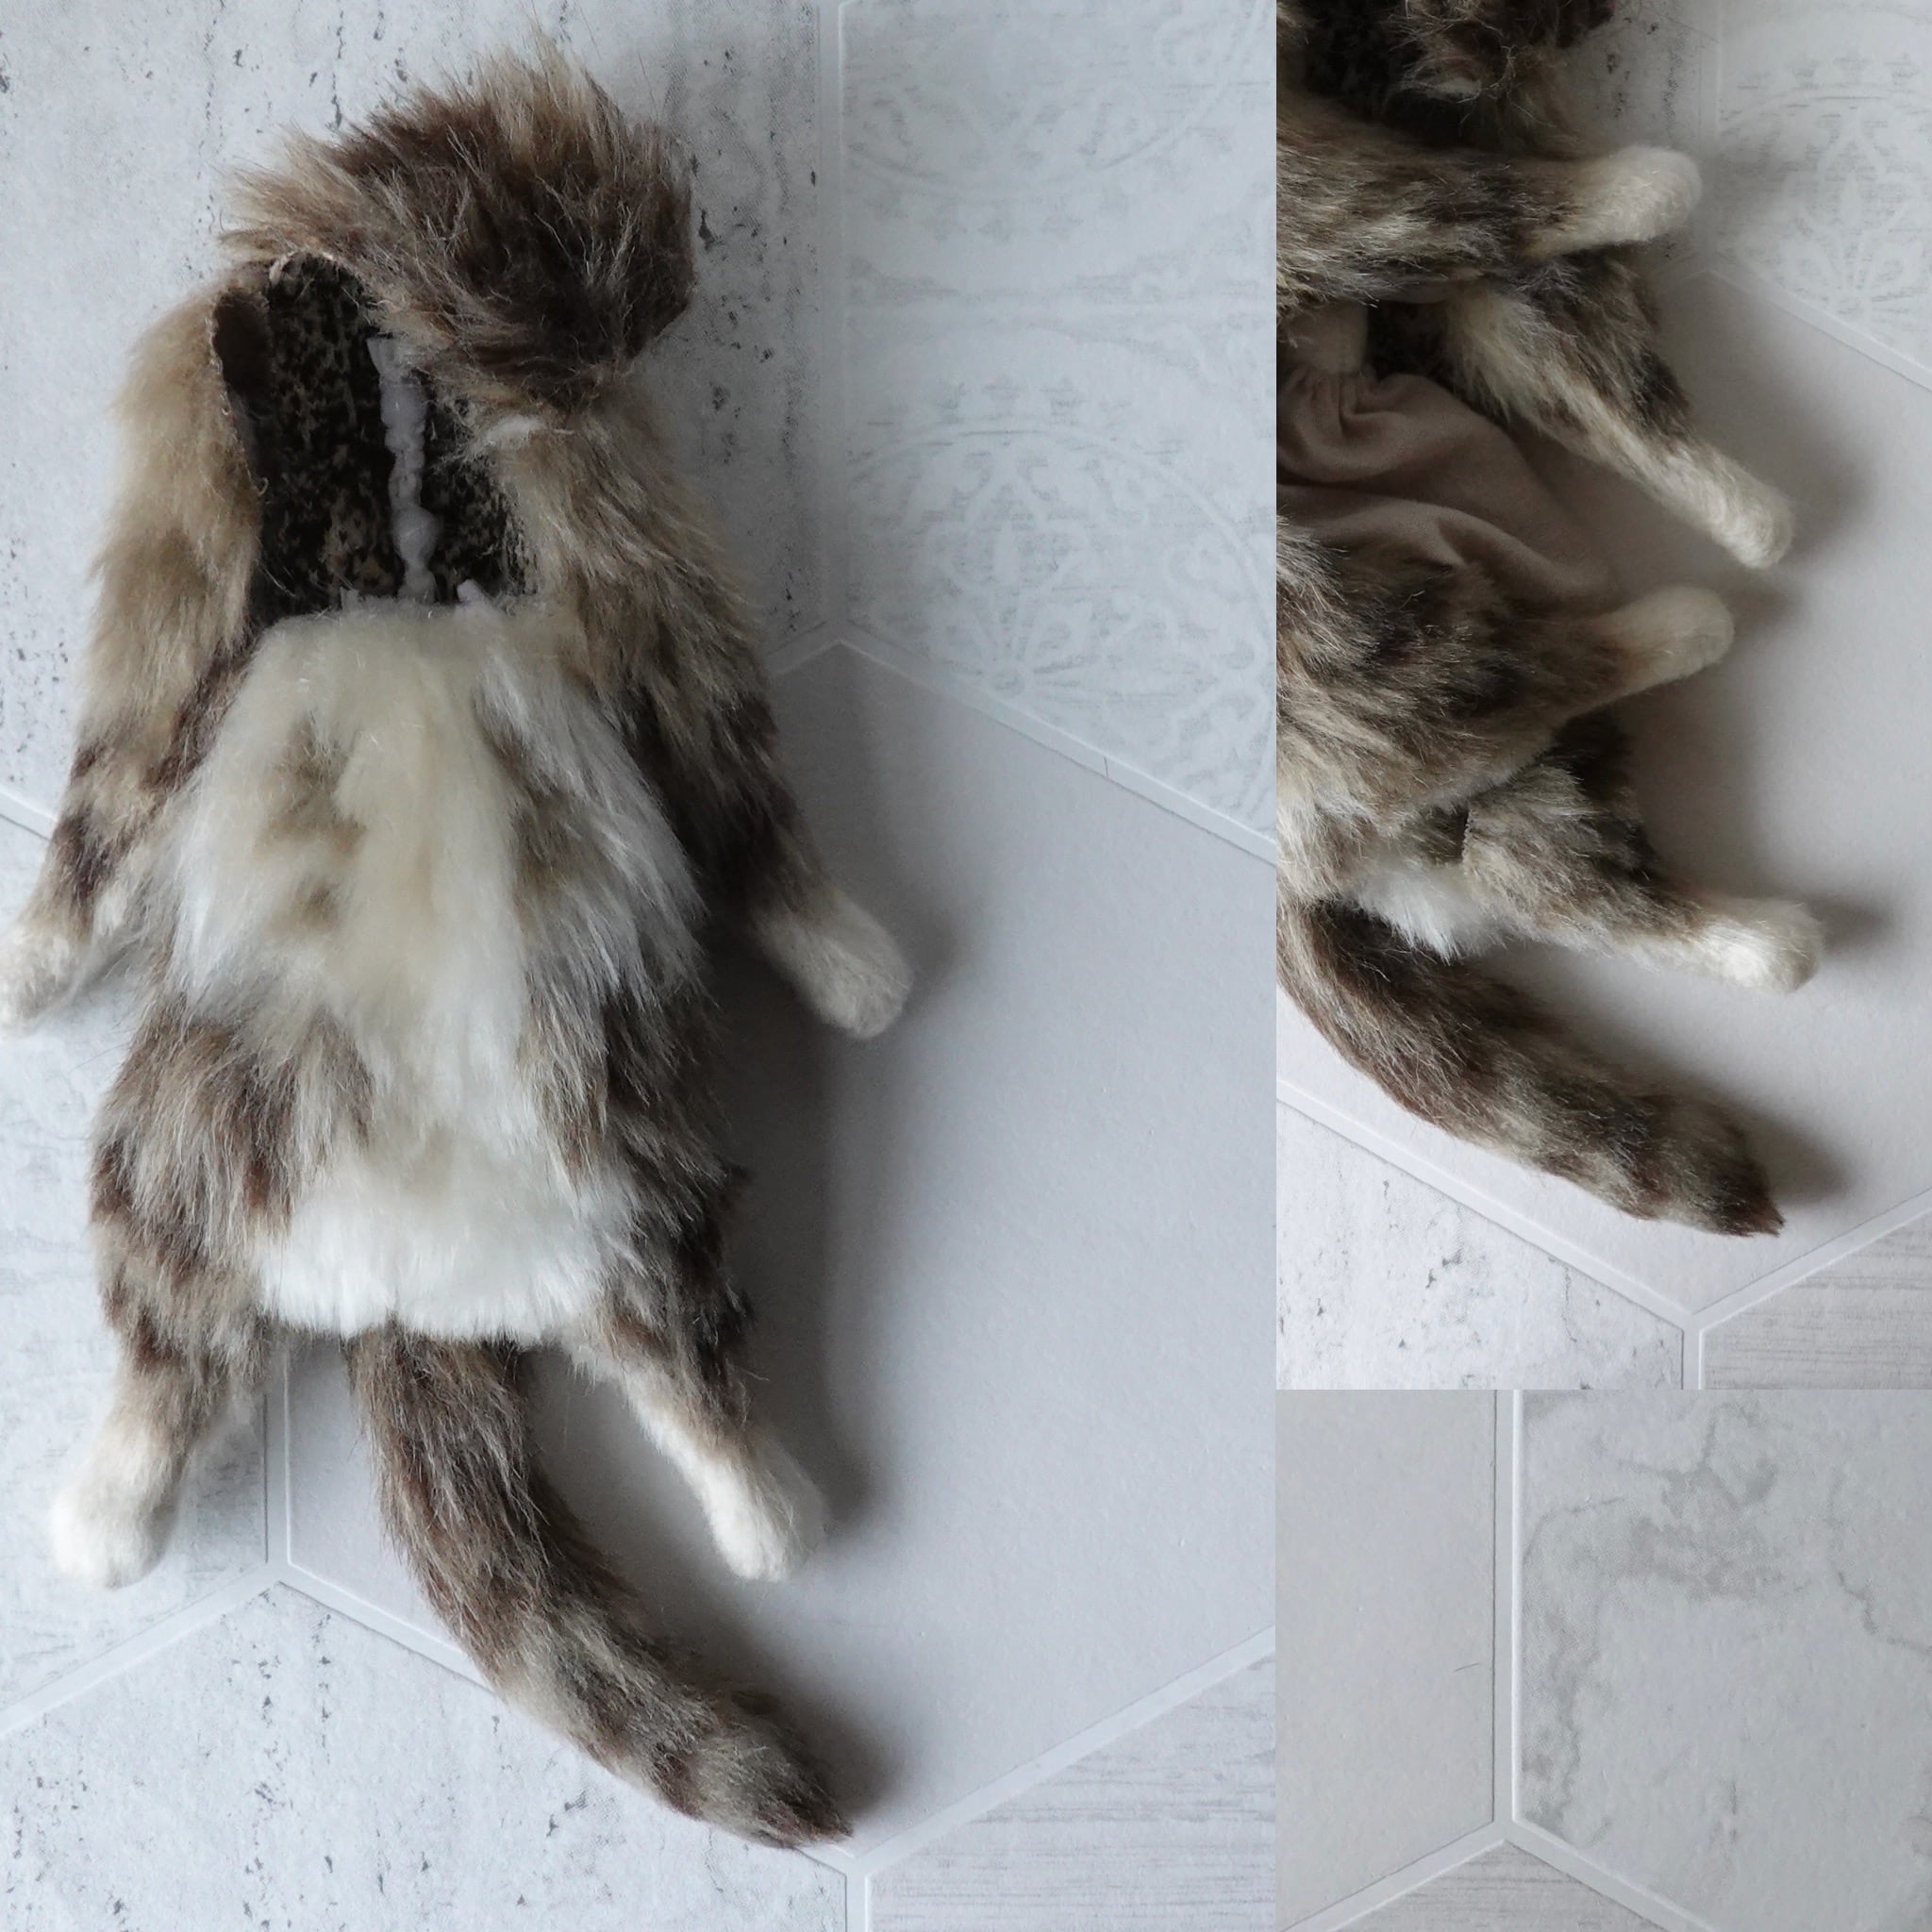
⚫︎四肢を背中のカワに縫い合わせ尻を閉じる
カワが全身で繋がっているため、最終的に歪みが出ないよう、出来るだけ下半身から仕上げていきます。この段階で、テディベア座りができるかどうかをしっかり確認します。小さな尻尾をお尻側に巻き込んでいる動物などは、座った時のお尻周りを丁寧にチェックします。
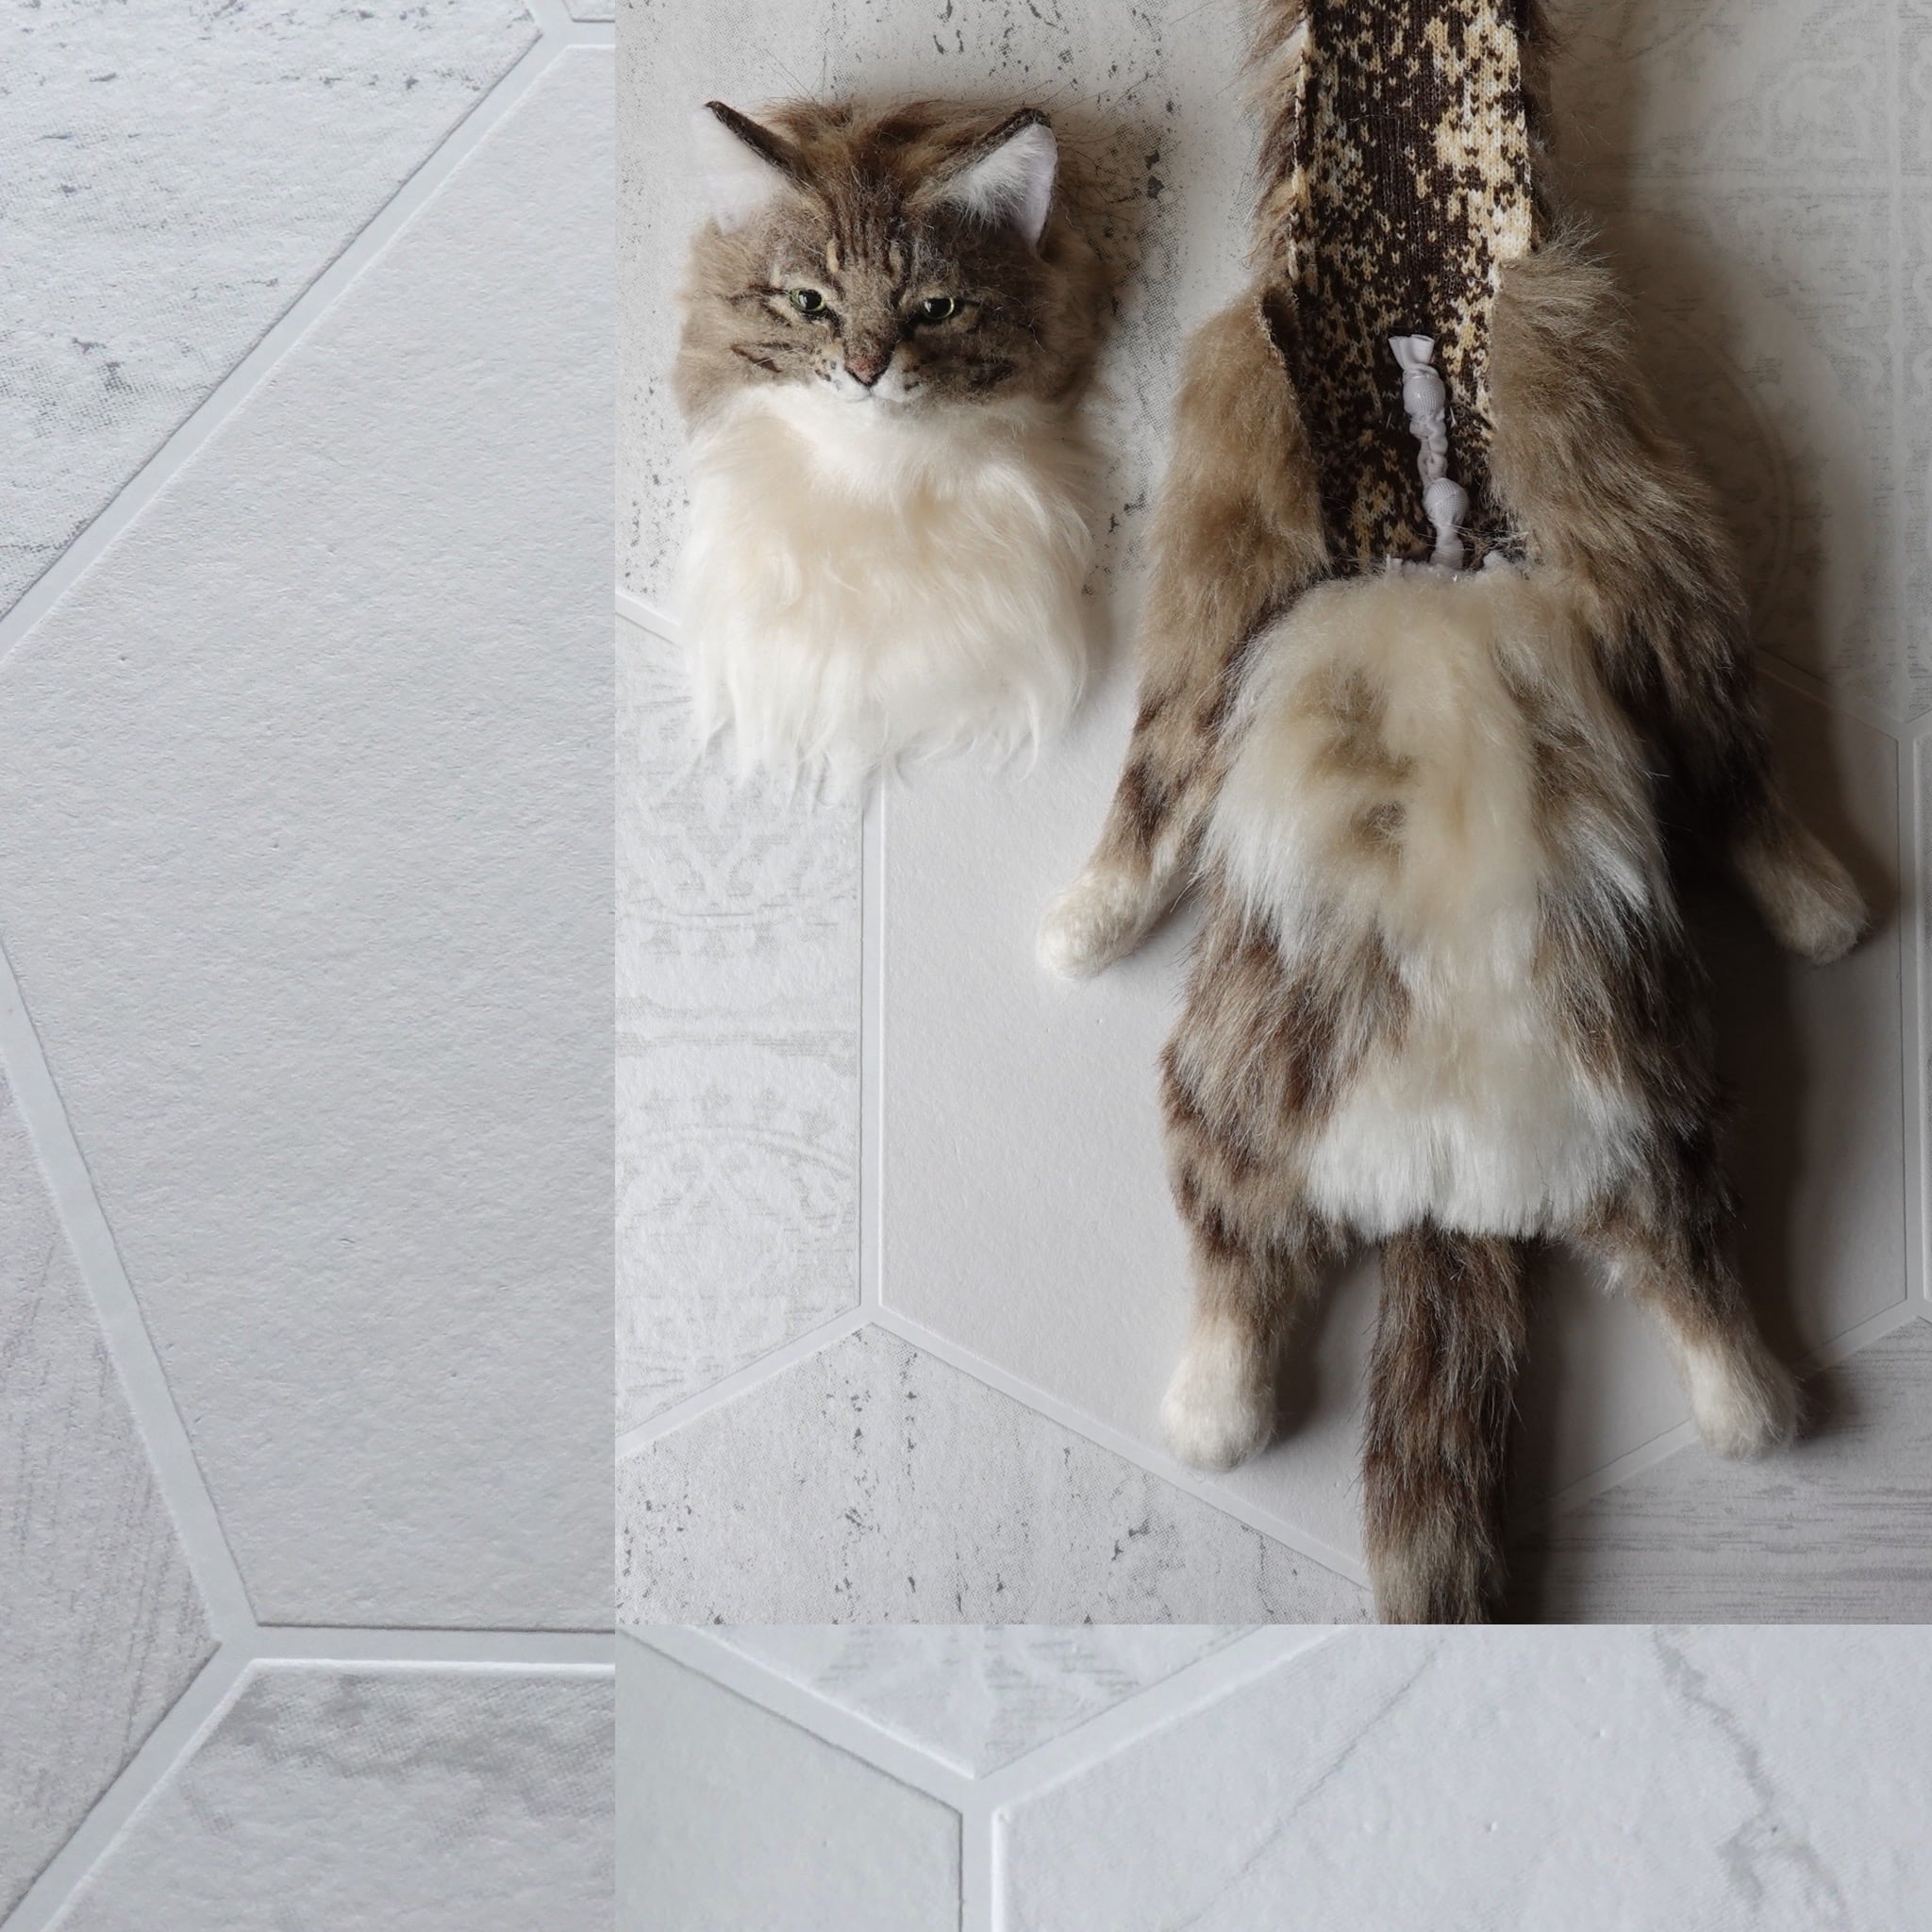
⚫︎背骨に肋骨とナイゾウと骨盤をつけ、背中のカワにつけ「本体」を作る
カワに背骨を縫い付けます。ぬいぐるみの背中を触ると、ゴツゴツした背骨が指に当たるのがわかります。背骨に他のホネやナイゾウ袋を固定することで、ポーズによって自然に背中や他のパーツが動くようになります。
⚫︎四肢のホネを背骨に繋げる
腕は肋骨に、脚は骨盤に固定します。
これで本体のホネがすべて繋がります。
⚫︎腹のカワを作り本体につける
本体側の仕上げをします。
テディベア座りをした場合、お腹は前面になるため、デザインを含めお腹のカワにはこだわっています。
動物はお腹の毛並みの方向が複雑でその複雑さをカーリーファーで表現することが多いです。
また、お腹の模様が複雑な個体も多々あり、場合に応じてチャームポイントとして表現しています。
仔ネコは裏地をピンク色に染めたファーを使用し血色感を出しています。
⚫︎目を作り頭部につける
差し目をカットし着色し、仮の目と入れ替え接着します。目の大きさ、形、色味、傾き加減で表情や雰囲気だけでなくキャラクターそのものが変わるので最も重要な作業の一つです。
⚫︎耳を作り頭部につける
耳はキャラクターを決める大きな要素です。
動物の耳はその場その場の注意の方向や感情によって向きが異なるため、耳の向きを固定してしまうことには少し抵抗を感じながら付けています。
⚫︎マフラー(首から胸にかけてのカワ)を作り頭部につける
四つ足の動物はこの胸の辺りが発達しており、前足の付け根から大きく前に張り出しています。テディベア座りを採用するに当たり、その形状をどこまでデフォルメするかが課題です。前傾した際に膨らみが崩れないよう裏張りをします。
⚫︎本体に頭部をつける
本体側の後頭部のファーと頭部側のマフラーを同時に付けていきます。前から見た首の長さと後ろから見た首の長さが不自然にならず、かつ首が固定されないように気を配ります。
🐈⬛ Column 🐈⬛:最大の難所
カピーシのぬいぐるみは、実際の動物同様に頭頂から尻尾の先まで仕切りがなく「カワはすべて繋がって」いて「ホネもすべて繋がって」いる状態です。互いが引っ張り合い、あるいは譲り合っている。その均衡によりいろんなポージングが可能になっています。現在、背中と頭(と胸部)を別々に制作してから縫合する製法をとっていますが、最終的に左右の耳の下(頭骨に綴じ付けます)に全てが集約されているような気がしています。腕の動き、首の動き、だけでなく、耳下のカワ(ファー)をどのように付けるかによって、体の多くの部分の可動域が変化するように思います。縫合時に余分なファーを切り落とす際はいつも何度も確認してドキドキしながら慎重にカットしています。全工程の中で最も重大な決断をせまられる、最も緊張する瞬間です。
I
⚫︎肉球をつける
ニードルフェルトで表現する場合は、複数の色をブレンドすることも多く、実際の肉球の色や形を意識して作ります。平面的にならないよう、一定の膨らみを持たせるように手足のポーに埋め込んでいきます。
柔らかい肉球を敢えて硬いビーズを縫い付けることで表現する場合もあります。アクセントとして、ゴールドやシルバーが手足の先でキラリと光るのも素敵です。
⚫︎タグをつける
「capeesh」のロゴが刻印された真鍮のタグを背中側の尻尾の付け根に縫い付けます。
シルエットや抱いた時の感触の邪魔にならないよう、注意します。
⚫︎トリミングする
デザインによっては長毛のファーと短毛のファーが混在するため、その境界をなだらかにするなど、全体のシルエットを整えます。
ここまでで仮完成です。
6. 検品・修正・調整
検品とはいえ、ここで切開を伴うような大幅な修正をすることも多く、一部には基準をクリアできず完成・販売に至らない作品もあります。
🐈⬛ Column 🐈⬛:最終調整
最終調整前には一旦制作から離れ、制作環境や自身を一番良い状態にしてから仕上げをします。
どんな角度から見ても良い形状になるよう、ニードル等で整えます。
また、一度は必ず屋外の日光の下で確認調整します。既に小さな動物のカタチをしているぬいぐるみ、抱えてポー先の細かいファーをカットしている所など「仔猫の爪を切っている人」みたいな気持ちです。最後にドライヤーの温風を当てて、元々のファーの毛の美しさを引き出します。「シャンプーしたての猫を乾かすってこんな感じかな」といつも楽しい時間です。お買い求めいただいた動物たち、時々温風を優しく当てていただくと毛がふわっとしますので是非お試しください。
7. 完成
作品に合う壁紙を選び撮影します。できるだけ自然光のみで撮るようにしています。
試行錯誤を経て現在この製法に至りましたが、今後も果敢に更新・改良を続けてまいります。
理想のぬいぐるみを目指して。